CyLock MFA Guide
Introduction
CyLock MFA is a powerful, Multi-Factor Authentication (MFA) Solution a token-less, advanced Out-of-Band Two-Factor Authentication (2FA) solution which provides strong authentication & authorization mechanism using end users mobile devices. CyLock MFA is designed to protect user accounts, applications and devices.
Organizations or individuals can protect their applications by using CyLock Multifactor Authentication (CyLock MFA). CyLock Portal provides administrators with the ability to manage their users, protect applications and configure various MFA parameters.
To use CyLock MFA, users have to subscribe for a plan and register their details to gain access to CyLock Portal. Refer below sections for using CyLock MFA effectively.
CyLock Portal will allow organization administrator or individuals to manage their user accounts, protect applications, manage devices etc. The brief description of the functionalities is given in subsequent sections.
CyLock MFA is available on


Download CyLock MFA mobile app  to carry out authentication.
Getting started
The CyLock MFA is a secured web-based interface using which various types of users (developers, security admins, business users, operators, and technologists) administer to access applications using its significant features.
This topic covers the following:
Launching CyLock MFA Platform
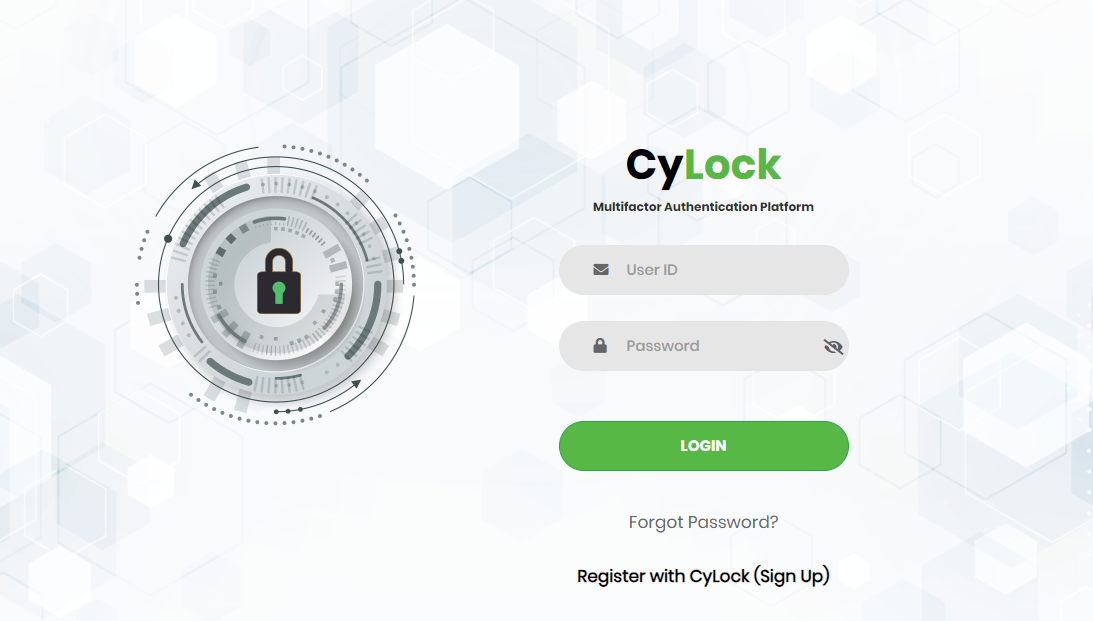
To get started with CyLock MFA, you must launch it and login to use its features. You can launch the CyLock MFA portal in your system using a web browser. Open a web browser and type https://portal.cybernexa.com.The system displays the CyLock MFA Platform Login page as shown in Figure 1. Log in to create and manage your applications.
Create your Account (Sign-up)
1.To create new account, click Register with CyLock (Sign-up) in the Login page as shown in Figure 1.
-
The following table lists the required fields and the corresponding details.
Field Description Validation User ID Username of the user to login to the CyLock Portal Accepts 2 to 30 upper-case and lower-case alphabets, numbers, hyphen, underscore, dot and at the rate symbol First Name First name of the user Accepts 2 to 30 upper-case and lower-case alphabets and space. Last Name Last name of the user Accepts 1 to 30 upper-case and lower-case alphabets and space. Email Address Valid email address of the user Accepts a valid email format. Phone Number Valid phone number of the user Accepts 10 numbers. Password Password to enter the CyLock portal Accepts minimum 8 characters and contain at least 1 lowercase,1 uppercase,1 numeric,1 special character Confirm Password Confirmation password that is same as the entered password Should match the characters provided in the Password field. Select Organization / Individual Option to select the type of login. Available options are:
- Organization – indicates that you are signing up to create an organizational account
- Individual – indicates that you are signing up to create a personal account
NA Organization Name Name of the registering Organization Select No. of Employees Option to select the employee count range in the organization. Available options are: - 1 – 100
- 100 – 500
- 500 – 1000
- 1000 – 2000
- 2000 – More than 2000
NA Note: Organization Name and Select No. of Employees fields are displayed only when Organization is selected from the Select Organization / Individual drop-down.
- 2. Enter all required fields and click “Sign-up” button.
- 3.Enter the received registration token code in the Enter your token code field and click the “Verify” button. The system displays a success message as shown in Figure 4.
- 4.Click the “OK” button. The system displays a Thank you screen as shown in Figure 5.
- 5.Click "Login" to navigate to the Login page.
Figure 1 - Login Page
The System navigates to Sign-up page as shown in Figure 1.1.
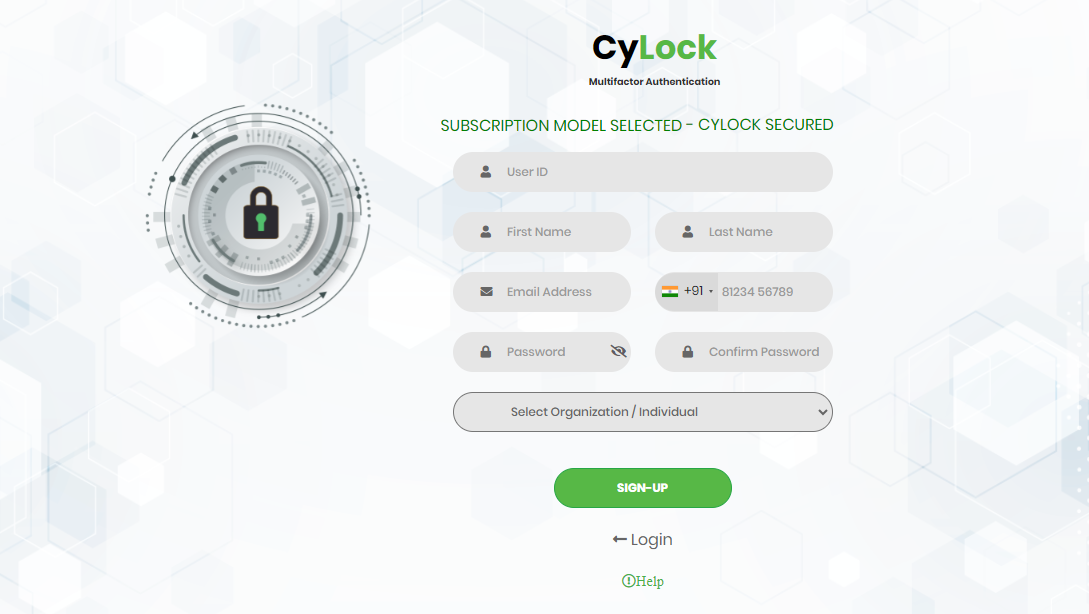
Figure 1.1 - Sign-Up Screen
The system generates and sends an email with a verification token to the provided email ID as shown below.
Note: Figure 2 Shows the Registration Token sample in the email.

Figure 2 - Registration Token Sample
While sending verification token, the system displays the Email Verification screen as shown below.

Figure 3 - Email Verification Screen

Figure 4 - Registration Success Message
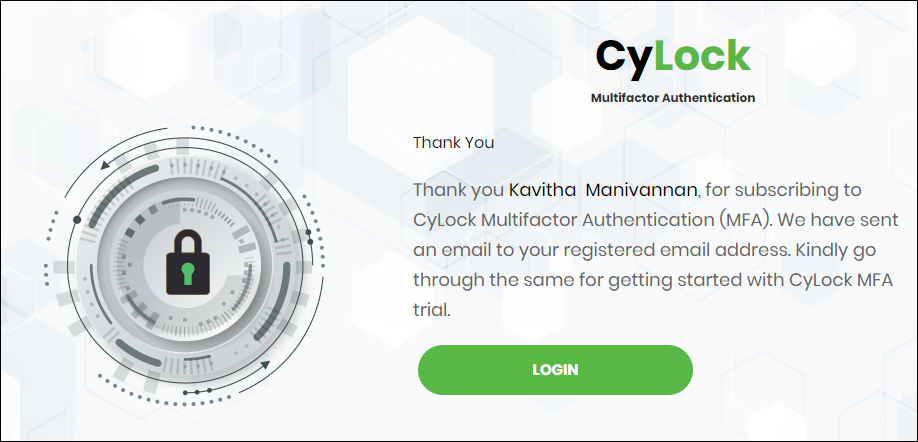
Figure 5 – Thank you Screen
Login to CyLock MFA Platform
You can log into the CyLock MFA Platform from any of the web browser available in your system.
- Open the web browser and type https://portal.cybernexa.com. The system displays the CyLock MFA Platform Login page as shown in Figure 6.
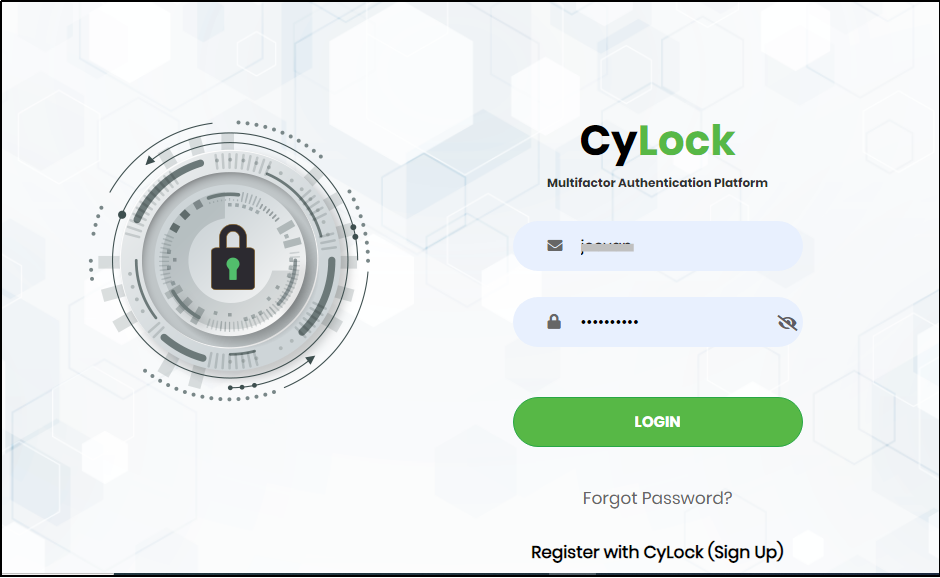
Figure 6 - Login Screen
Enter the registered user id and password in respective fields and click “Login”. The Homepage appears as shown in Figure 7.
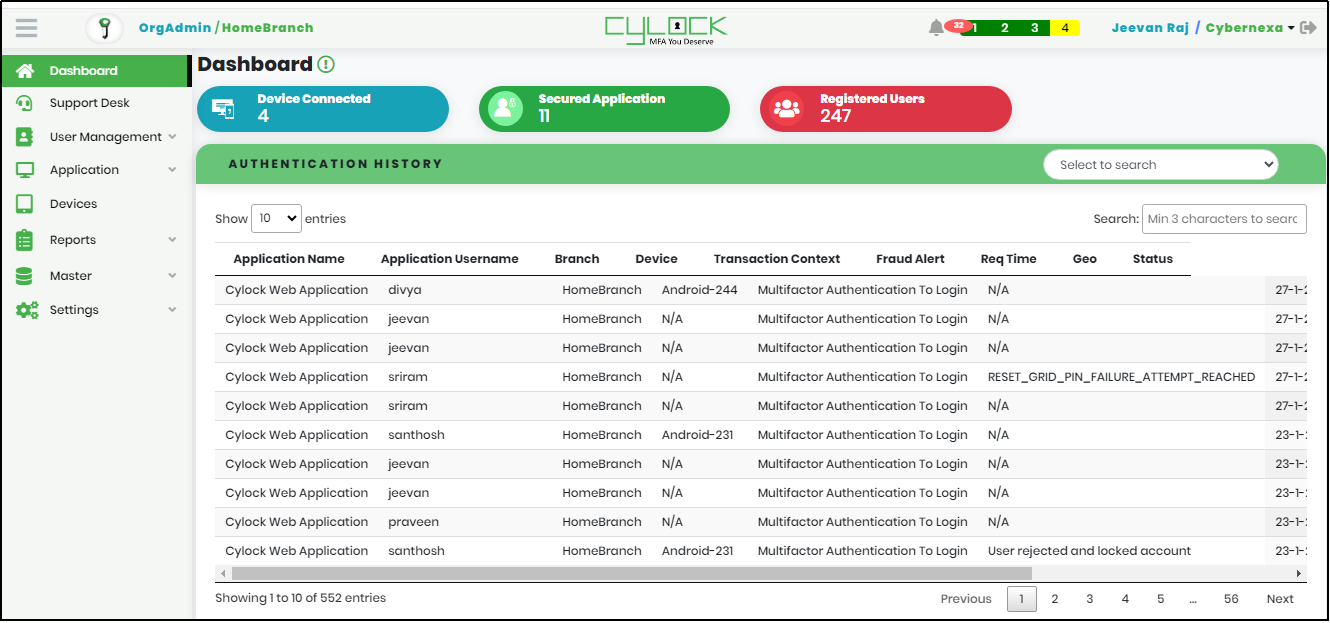
Figure 7 - Admin Dashboard
Note: If the User enters the invalid credentials more than the number of Login Failure Attempts (Ref configurations list for login failure attempt count), then the Portal user is locked. The Portal user can be unlocked by Admin users in user management module, or it will be unlocked automatically after the given hours (Ref configure time for auto unlock time).
Forgot Password
If you have forgotten your password and want to change it, click “Forgot Password?” in the Login Page. The system displays Forgot Password screen as shown in Figure 8.
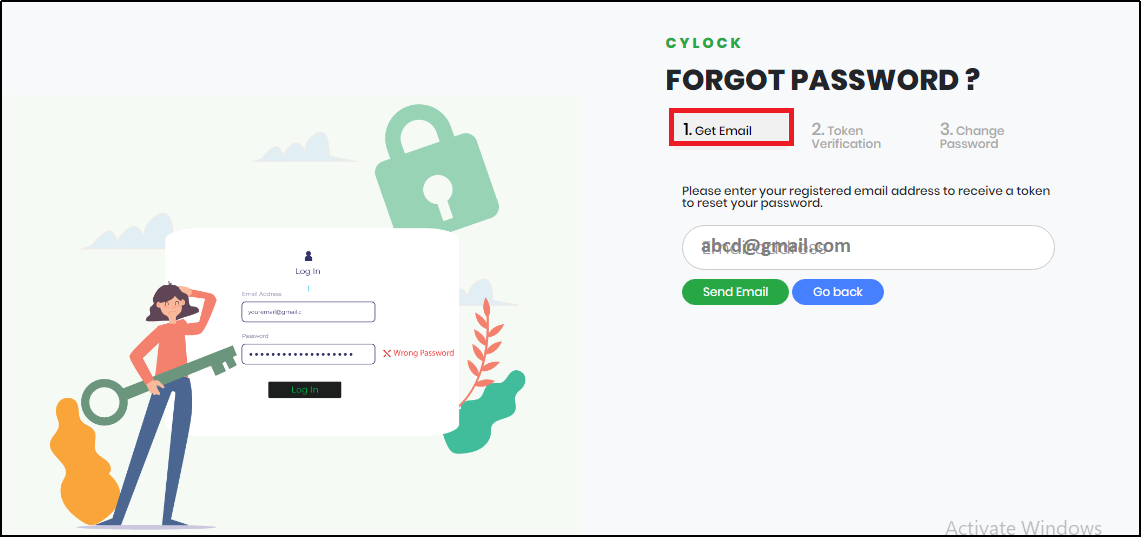
Figure 8 - Forgot Password Screen
To reset your password
- Get Email Step:Enter the registered Email address and click the “Send Email”. An email with the token is sent to your registered email address.
- Token Verification Step: Enter the token received through registered email and click the “Verify Token” button.
- Change Password Step:Enter the required password as per the Password Policy and click the “Change Password” button.
- Click “Ok” to display the CyLock MFA login screen.
- Enter the new password and log in to the CyLock Portal.
Note:Below Figure 9 is the Reset Token sample in the email.
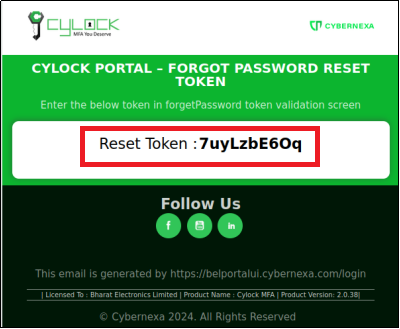
Figure 9 -Token Reset sample
While sending the token to the registered email address, the system navigates to “Token Verification” screen as shown in Figure 10.
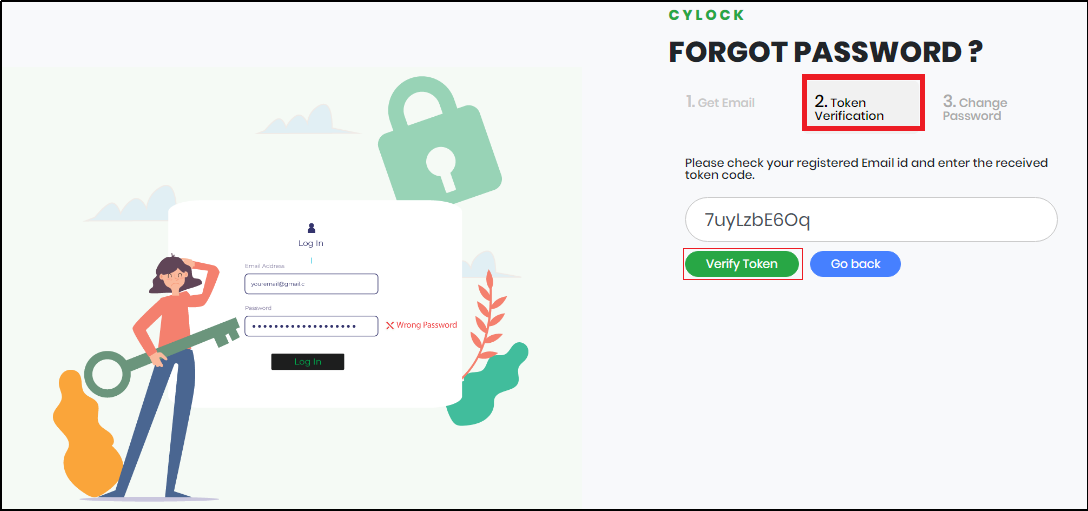
Figure 10 - Token Verification Screen
The system displays the Change Password Screen as shown in Figure 11.
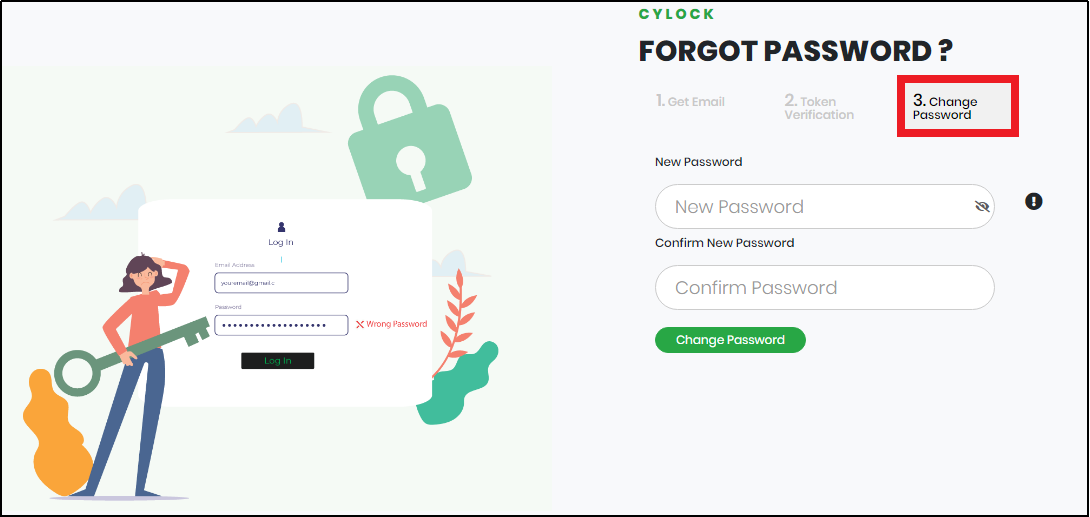
Figure 11 - Change Password Screen
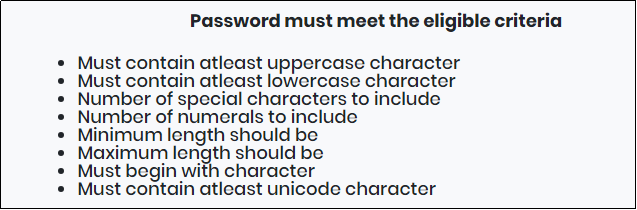
Figure 11.1 - Change Password Screen
Note:User is allowed to use password other than last 3 passwords. Refer the Password Policy screen to view the Change Password limit count.
The system displays a Success message as shown in Figure 12
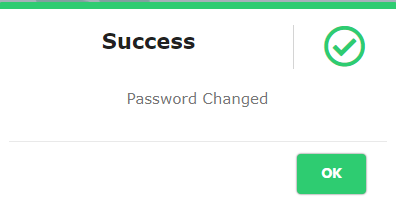
Figure 12 - Password Change Success Message
Password Success Message will also be sent to registered email as shown in below Figure 12.1
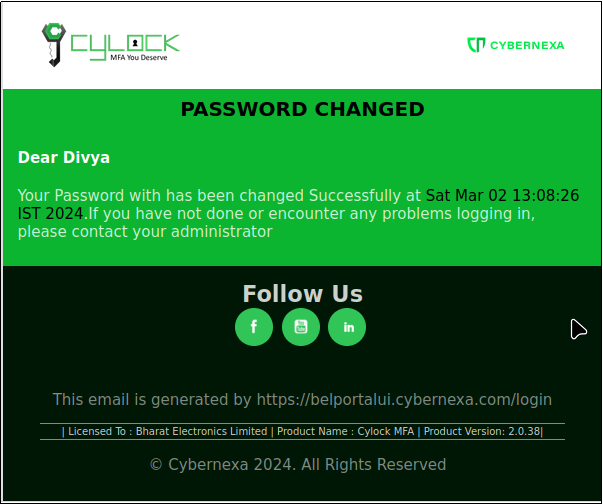
Figure 12.1 - Password Change Success Message
Home-page
After successful login to CyLock MFA Portal, Homepage is displayed as shown in Figure 13.
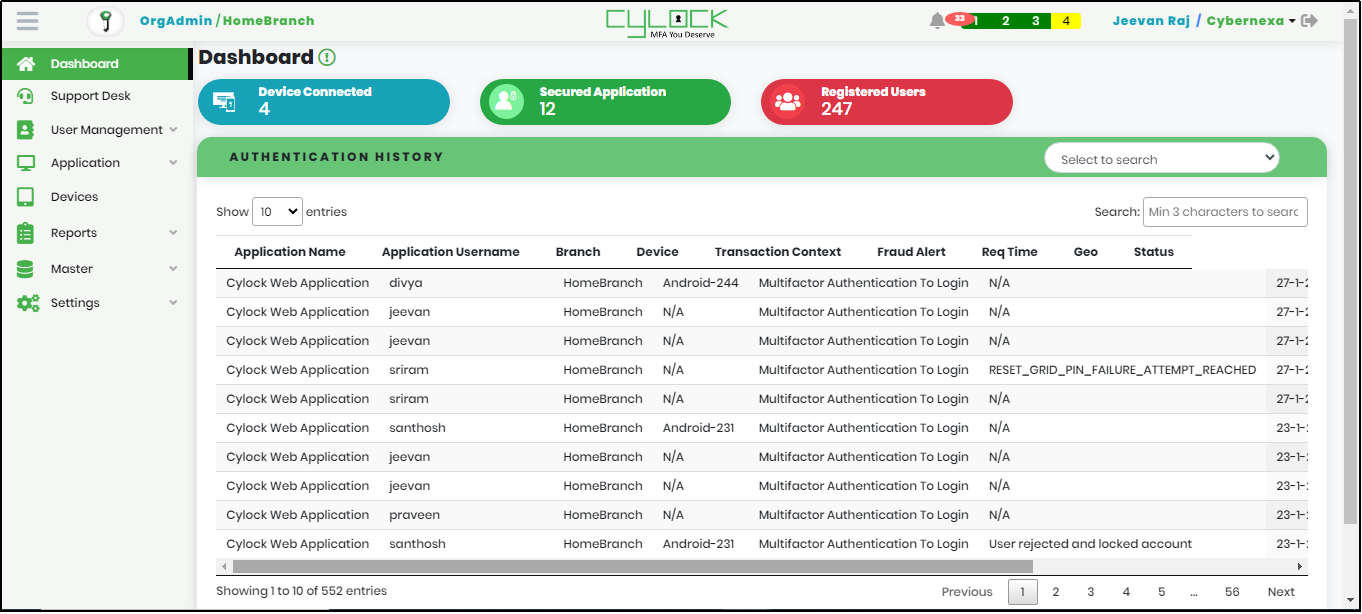
Figure 13 - Homepage
Homepage includes below menus on the left pane of the screen.
- Dashboard
- Support Desk
- User Management
- Application
- Devices
- Reports
- Masters
- Settings
Dashboard
Dashboard displays basic metrics, Authentication History, and other details as mentioned below.
On the Top left of screen, CyLock logo  is displayed.
By clicking CyLock logo, License and Build information is displayed as shown in Figure 14.

Figure 14 - License & Build Information
- Account Limit: The number of accounts that can be created in this portal (Based on the license purchased)
- Device Limit: The number of devices that a user can register (Based on the license purchased)
- Total registered users: Number of users registered in CyLock Application under that organization.
- Available Users count: Remaining user accounts that can be registered
[Available Users count = Account limit - Total registered users]
 Default Role: Role assigned while creating the user.
 Default Branch:Branch assigned while creating the user.
On the top right corner, Notification icon, Process steps, User name, Organization Name, Log out icons are displayed.
 Notification icon:When enabling portal access for single user or selected multiple users, a notification will be received by the Admin displaying the Mail sent status. Whenever a notification is received, the icon will display the number of the notifications received as shown in Figure 15.
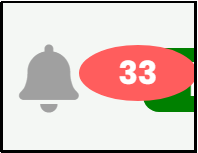
Figure 15 - Notification Icon with and without incoming messages
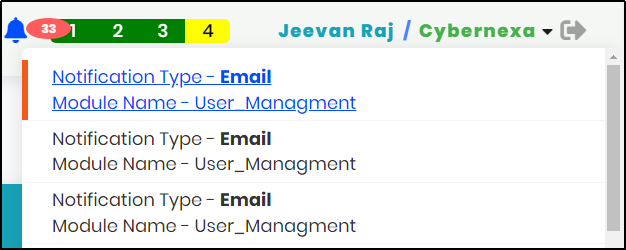
Figure 15.1 - Notification Tab
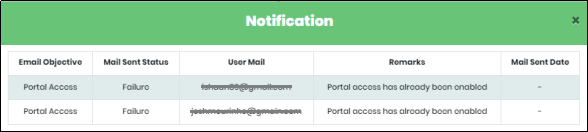
Figure 15.2 - Notification Message screen
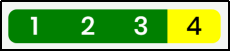 Process Steps:Registration process is of 4 steps:
- Step-1: Add new portal user
- Step-2: Secure application
- Step-3: Register application user
- Step-4: Add device for user
Note:Initially all the stages will be in Red colour, as the process gets completed it changes to Green. Incomplete stages will be in Yellow colour.
 Username: Name of the user.
 Organization name: Organization name of the user.
On clicking drop-down icon near Organization Name, a list of options- Profile, Set Default Role are displayed as shown in Figure 16.
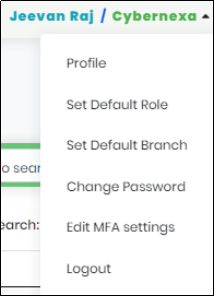
Figure 16 - User Profile Menu
On the left pane of the screen, Basic Metrics that includes Device Connected, Secured Application, Registered Users, and Authentication History are displayed as shown in Figure 13.
Basic Metrics:
- Device Connected
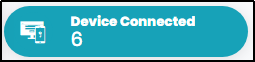 – Number of devices registered under various applications by Organization users
 - Secured Application
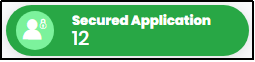 – Number of applications that have been secured in the Organization
 - Registered Users
 – Number of registered users in the Organization using CyLock MFA
Authentication History: List shows the authentication history performed by users of the Organization, as shown in Figure 17.
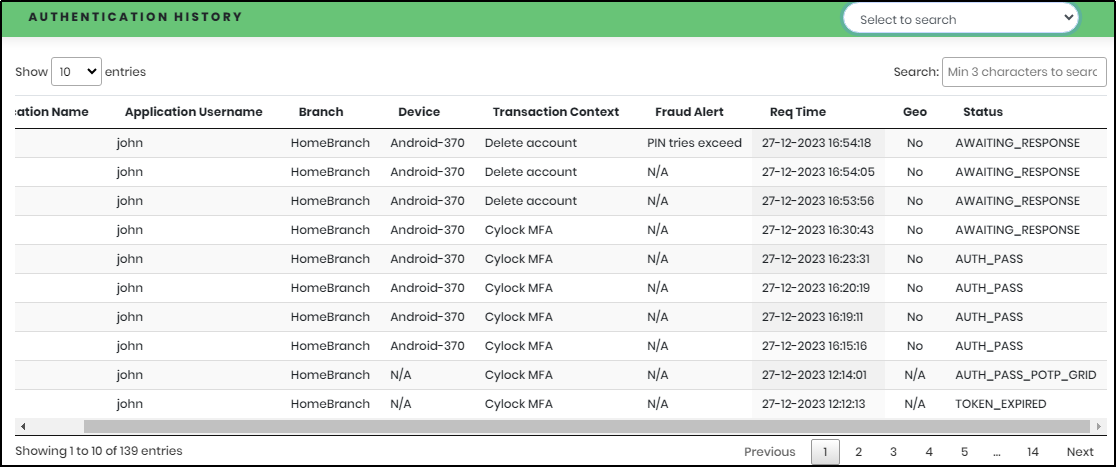
Figure 17 - Authentication History
The Authentication History list displays the below details:
- Application Name
- Application Username
- Branch
- Device
- Transaction Context
- Fraud Alert
- Req Time
- Geo
- Status
The list view displays 10 transactions in a page and can be customized using the drop-down selection as shown in figure 17.1.
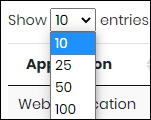
Figure 17.1 - List View
A column-based search function is available in the list of authentication history. “Select to Search” Drop Down lists the following as shown in Figure 17.2
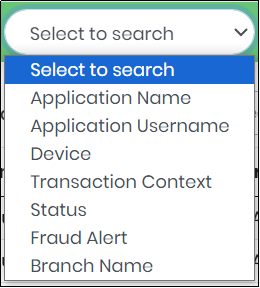
Figure 17.2 - Select to search Drop-Down
Select the column value to search, type the search value in the Search text box to quickly get the corresponding authentication data as displayed in Figure 17.3.

Figure 17.3 - Authentication History Search result
Support Desk
The Support Desk helps the administrator to search and get all the information of a particular application user in a single page. Customized users with privileges have access to support desk menu. On expanding Main Menu, click Support Desk Menu, the Support Desk Screen will be displayed as shown in Figure 18
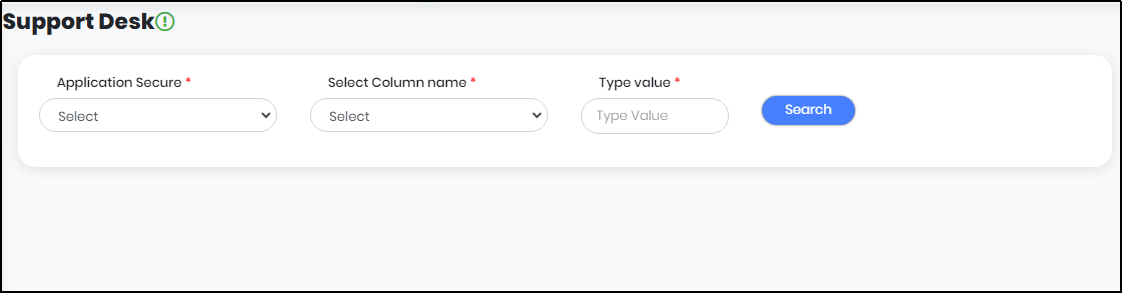
Figure 18 - Support Desk Screen
Select an Application from the list of “Applications Secure”. Select Column Name from the list as shown in Figure below. In “Type Value”, enter the value to search as shown in Figure 18.1
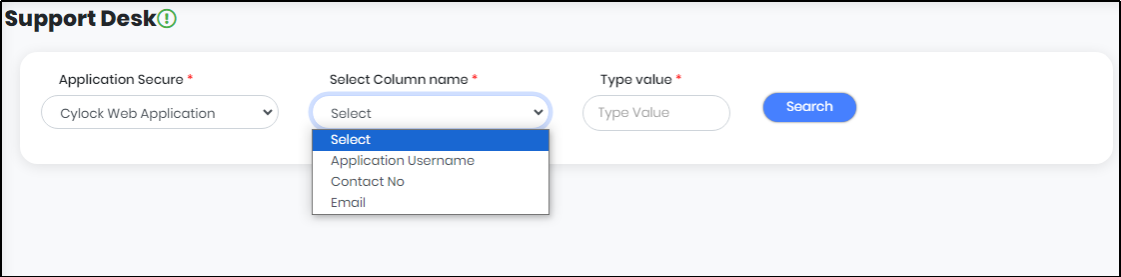
Figure 18.1 - Support Desk Screen with updated values
After selecting all the values, click “Search” to get one or a list of application users as shown in Figure 18.2
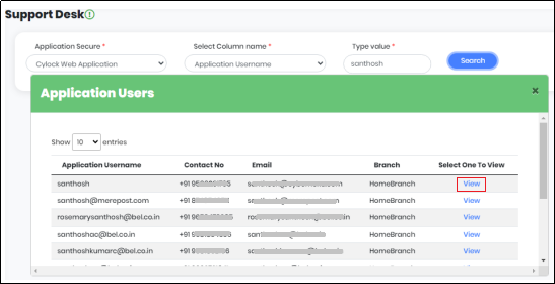
Figure 18.2 - Support Desk screen Displaying Application User
Application User
On the Application Users Tab Click “View” under “Select One to View” against the Application username. The system displays the entire details of that particular application user as shown in Figure 18.3. The Application User Tab displays user details of that Application User including Application Name, First name of the user, Last name of the user, Default Online Authentication Mode, Default Offline Authentication Mode, Application User Name, Authentication type, Device limit, Contact Numbers, Geo-fencing, etc.,
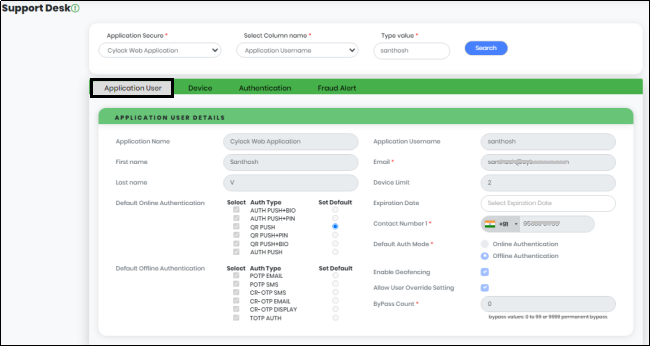
Figure 18.3 - Support Desk screen Displaying Application User Tab
Device
The Device Tab displays one or a list of devices registered by the user. Details displayed - Application Username, Device, OS Name, Is Default, Device Registered Date, Select One to View as shown in Figure 18.4.
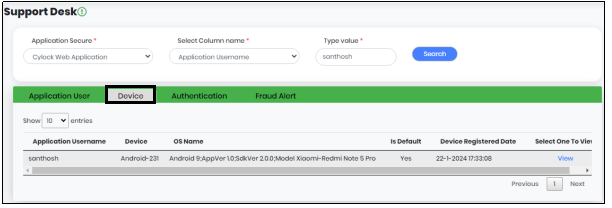
Figure 18.4 - Support Desk screen Displaying Device Tab
Click “View” to get Registered User details and Geo-Fencing details as shown in Figure 18.4.1
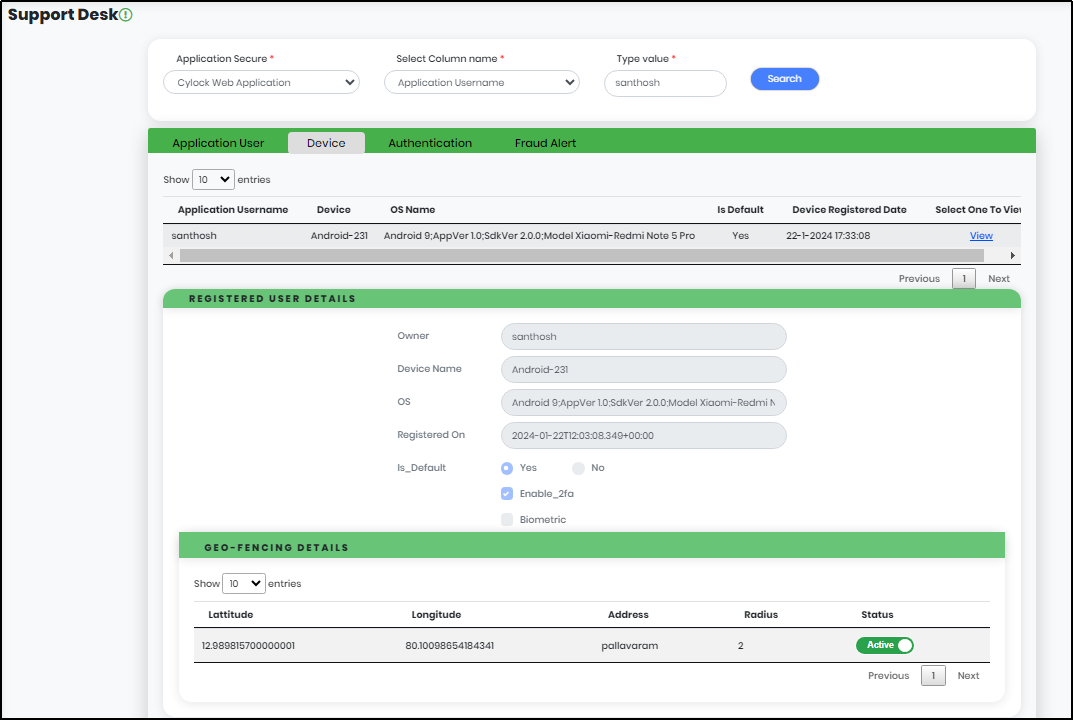
Figure 18.4.1 - Support Desk screen Displaying Device Tab
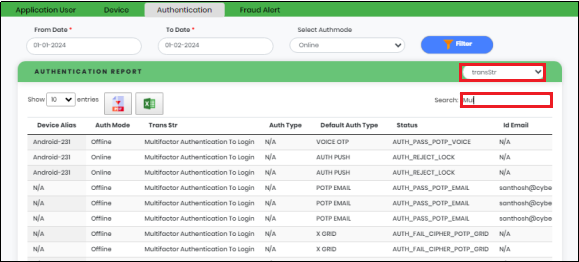
Authentication
In the Authentication Tab, Select “From” date, “To” date and Select Online / Offline in “Select Authmode”. Click “Filter” to get the Authentication report of that particular user for that specified period as shown in Figure 18.5
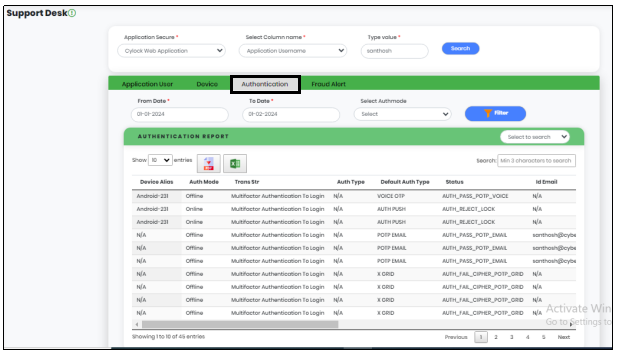
Figure 18.5 - Support Desk screen Displaying Authentication Tab
A column-based search function is available in the Authentication Tab. “Select to Search” Drop Down lists the following as shown in Figure 18.5.1.
Figure 18.5.1 - Select to search Drop-Down
Fraud Alert
In the Fraud Alert Tab, Select “From” date, “To” date. Click “Filter” to get the Fraud Alert report of that particular user for that specified period as shown in Figure 18.6
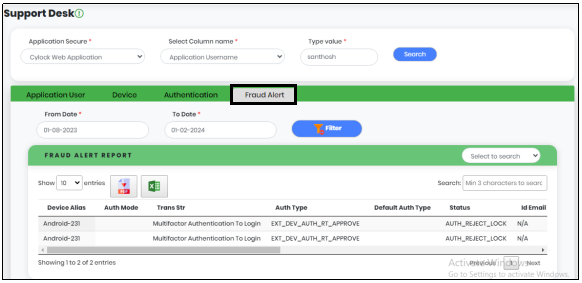
Figure 18.6 - Support Desk screen Displaying Fraud Alert tab
A column-based search function is available in the Fraud Alert Tab. “Select to Search” Drop Down lists the following as shown in Figure below.
Figure 18.6.1 - Select to search Drop-Down
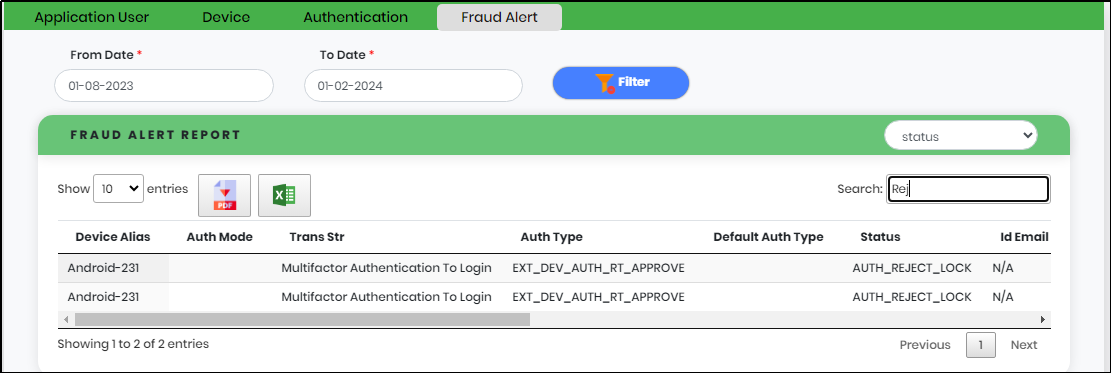
Figure 18.6.2 - Support Desk screen Displaying Fraud Alert Tab search result
Note:
- The list view displays 10 transactions in a page and can be customized using the drop-down selection as shown in Figure 18.7.
- Click
 to save the search results as PDF File.
 - Click
 to save the search results as Excel File.
Figure - 18.7 List View
User Management
User Management allows Organization Administrator to add User, change User status, view / update User information and delete User from the Organization. User Management includes two types of Users, namely Portal Users and Local Users.
- Portal Users - The users designated for managing the Cylock portal are known as portal users. User access to the portal is regulated by assigning roles and privileges.
- Local Users - In any application that requires the FFA to be completed but does not maintain temporary users. In order to handle temporary users with login credentials and carry out first factor authentication for the client application, these local users were created.
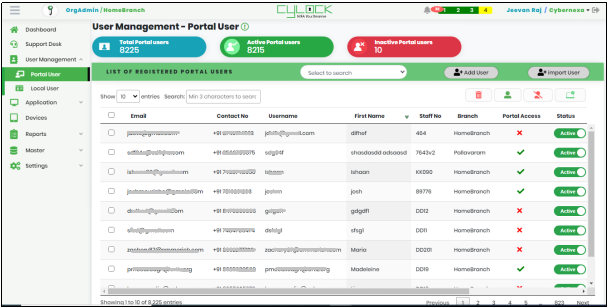
Figure 19 - User Management Dashboard
From the Main menu, expand User Management menu and click Portal User sub menu, the system displays User Management Dashboard - Portal User as shown in Figure 19. User Management Dashboard includes Metrics and List of Registered Portal Users.
Metrics includes as below:
- Total Portal Users – Number of Portal Users
- Active Portal Users – Number of Active Portal Users
- Inactive Portal Users – Number of Inactive Portal Users
The List of Registered Portal Users view includes below details
- Email – Email of the Portal User
- Contact No – Contact o of the Portal User
- User Name - User Name of the Portal User
- First Name – First Name of the Portal User
- Staff No - Staff No of the Portal User
- Branch – Default Branch of the Portal User
- Portal Access – Portal Access Status of the Portal User
- Status – Active/Inactive toggle
- View/Update – link to view or update user details
- Created Date – Created date of the Portal User
- Delete – Delete icon to remove the User account
A column-based search function is available in the list of registered Portal Users. Select the column value to search, from the “Select to search” drop down as shown in Figure 19.1.
Figure 19.1 - Select to search Drop-Down
Type the search value in the Search text box to quickly get a portal user data as displayed in Figure 19.2..
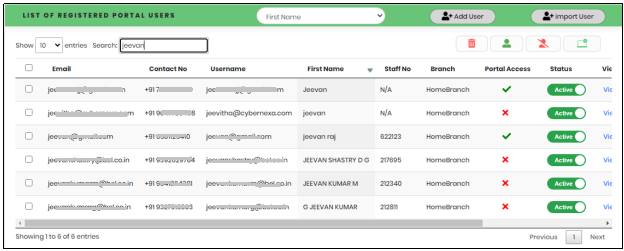
Figure 19.2 - User Management search result

Figure - 19.3 Options Panel
| Delete | To delete all the selected users at a time |
| Active User | To make multiple users active at the same time |
| Inactive User | To make multiple users inactive at the same time. |
| Enable Portal | Enable portal Access - To enable portal access for multiple users at the same time. Once the users are selected and given portal access, users will receive a notification that they are granted portal access. |
The list view displays 10 transactions in a page and can be customized using the drop-down selection as shown in Figure 19.4.
Figure - 19.4 List View
Adding Portal User
- In the Portal User list view, click “Add User” button as shown in below Figure. The System displays the “Add Portal User” form.
- In the Add Portal User form as shown in Below figure 21, enter below details.
- First Name – required; First Name of the Portal User
- Last Name - optional; Last Name of the Portal User
- Staff No – optional; Staff No of the Portal User
- User ID – required; User ID of the Portal User
- Email – required; Email id of the Portal User
- Contact Number – required; Contact Number of the Portal User
- Enable Portal – optional; allows User to access CyLock Portal
- User Role – required; Select any role from the customized role list as shown in Figure 21.1. The portal user can be assigned many roles. Only one role can be selected as the portal user's default role.
- User Branch– required; Select any branch from the branch list as shown in Figure 21.2. The portal user can be assigned many branches. Only one branch can be selected as the portal user's default branch.
- Click “Save” to save all entries. The system displays a success message as shown below in 22
- Click “Ok”. The system sends login credentials (2FA) to the registered email address of the Portal User so as to access CyLock Portal.
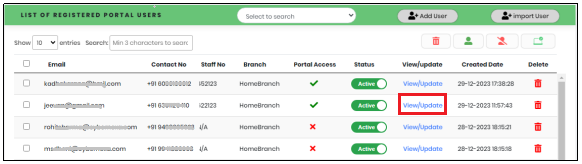
Figure 20 - Portal Users List View
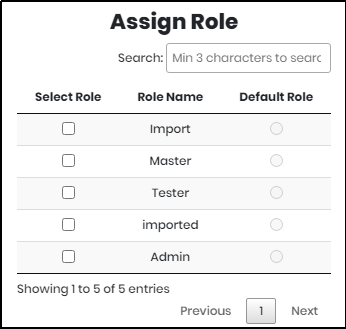
Figure 21.1 - List of Roles
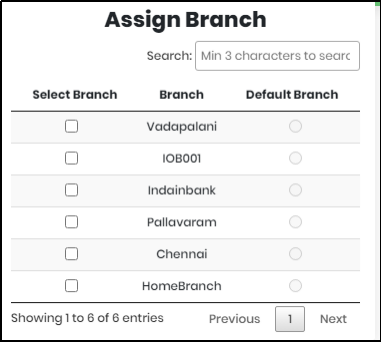
Figure 21.2 - List of Branches
Note:Portal Users can carry out the actions based on the privileges allocated to their default role. Portal users won't be able to carry out the activity on the screen if the privilege isn't granted to their logged in role. Each list will function based on the branch that is currently logged in.
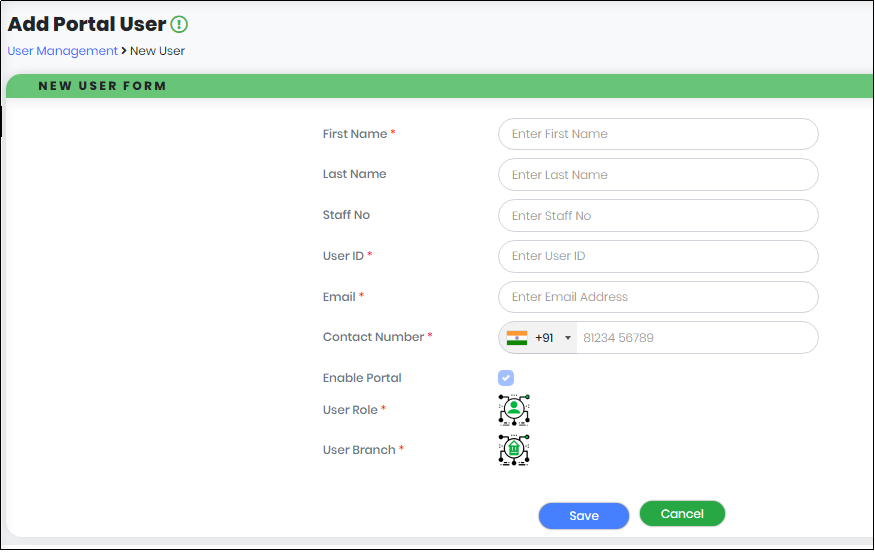
Figure 21 - Add Portal User form
Note: Click “Cancel” to exit the form without saving.

Figure 22 - Portal User Registration Success Message
Editing Portal User
- In the Portal User list view, click “View/Update” link corresponding to the Portal User whose details need to be updated as shown in Figure 23.
- In the Edit Portal User Form, update parameters to be changed.
- Click “Update” to save all entries. The system displays a success message as shown below.
- Click “OK” to update User details.
Figure 23 - Portal Users List View
The system navigates to Edit Portal User form as shown below.
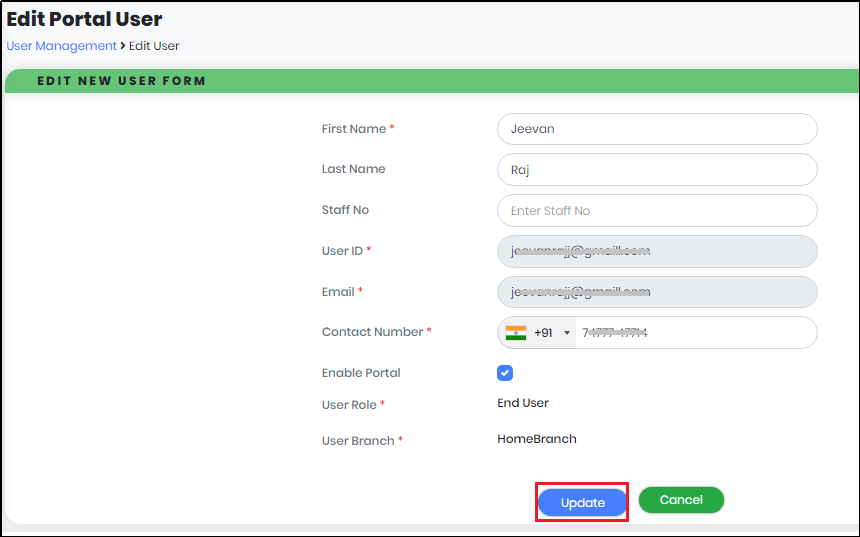
Figure 24 - Edit Portal User Form
Note: User ID and Email are not allowed to update.
Note: Click “Cancel” to exit the form without saving.

Figure 25 - User Detail Updated Success Message
Importing Portal User
- In the Portal User list view, click “Import Portal User” button as shown in Figure 26.
- Click “Download” button to download the Import Portal User download template in the “Downloads” folder of the Computer.
- Enter all information in the required fields and save to a destination folder.
- In the Upload Template screen, choose the saved file from the destination folder and Click “Upload”.
- Click “OK” to update User details.
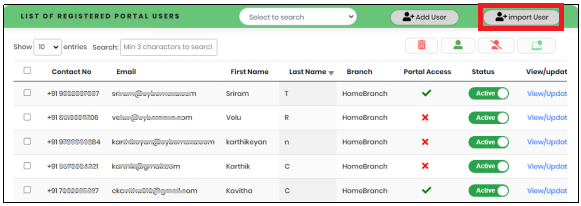
Figure 26 - List of Registered Portal Users
The System displays the “Download/Upload Template” screen as shown in Figure 27
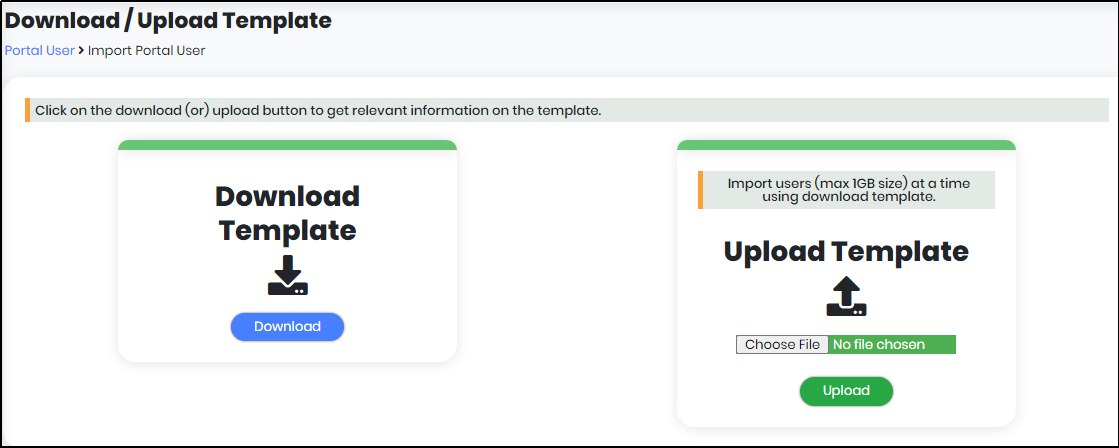
Figure 27 - Download/Upload Template
Figure 27.1 & 27.2 is the snapshots of the template file.
Data Entry Sheet
.png)
Figure 27.1 - Import Portal User Template (Sheet 1)
Instruction Sheet
.png)
Figure 27.2 - Instruction Sheet (Sheet 2)
Note: Import is allowed for 100 user entries at a time using the template.
The System displays success message upon upload as shown in Figure 28.

Figure 28 - Imported Success Message
Figure 29 shows the snapshot of sample imported data.
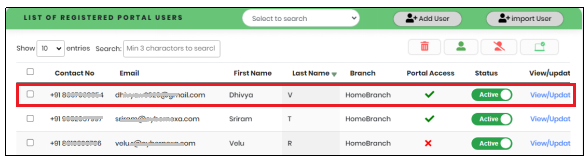
Figure 29 - Imported user list
Deleting Portal User
- In the Portal User list view, click “Delete” icon
 corresponding to the Portal User. The system displays the below confirmation message to delete the
Portal User 1.as shown in Figure 30.
corresponding to the Portal User. The system displays the below confirmation message to delete the
Portal User 1.as shown in Figure 30.
- Click “Confirm” to remove the selected Portal User Account. The system displays a success message as shown in Figure 31.
- The system displays a Failure message in the portal if the user linked with the application user is trying to be deleted as shown in Figure 32.
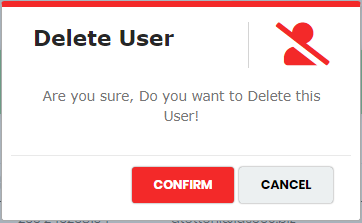
Figure 30 - Delete User Pop-up
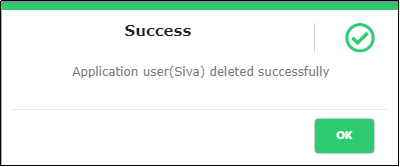
Figure 31 - User Deletion Success Message
Note: Click “Cancel” in Delete User popup, to exit the process without deleting the User account.
Note: The portal user is not permitted to be deleted from the portal if they are mapped with an application user. To delete such portal user, you must first delete the application users that are mapped to the portal user.
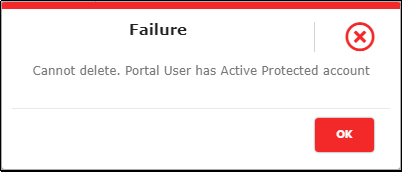
Figure 32 - Failure Message Pop-up
Enabling/Disabling Portal User
- In the Portal User list view, use toggle button
 corresponding to the Portal User. The system displays “Disable User” popup message as shown in Figure 33
 - Click “Confirm” to disable the selected Portal User.
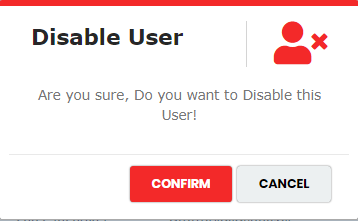
Figure 33 - Disable User Pop-up
Note: Click “Cancel” to exit disabling Portal User without saving.
Local User
Local User Dashboard allows the Organization Administrator to Add Local User, Import Local User, Change User status, View / Update User information and Delete User from the Organization. On clicking Local User under User Management menu, User Management – Local User Dashboard is displayed as shown in Figure 34..
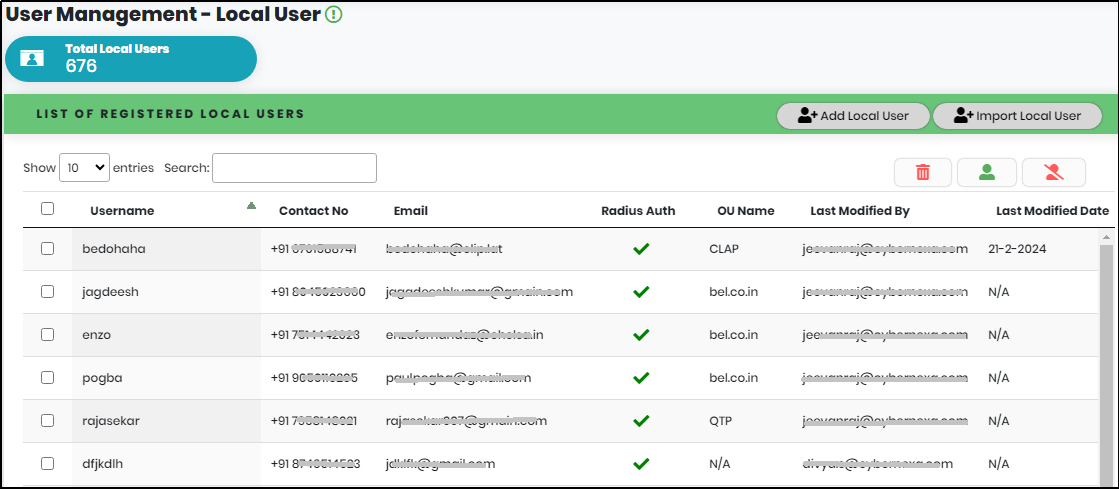
Figure 34 - Local User Dashboard
User Management – Local User Dashboard includes metrics and List of Registered Local Users.
Metrics displays Total Local Users – Number of Local Users.
The List of Registered Local Users view includes below details
- User Name – Display Name of the Local User
- Contact Number – Contact Number of the Local User
- Email – Email id of the Local User
- Radius Auth – Enabled or disabled for RADIUS authentication
- OU Name – OU/Group Name Name of the Local User
- Last Modified By – Show the email address of the portal user who made the modifications to the local user.
- Last Modified Date – Show the recent modified date of the local user.
- Status – Active/Inactive toggle
- View/Update – link to view or update user details
- Delete – Delete icon to remove the User account
Adding Local User
- In the Local User list view, click “Add Local User” button as shown in Figure 36. The System displays the “New User form”.
-
In the New User form as shown in Figure 36, enter below details.
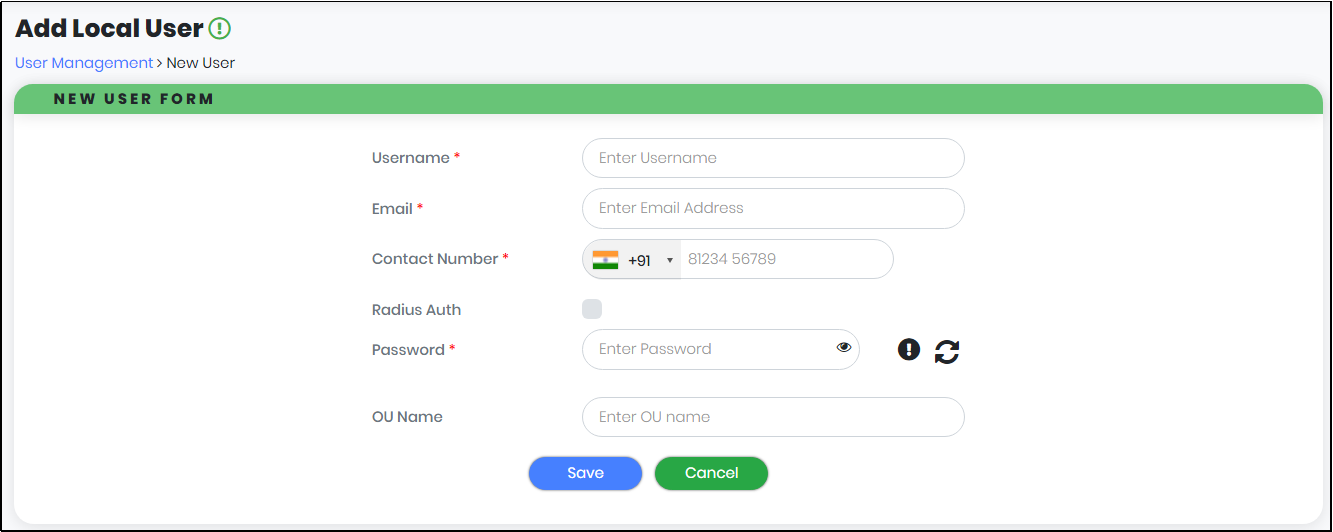
Figure 36 - New User Form
- User Name – required; Display Name of the Local User
- Email – required; Valid Email id of the Local User
- Contact Number – required; Valid Contact Number of the Local User
- Radius Auth – Check to allow second factor authentication
- Password – required;The user has two options: either type in the password or click the Load symbol to generate a random password.
- OU Name – optional;Group Name/OU Name of the Local User.
To View the Password Policy enabled:
Click the Information icon to view the Local user's Password Policy as shown in Figure 37.
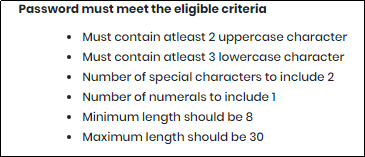
Figure 37 - Password Policy
- Click “Save” to save all entries. The system displays a success message as shown in Figure 38.
- Click “OK” to close the window.
Figure 35 - List of Registered Local Users view

Figure 38 - Local User Registration Success Message
Editing Local User
- In the Local User list view, click “View/Update” link corresponding to the Local User whose details need to be updated as shown in Figure 39.
- In the Edit Local User Form, update parameters that require change.
- Click “Update” to save all entries.
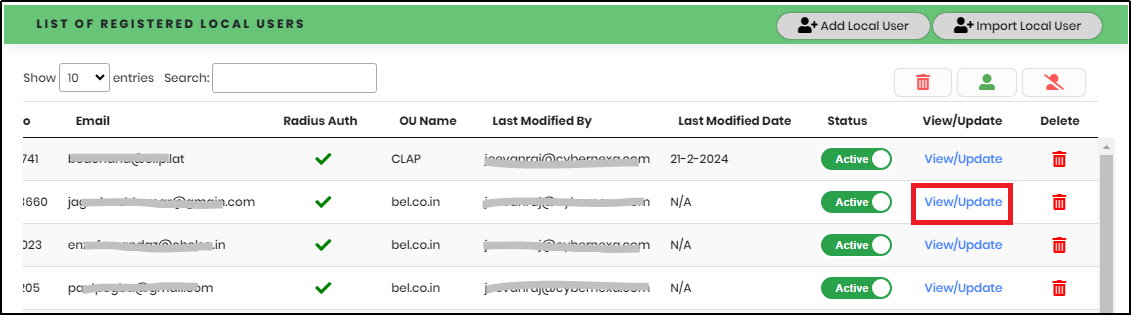
Figure 39 - Local Users List View
The system navigates to Edit Local User form as shown in below Figure 40.
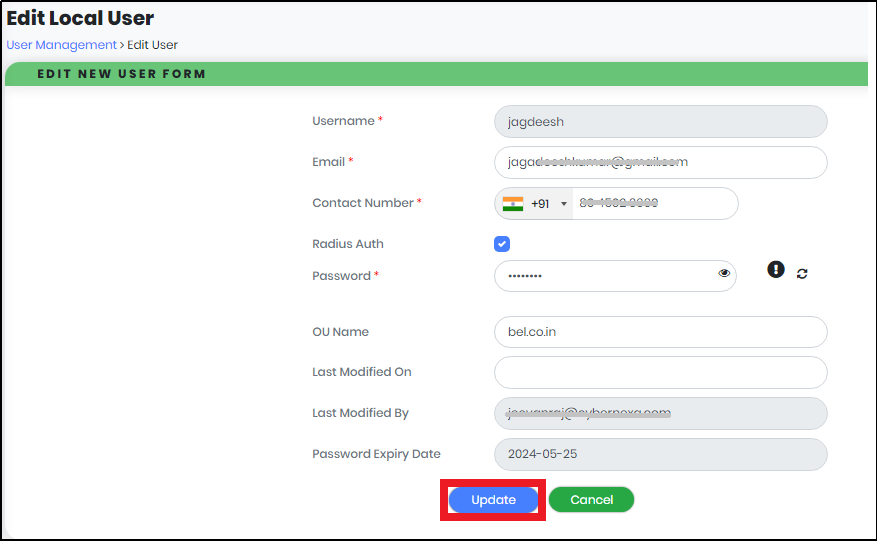
Figure 40 - Edit Local User Form
Note: Click “Cancel” to revert any changes.
Password Policy is as same as Figure 37.
Importing Local User
- In the Local User list view, click “Import Local User” button as shown below.
- Click “Download” button to download the import Local User download template in the “Downloads” folder of the Computer.
- Enter all information in the required fields and save to a destination folder.
- In the Download/Upload Template screen, choose the saved file from the destination folder and Click “Upload”.
- Click “OK” to navigate to List page. Below Figure 45 shows the sample imported Local User.
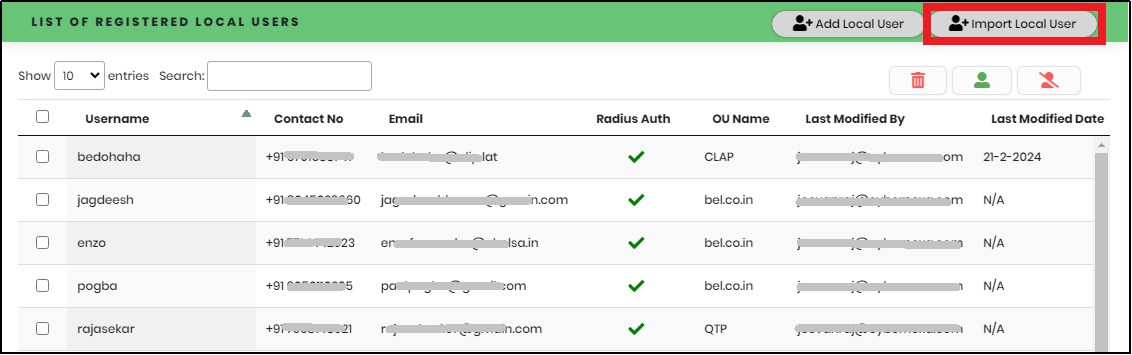
Figure 41 - List of Registered Local Users
The System displays the “Download/Upload Template” screen.
Figure 42 - Download/Upload Template screen
Figure 43.1 & 43.2 is the snapshots of the template file.
.png)
Figure 43.1 - Import Local User Template (Sheet 1)
Figure 43.2 - Instruction Sheet (Sheet 2)
Note: Import is allowed for 100 user entries at a time using the template. The System displays below success message.
The System displays success message as shown in Figure 44.

Figure 44 - Imported Local User Success Message
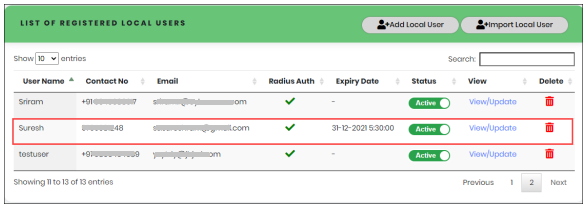
Figure 45 - Imported Local User List
Deleting Local User
- In the Local User list view, click “Delete” icon corresponding to the Local User. The system displays the below confirmation message to delete the Local
User 1.as shown in Figure 46.
- Click “Confirm” to remove the selected Local User Account. The system displays below success message.
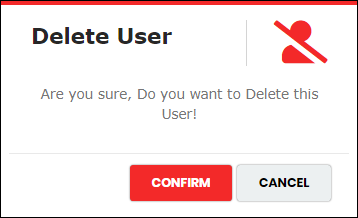
Figure 46 - Delete User Pop-up
Note: Click “Cancel” in the Delete User popup to exit the process without deleting the User account.
Enabling/Disabling Local User
- In the Portal User list view, use toggle button corresponding to the Local User. The system displays “Disable User” popup message.
- Click “Confirm” to disable the selected Local User.
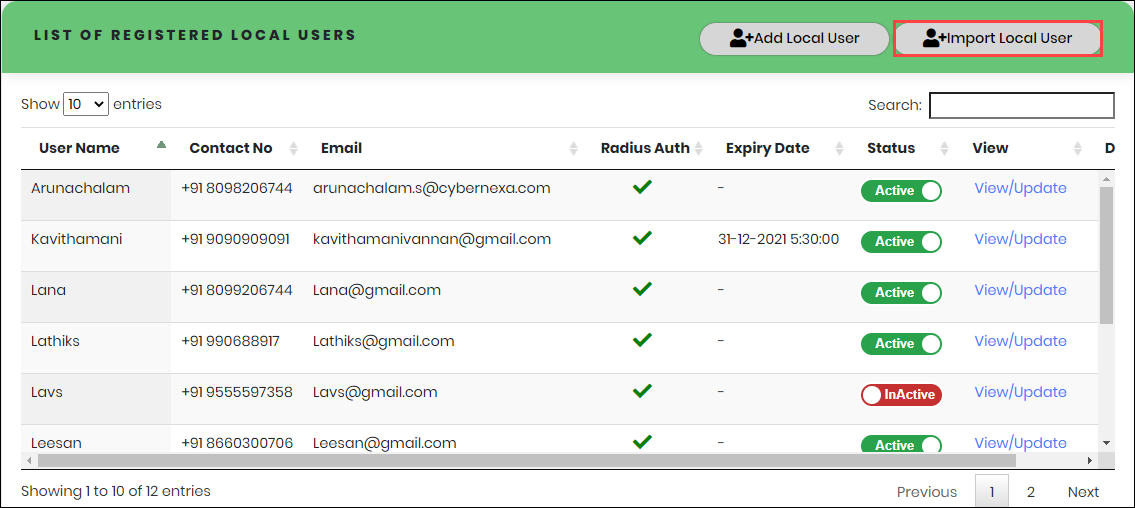
Figure 47 - Inactive User Pop-up
Note: Click “Cancel” to exit disabling Portal User without saving.
Application
Application allows only Organization Administrator to secure new application, view locked accounts, add/view users for each secured application, change application status, view/update application information and delete an application.
Customized users do not have the privilege to secure an application.
From the main menu, click Application to display the available sub menus. Click “Secure Application” sub menu from the Application menu as shown in Figure 48.
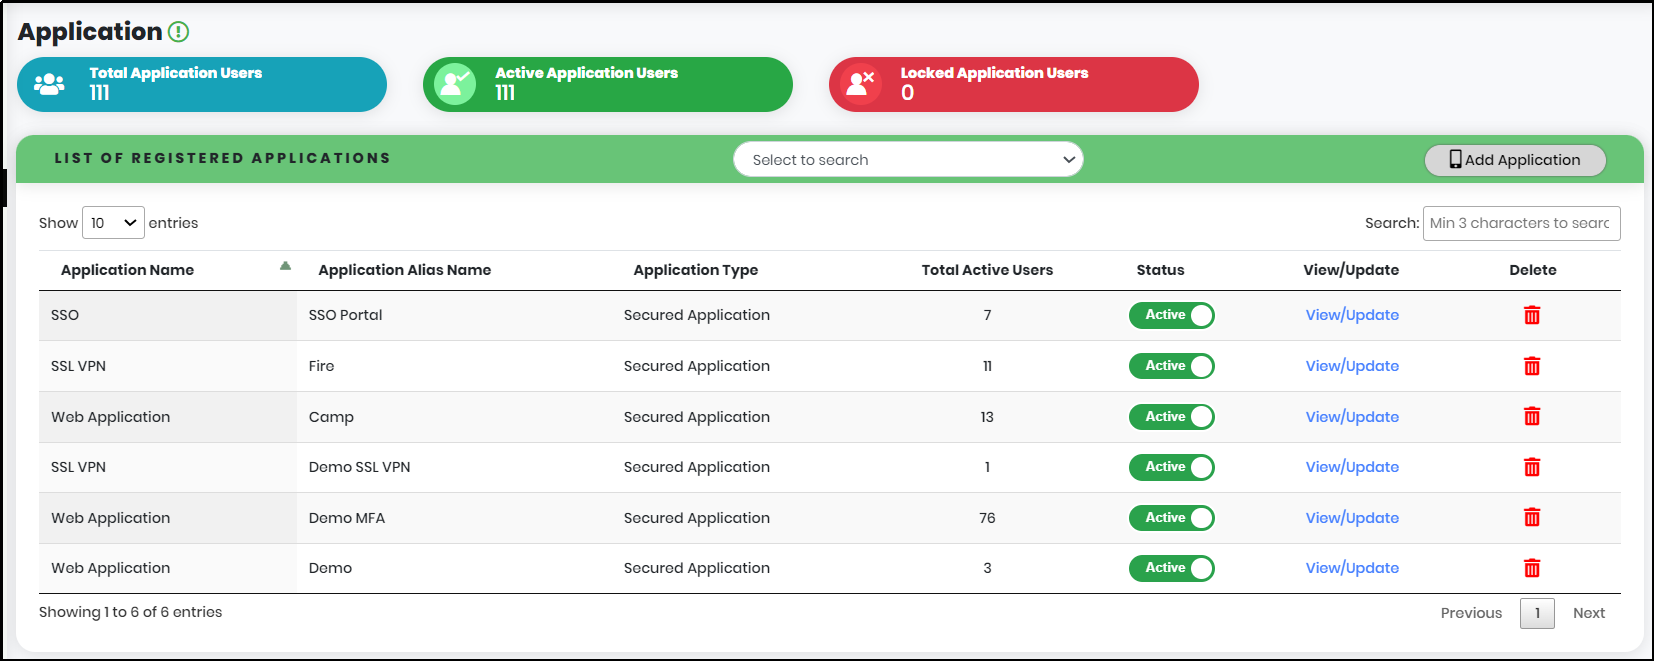
Metrics include the below details:
- Total Application Users: – Total application Users using CyLock MFA in an Organization
- Active Application Users: – Total Active application users in an Organization/li>
- Locked Application Users: – Total Inactive application users in an Organization
List of Registered Applications includes as below:
- Application Name – Type of Application
- Application Alias Name – Alias Name of the Application
- Application Type – Application type specifies whether the application is Management Application or the Secured Application.
- Total Active Users – Number of Active Users associated to the Application
- Status – Active/Inactive state of the Application
- View/Update – View or update the Application Information
- Delete – delete the application, only if no users associated to the Application
Note: The Management Application will be secured automatically during the Signup process to allow MFA for the CyLock Portal.
A column-based search function is available in the list of registered Applications. Select the column value to search. Select to Search Drop Down is shown in Figure 48.1.
- Application Name
- Application Alias Name

Figure 48.1 - Select to search Drop-Down
Type the search value in the Search text box to quickly get a Secured Application data as displayed in Figure 48.2.
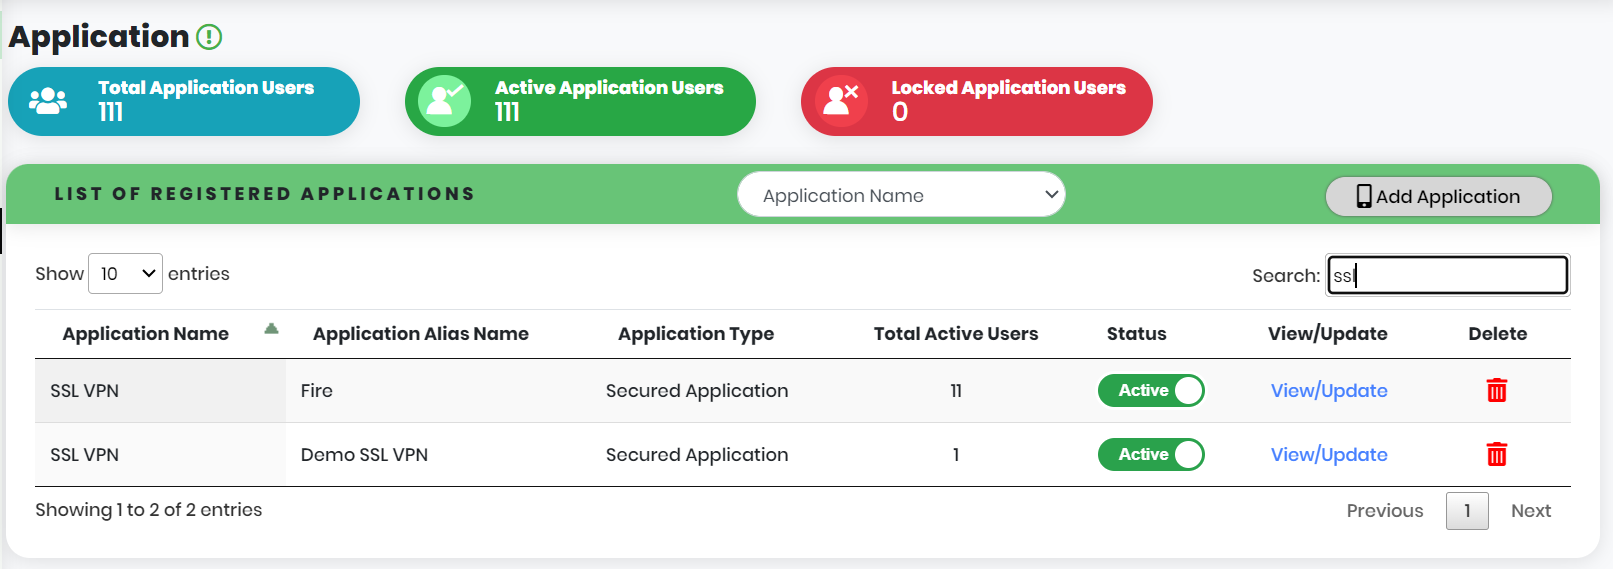
Figure 48.2 - Application Search result
Securing an Application:
Using CyLock MFA, Organizations / Individuals can enable MFA for Applications as shown in Figure 49.
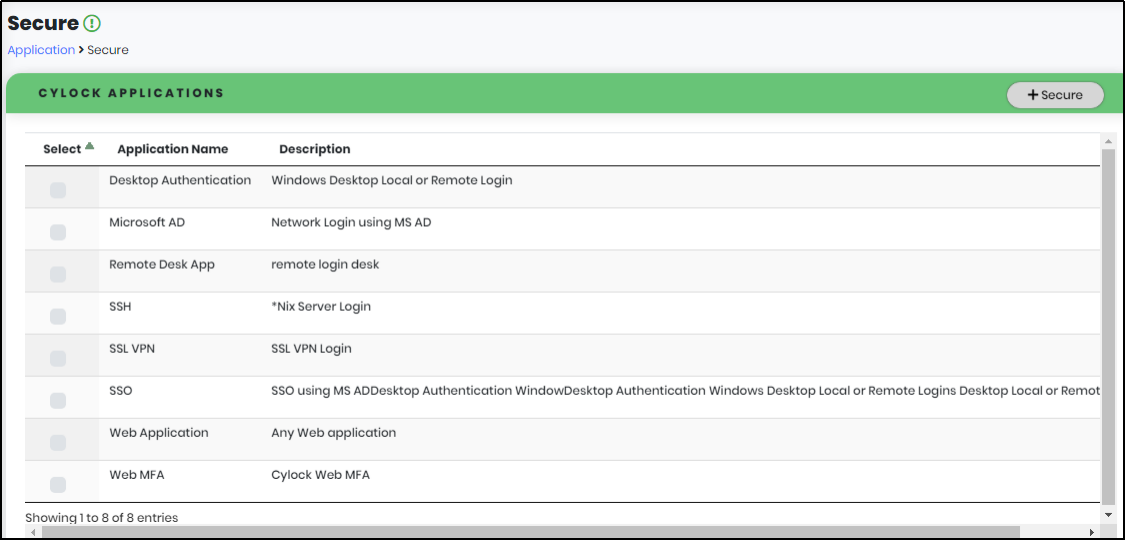
Figure 49 - CyLock Applications List Screen
Note:
Except Web Application, for securing all other applications, download corresponding agents/components to integrate with CyLock MFA platform. Use the details displayed during application protection
Pre-requisites:
Securing an application requires an active CyLock account. Refer “Getting Started” to start using CyLock MFA to protect your applications.
Adding new Application
- In the List of Registered Applications view as shown below, click “Add Application” to navigate to Secure page.
- In the Secure page, select Application by clicking corresponding checkbox as shown below in Figure 51.
- Click “Secure” button as shown in Figure 51 to navigate to Application Key page.
- Application Information page is shown in Figure 52, enter all details as required.
- Do not share the API Key and Customer ID with anyone.
- Email Address & Contact Number should be unique across the organization
- Click “Save” to secure the application.
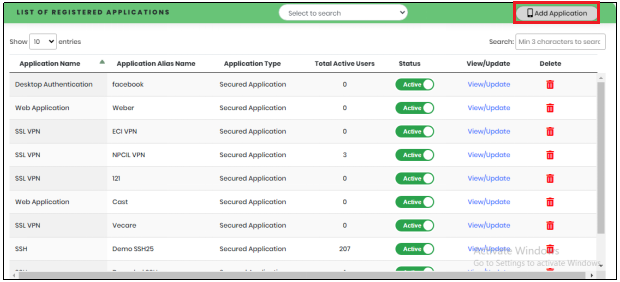
Figure 50 - List of Registered Applications

Figure 51 - CyLock Applications
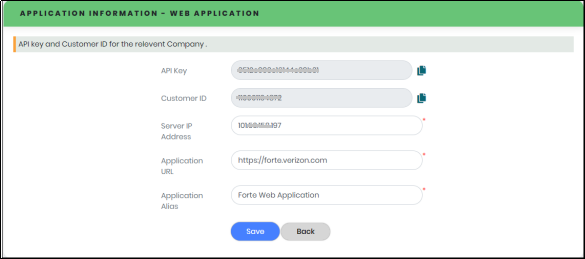
Figure 52 - Application Information Screen
| Parameter | Description |
|---|---|
| Application Key | Read-only, auto-generated unique key |
| Customer ID | Read-only, auto-generated unique key |
| Server IP Address | Valid Server IP Address |
| Application URL | Valid Application URL |
| Application Alias | Unique Application Alias Name |
Note:
Note: Press “Back” to cancel saving the Secured Application created and go back to the previous screen. After successfully securing the Application, the Application screen will be displayed as shown in Figure 53.
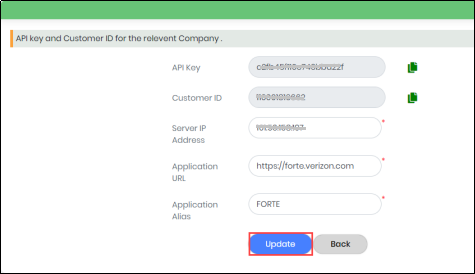
Figure 53 - Application Information Screen
Viewing Locked Accounts
1.On expanding Applications, Click “Locked User” to navigate to Locked User List page.

Figure 79 - List of Locked Users
2.In the Locked User List page, click “Unlock” in the Status column corresponding to the Application User Name whose account is locked.
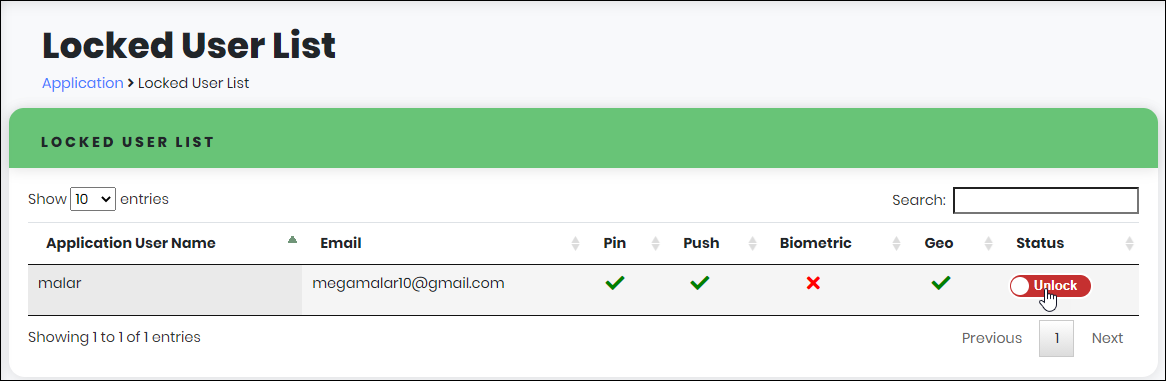
Figure 80 - Locked User List
The system displays below message to confirm unlock action.
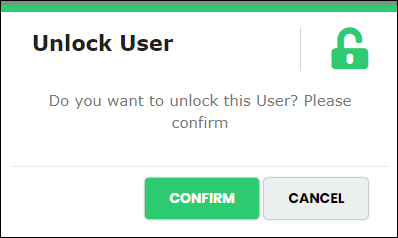
Figure 81 - Unlock User Pop-up
3.Click “Confirm” to unlock the user.
Note: Click “Cancel” to undo any changes.
Select to Search Drop Down
- Application User Name
- Application Name
A column-based search function is available in the list of Application users. Select the column value to search, type the search value in the Search text box to quickly get a application user data as displayed below.
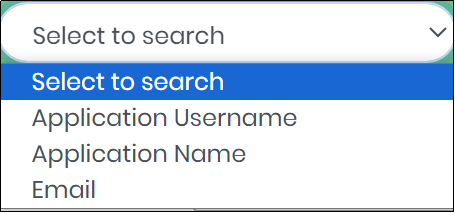
Figure 81.1 - Select to Search Drop-Down
The list view displays 10 transactions in a page and can be customized using the drop-down selection as shown below.

Figure 81.2 - List View
Enabling/Disabling Application Status
- In the Application list view, use toggle button corresponding to the Application.
The system displays “Inactive Application” popup message as shown in Figure 54.. - Click “Confirm” to disable the the selected Application.

Figure 54 - Inactive Application Pop-up
Note: Click “Cancel” to exit disabling Application without saving.
Viewing/Updating Application information
- In the List of Registered Applications view, click “View/Update” corresponding to the Application as shown in Figure 55.
- In the Application Information page, modify all parameters as needed
- Click “Save” to update the details of the Application.
- Click “Ok” to save changes and go to back to list view.
Figure 55 - List of Registered Applications
The system displays “Application Information” page as shown in Figure 56.
Figure 56 - Application Information Screen
Note: Click “Back” to navigate to the List view without saving changes.
The system displays an Application update success message as shown in Figure 57.
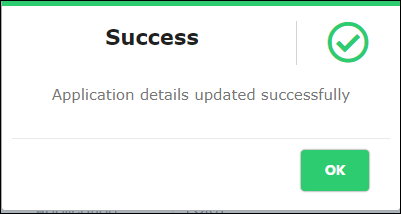
Figure 57 - Application Update Success Message
Deleting Application
- In the Application list view, click “Delete” icon corresponding to the Application. The system displays the below confirmation message to delete the Application.
- Click “Confirm” to remove the selected Application. The system displays below failure message, as Active users associated to the Application.
- Remove all active users associated with the Application before deleting it.
- Click “Cancel” in the Delete Application popup to exit the deleting process.
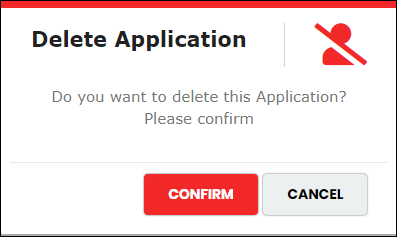
Figure 58 - Delete Application Pop-up
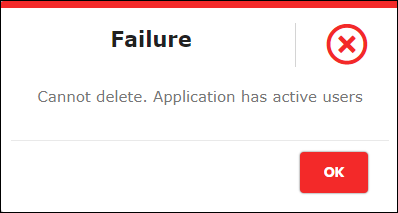
Figure 59 - Failure pop-up
Note:
Application User
In the List of Registered Applications view, click  corresponding to the Application to View the registered application Users
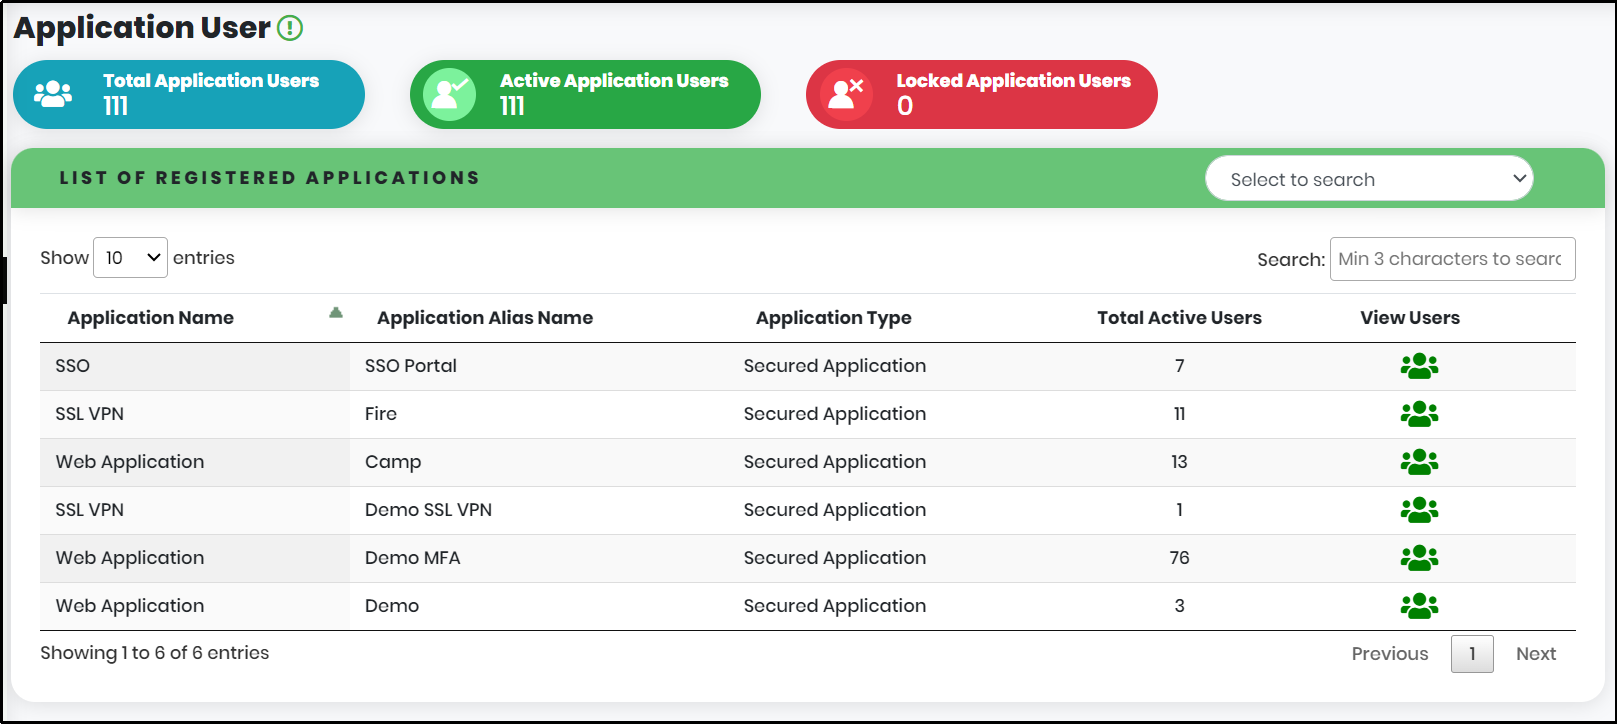
Figure 60 – Application User Dashboard
The system navigates to Application User list page as shown below.
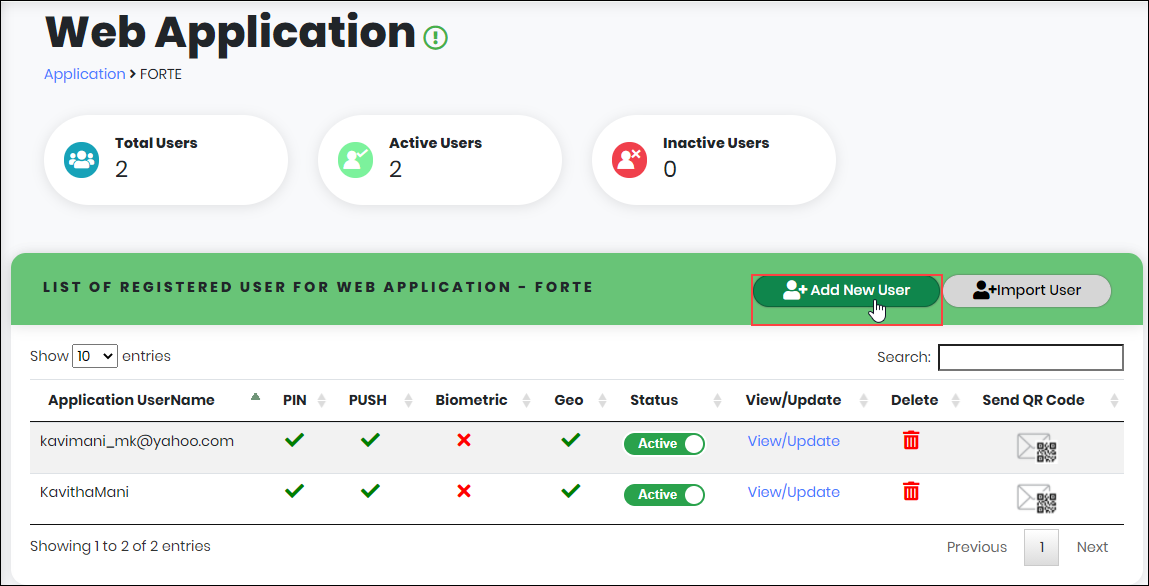
Figure 61 - List of Application Users
In the List of Registered User view, click “Add New User” as shown above, to navigate to “Add Application User” page.
Administrator can perform below configurations for Application User in the List of Registered User page.
- Add Application User
- Importing Users
- Enabling/disabling Application User Status
- Viewing/Updating Application User Information
- Deleting Application User account
- Sending QR Code to Application User for Mobile Device Registration
Add Application User
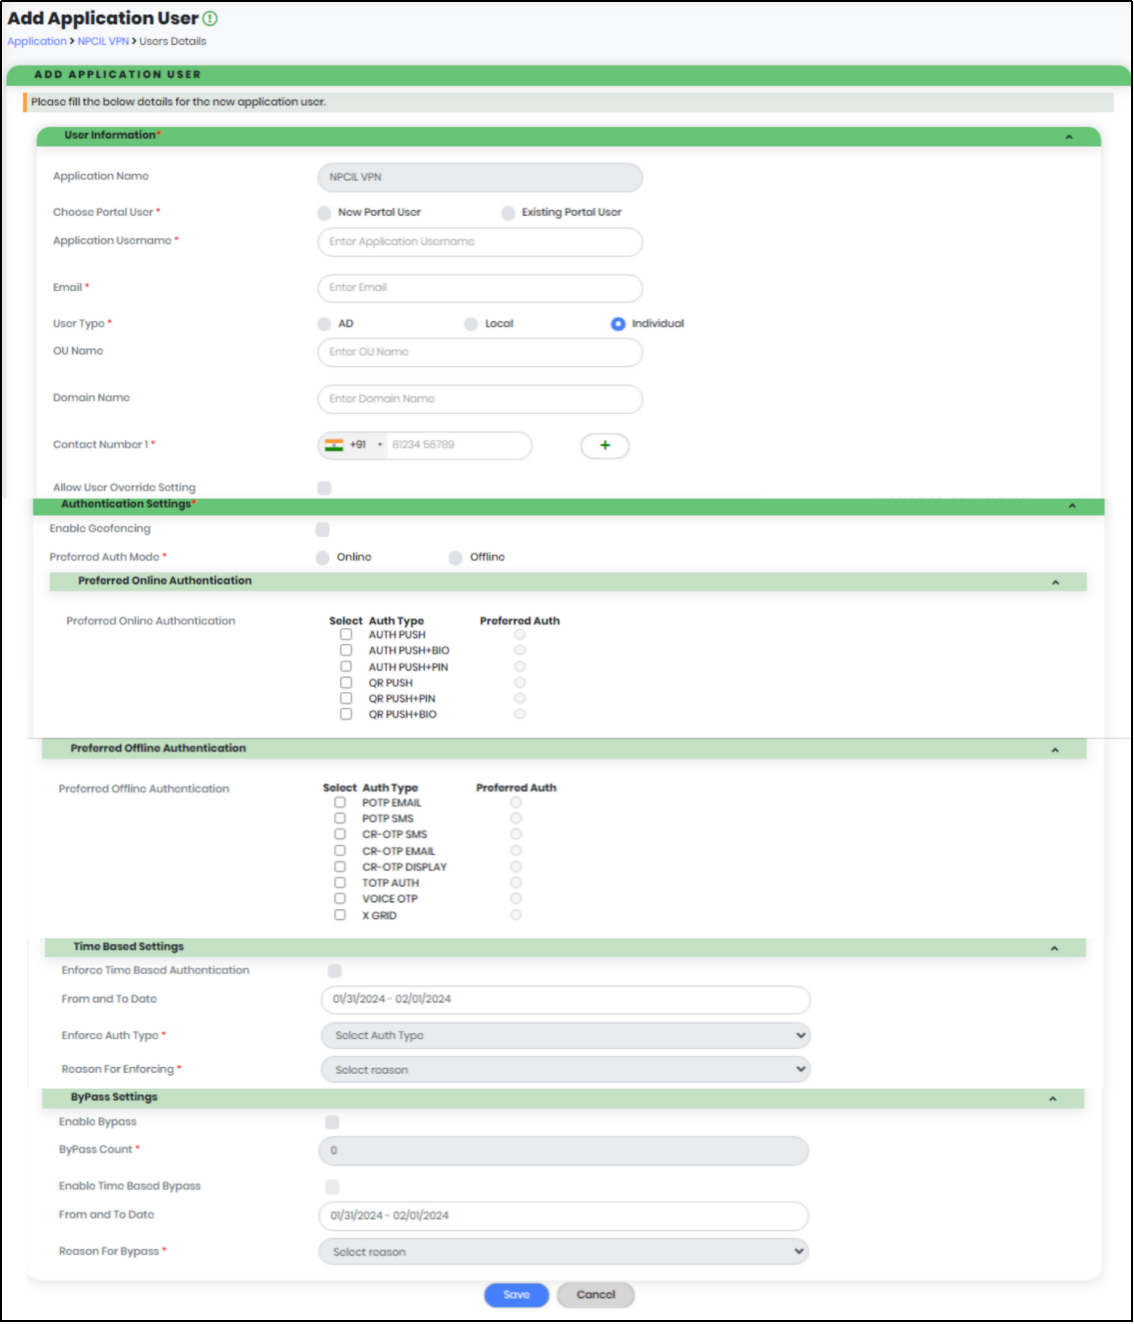
Figure 62 -Add Application User Info
Below is the list of all required fields and corresponding details.
User Information – required; Application User information
- Application Name – Type of Application associated to the User, displayed by default
- Choose Portal User – required; New Portal User or Existing Portal User can chosen here to map the portal user with the application user.
- First Name – required; First Name of the Portal User
- Staff No – optional; Staff No of the Portal User
- Enable Portal – optional; Portal Access state
- Existing Portal User – required; Select Portal User Name from the list of displayed email ids to access CyLock Portal
- Application User Name – required; Enter User Name to access Application
- Email– required; Enter Email address of the Application User for sending Notification
- User Type- required; User Type can be AD , Local or Individual
- AD – Choose AD if the User comes under the AD
- Local - Choose Local if the User comes under the Local User
- Individual - Choose Individual if the User does not come under the Local/AD
- OU Name– Specifies the OU Name of the User.
- Domain Name– Specifies the Domain of the User.
- Contact Number–Two Contact Numbers can be added under the Application User. In that Only One can be the Preferred One.
- Contact Number 1– Enter Primary Contact Number of Application User
- Contact Number 2– Enter Secondary Contact Number of Application User
- Preferred Number– Select Contact Number 1 or Contact Number 2 of Application User for sending Notification
- Allow User Override setting–Select to allow User to override settings done by Administrator
- Enable Geo Fencing– Select to enable geographical restrictions while accessing the application
- Preferred Auth Mode– Choose Preferred Auth Mode
- Online– Authenticate Application User when the Mobile device is Online
- Offline– Authenticate Application User when mobile device is Offline
- Auth Push – Send push notification to the Application User
- Auth Push+BIO – Send push notification to the Application User which has to be authenticated by Biometric
- Auth Push+Pin - Send push notification to the Application User which has to be authenticated by entering the PIN
- QR Push – Scan the QR to authenticate
- QR Push+PIN – Scan the QR and authenticate with PIN
- QR Push+BIO - Scan the QR and authenticate with Biometric
- POTP EMAIL - Plain OTP sent through Email used for authentication
- POTP SMS - Plain OTP sent through SMS used for authentication
- CR-OTP EMAIL - Challenge OTP sent to Email that is used to generate Response OTP for authentication
- CR-OTP SMS - Challenge OTP sent to SMS that is used to generate Response OTP for authentication
- CR-OTP Display – Displays the Challenge in the Client Application
- TOTP AUTH –Authentication which uses the one time password which uses the current time as input
- VOICE OTP – Authentication which sends the OTP information through VOICE to the registered mobile number
- X GRID – Authentication which uses the GRID PIN and X-value to find the One Time Password in the GRID.
- Enforce Time Based Authentication – Enforce specific authentication type for a specific period of time
- From and To Date – Select the From date and To date
- Enforce Auth Type – Select Authentication type
- Reason for Enforcing – Reason for enabling the Enforce Authentication
- Enable Bypass – Option to enable the Bypass option
- Bypass Count – Enter Number of times to bypass authentication
- Enable Time Based Bypass – Enable Bypass for the specific period of time
- From and To Date – Select the From date and To date
- Reason for Bypass – Reason for enabling the Bypass option
Note: Multiple Application Usernames can be associated to single Portal Username
If New Portal User Chosen
If Existing Portal User Chosen
Authentication Settings – required; Set Preferred Authentication
Preferred Online Authentication –required; Select any online Authentication type as required. Among the chosen authentication types, only one authentication can be the preferred one.
| Select | Auth Type | Preferred Auth |
|---|---|---|
| AUTH PUSH | ||
| AUTH PUSH+BIO | ||
| AUTH PUSH+PIN | ||
| QR PUSH | ||
| QR PUSH+PIN | ||
| QR PUSH+BIO |
Note:Generally, PIN is recommended, as all Mobile devices might not have biometric during registration.
Preferred Offline Authentication –required; Select any offline Authentication type as required. Among the chosen authentication types, only one authentication can be the preferred one.
| Select | Auth Type | Preferred Auth |
|---|---|---|
| POTP EMAIL | ||
| POTP SMS | ||
| CR-OTP SMS | ||
| CR-OTP EMAIL | ||
| CR-OTP DISPLAY | ||
| TOTP AUTH | ||
| VOICE OTP | ||
| X GRID |
Time Based Settings –optional;
ByPass Settings –optional;
Note:Possible value for authentication bypass ranges from 0 to 99; 9999 is for permanent bypass authentication
1.Click “Save” to save all details of the Application User.

Figure 63 - Application User Registration Success Message
Click “OK” to save changes and navigate to List of Registered User page.
Importing Users
After selecting View Users icon  in the List of Registered Applications view, the system navigates to the Application User list view.
- In the Application User list view, click “Import User” button as shown below.
- Click “Download” button to download the import Application User download template in the “Downloads” folder of the Computer.
- Enter all information in the required fields and save to a destination folder.
- In the Download/Upload Template screen, choose the saved file from the destination folder and Click “Upload”.
- Click “Ok” to navigate the List page.
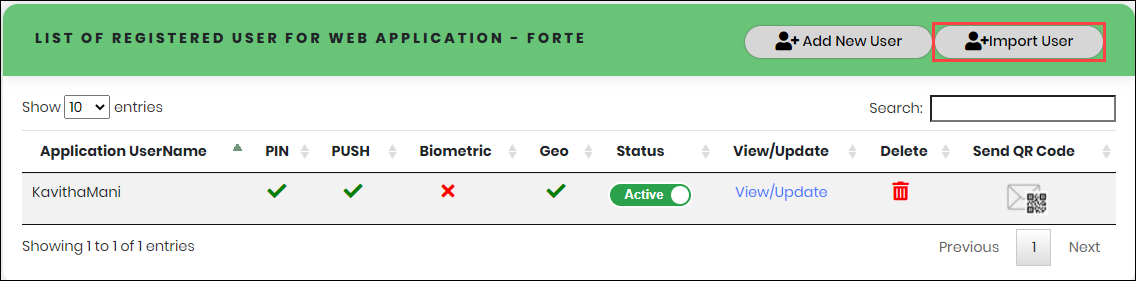
Figure 64 - Application User List view
The System displays the “Download/Upload Template” screen.
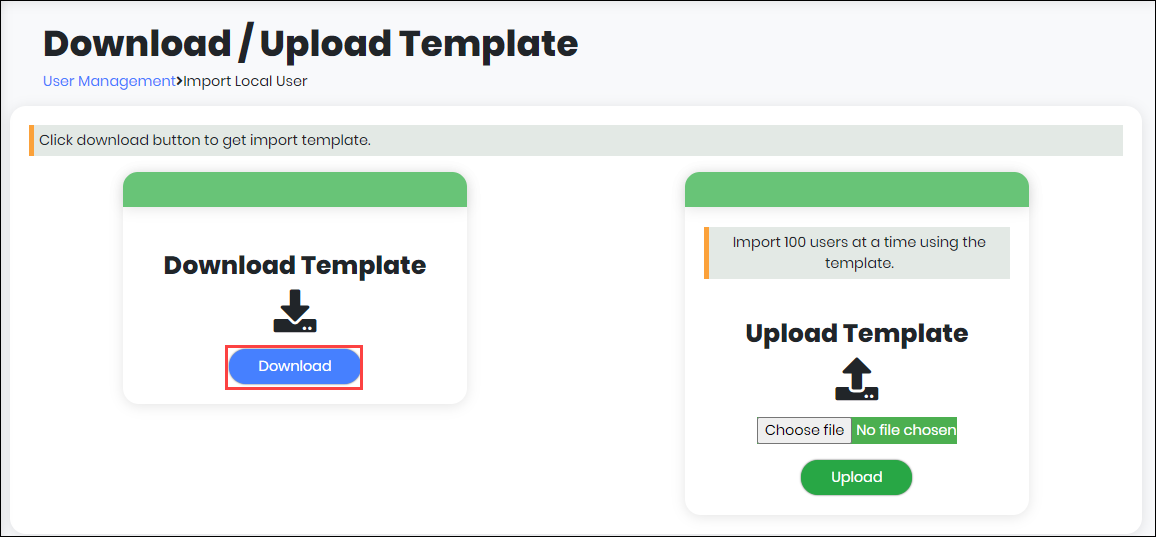
Figure 65 - Download/Upload Template screen
Note: Please read the instruction sheet of the template before populating the data.
Date Entry Sheet:
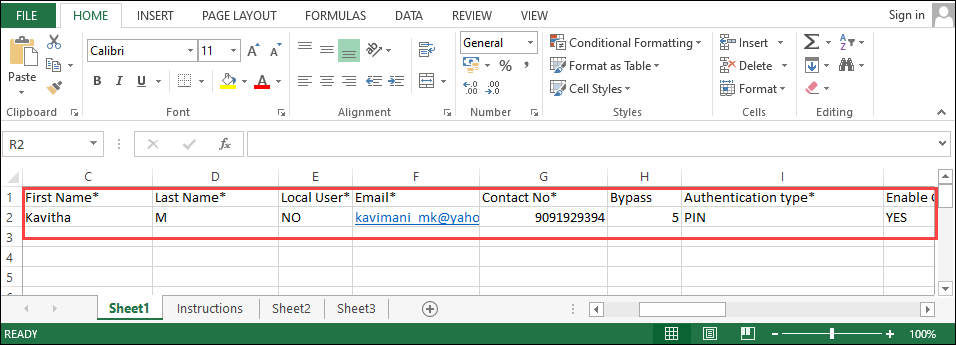
Figure 65.1 - Data entry Sheet
Instruction Sheet:
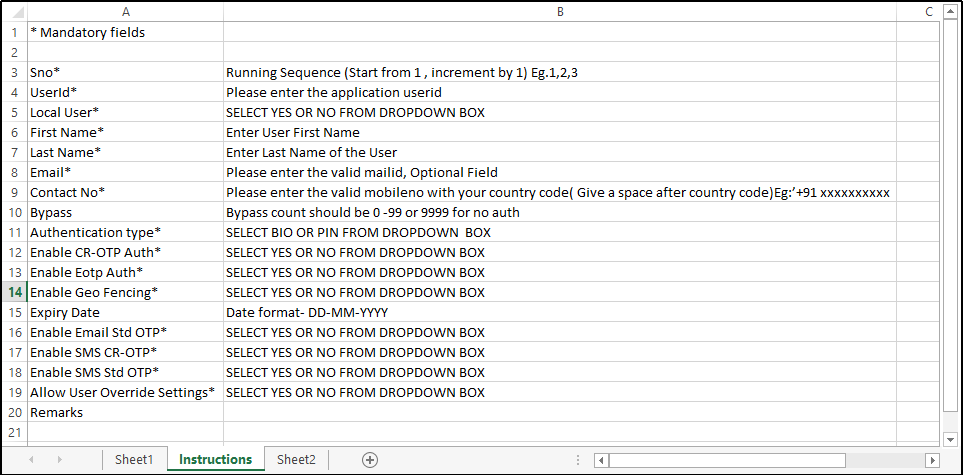
Figure 65.2 - Instruction Sheet
The System displays below success message

Figure 66 - Import User Details Success Message
Below snapshot shows the sample imported data.
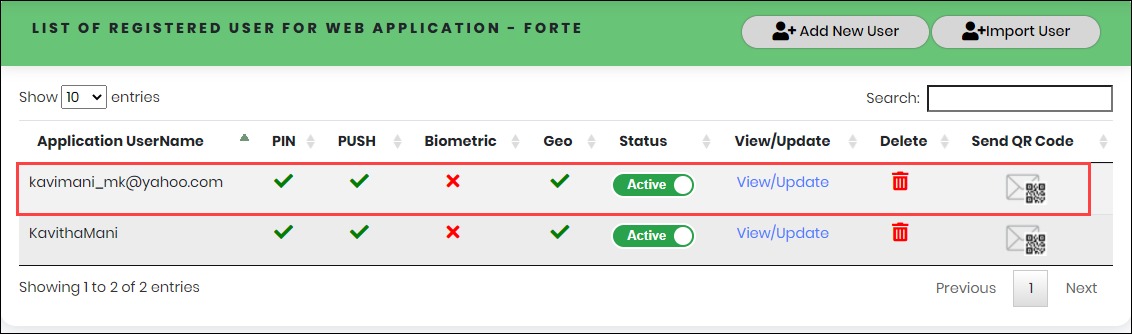
Figure 67 - Sample Imported User Data
Enabling/Disabling User Status
- In the Application User list view, use toggle button corresponding to the Application User. The system displays “Inactive User” popup message.
- Click “Confirm” to disable the the selected User.
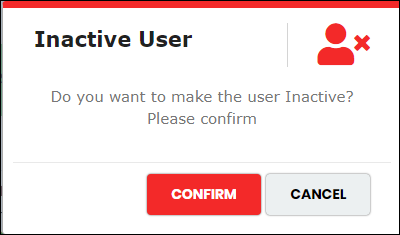
Figure 68 - Inactive User Pop-up
Note: Click “Cancel” to exit disabling User without saving.
Viewing/Updating User Information
- In the Application User list view, click “View/Update” link corresponding to the Application User.
- Update below parameters, if needs to be modified
- Email Address
- User Type
- OU Name
- Domain Name
- Contact Number 1
- Contact Number 2
- Preferred Number
- Allow Override Settings
- Enable Geo Fencing
- Preferred Auth Mode
- Preferred Online Authentication
- Preferred Offline Authentication
- Time Based Settings
- Bypass Settings
- If the Contact Number of the user is updated then the following alert box will be shown on the system.
- Click “Update” to save all changes.
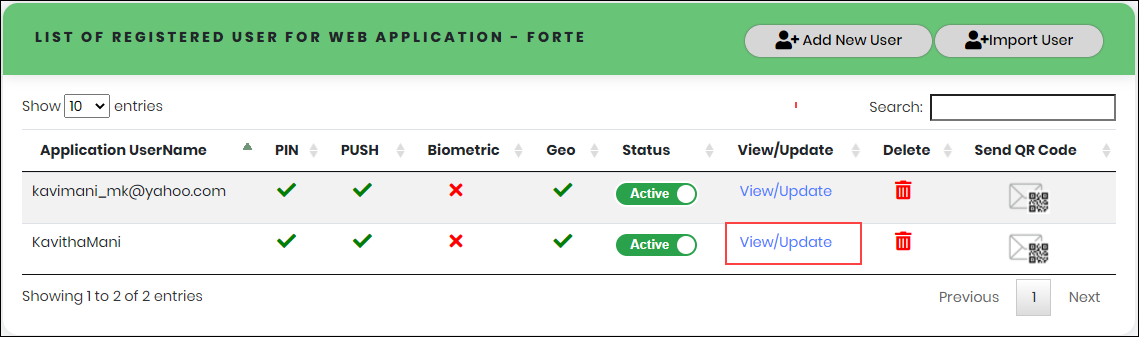
Figure 69 - List of Registered users list
The system displays the “Edit Application User” page as in Figure 76.
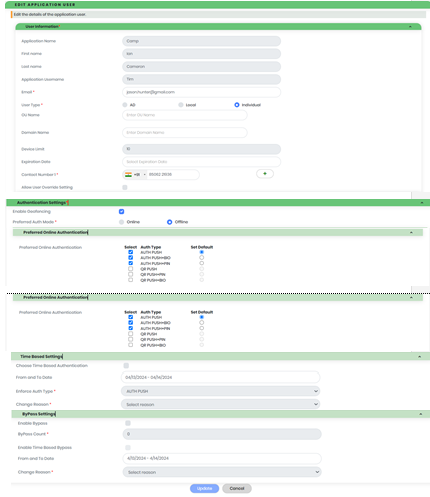
Figure 70 - Edit Application User Info

Figure 71 - Pop-up when Updating Contact Info of User
Device connected with the application user’s contact number will be deleted from the portal automatically
Note:An update to the contact number or email will display the reason drop-down for selecting or entering the update reason
Note:Click “Cancel”, to avoid saving any change and navigate to Registered User List view.
Deleting Application User Account
- In the Application User list view, click “Delete” icon corresponding to the Application User. The system displays the below confirmation message to delete
the Application User.
- Click “Confirm” to remove the selected User. The system displays below success message, as below.
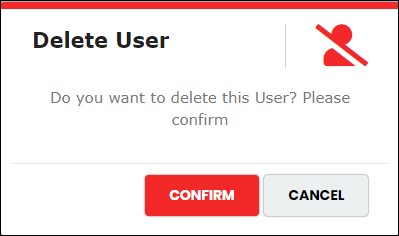
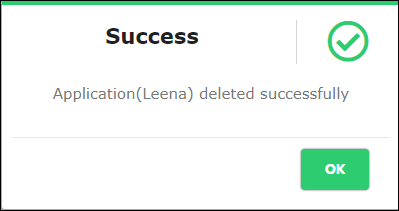
Figure 73 - Application Delete Success Message
Note:Click “CANCEL” in the Delete User popup to exit the deleting process.
Sending QR code to Application User
- In the Application User List view as shown in below figure, click “Send QR Code”
 icon corresponding to the Application User.
- Clicking the QR icon will display a pop-up for choosing the contact number to trigger the QR device registration.
- To send the QR code to the chosen number, Device binding must be completed. If the device binding is not initiated, it will display an error as shown in Figure 81
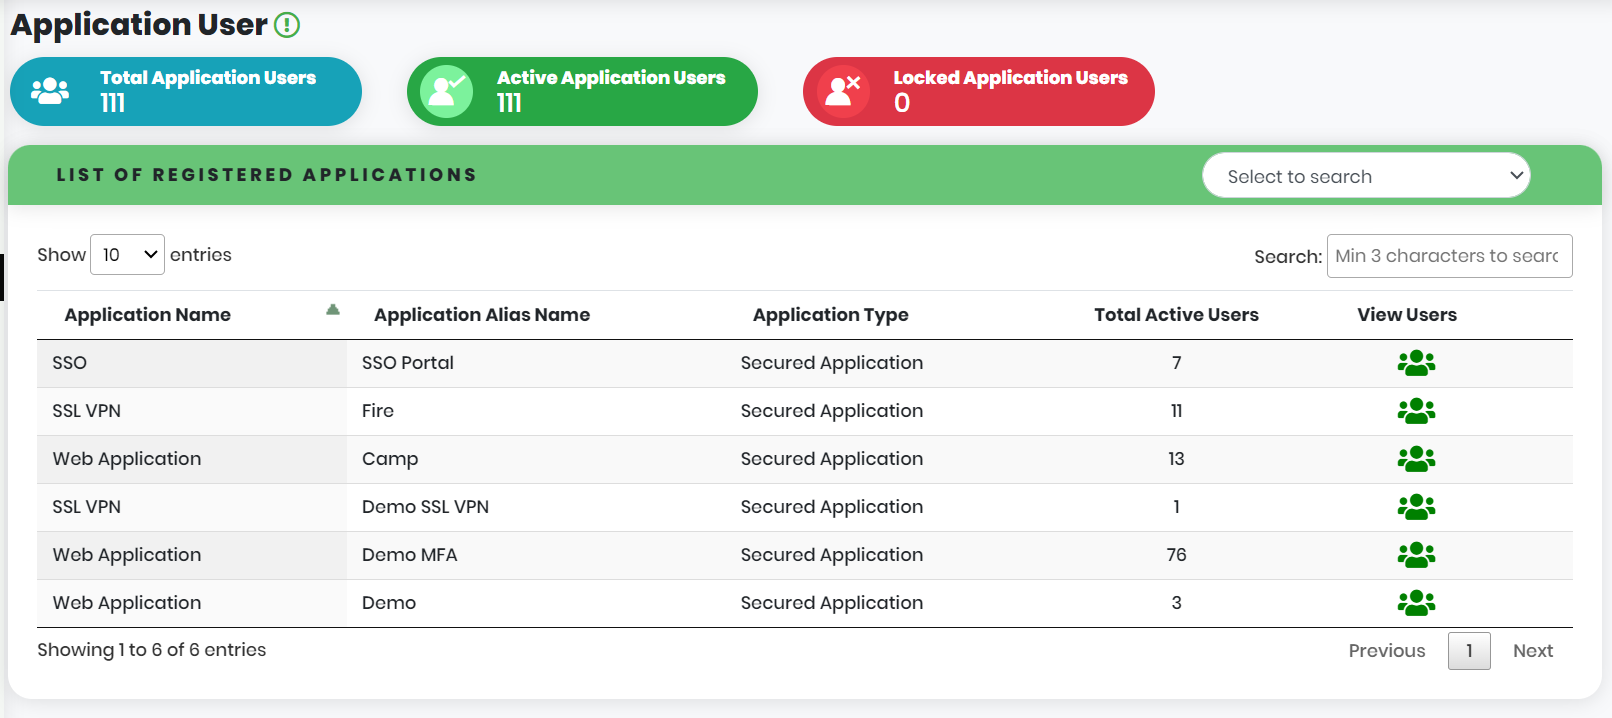
Figure 74 - Application User List view
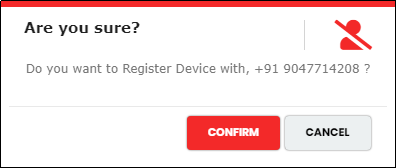
Figure 75 - Pop-up to confirm Contact Number
Note:The System sends the QR code to the Application User Email address as below sample.
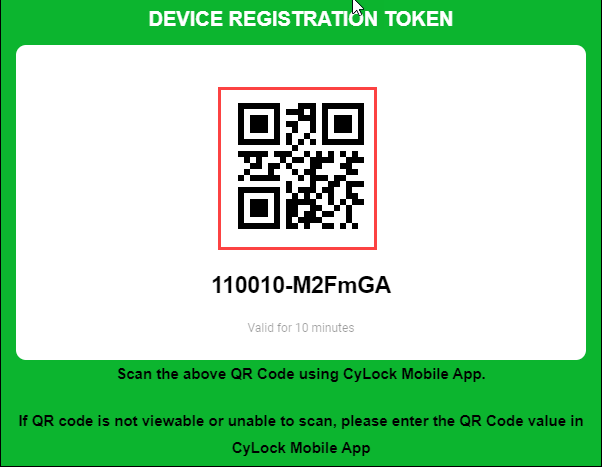
Figure 76 - Device Registration Token
The system displays the success message as shown below:

Figure 77 - QR code sent Success Message
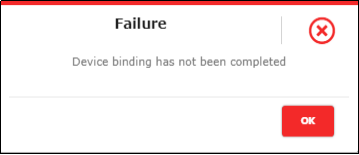
Figure 78 - Device binding incomplete Message
Devices
Devices allow Organization Administrator to change default device for application user, view or update registered device information and delete registered device.
From the Main menu, click Devices to display the Device Dashboard on the right pane. Devices Dashboard displays metrics and List of Registered Devices as shown below.
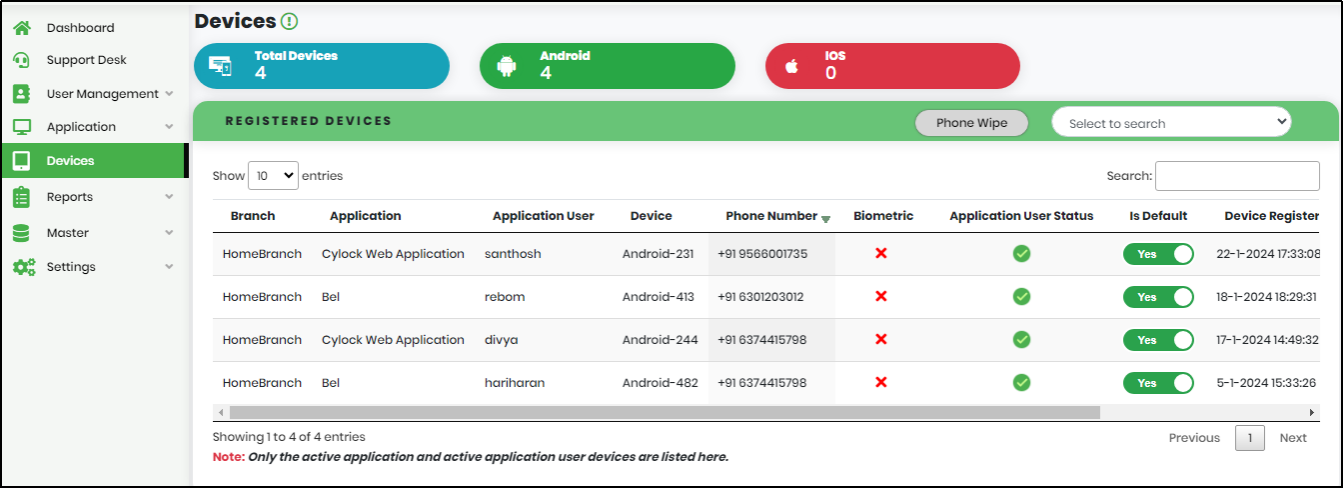
Figure 82 - Devices Dashboard
Metrics includes Total devices that are registered, Number of Android devices and Number of IOS devices.
Registered Devices list view include below parameters
- Branch – User Account Branch Name
- Application – Application Name to which User is associated
- Application User – Username given when User is associated to Application
- Device – Name of the Device
- Phone Number – Phone Number associated with the registered mobile device
- Biometric –Biometric available in mobile device
- Application User Status –Application users active status/li>
- Is Default – Primary registered device used for notification/authentication
- Is Registered Date –Device registered date
- View/Update – View or Update the device information
- Delete – Delete device, only if registered device is not default
Changing default device
- In the Registered Devices list view, use “No” toggle button, to make one of the registered devices of an Application User, as default.
- Click “Confirm” to make Is Default status as “Yes” corresponding to the selected device.
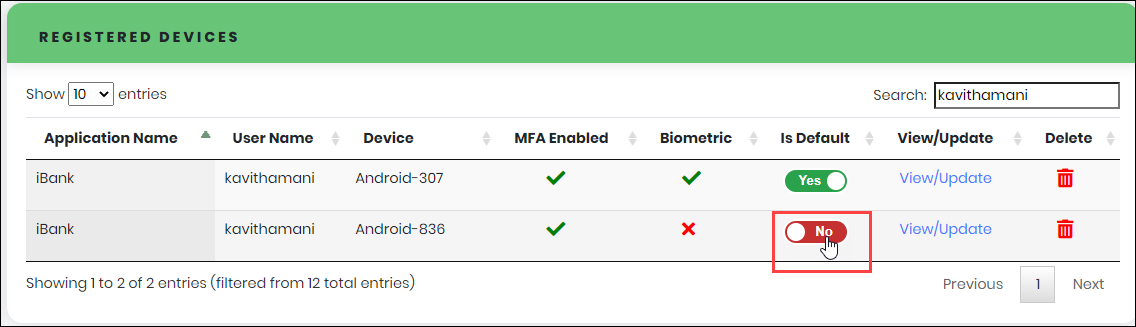
Figure 83 - Registered Devices
The system displays the below confirmation message
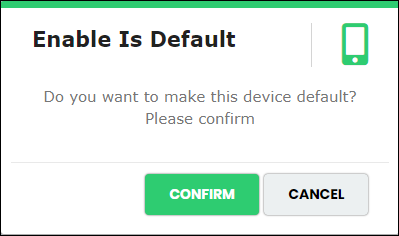
Figure 84 - Device default confirmation message
Note: The other registered device is automatically updated as “NO” in Is default status. If only one device is registered it will automatically set as Default device. If user tries to set “No” in Is default, it shows an pop-up message as shown in Figure
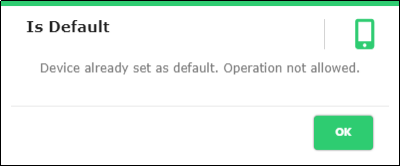
Figure 85 - Device default pop up message
Viewing/Updating Device Details
- In the Registered Devices list view, click “View/Update” corresponding to the registered device as shown in figure.
- Click “+” to add Geo Fencing to navigate to Add Geo Location screen.
- In the “Add Geo Location” screen, enter address and Radius (KM) within which mobile device can receive notification or User can do authentication.
- Click “Search” to get Geographical location of the address.
- Select the Location, as appropriate.
- Click “Add” to update Geo-Fencing Details as shown below.
- Click “Active” toggle button to inactivate the corresponding location.
- Click “View/Update” to edit Geo Location
- Click delete icon , to delete the corresponding location.
The system navigates to the Edit Registered User details screen as below.
Note: Except Geo Fencing, all parameters are read-only.
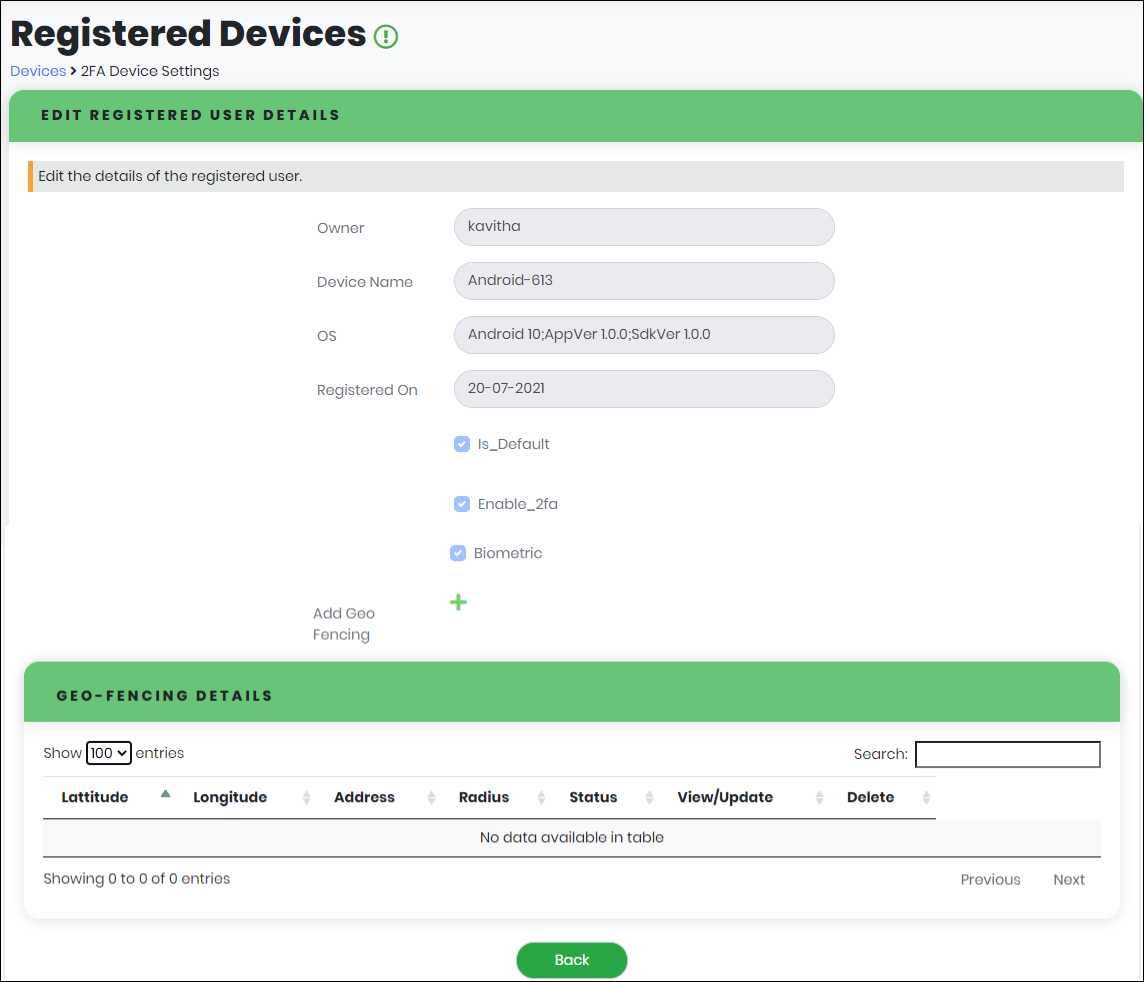
Figure 86 - Edit Registered User Details
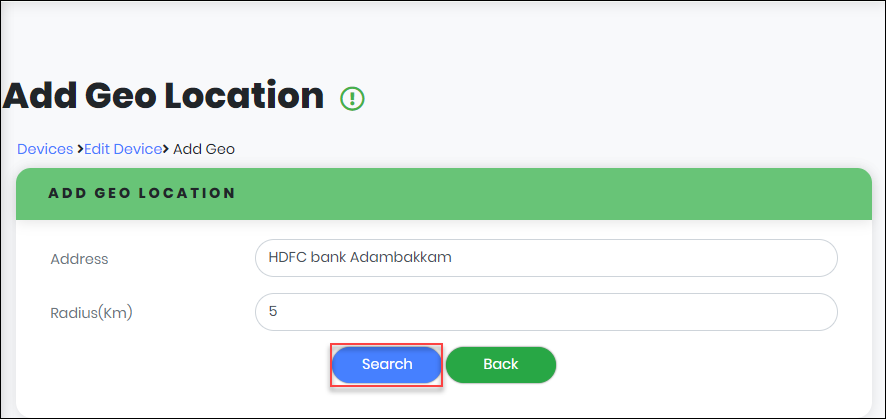
Figure 87 - Add Geo Location screen
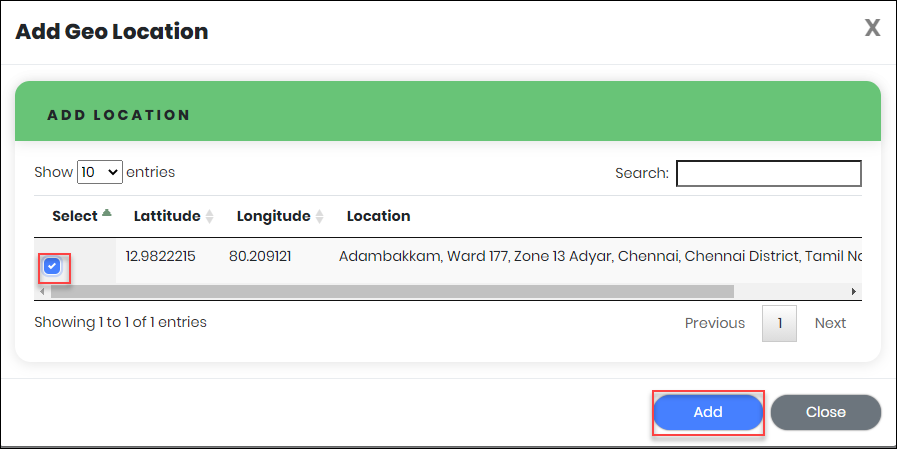
Figure 88 - Add Geo Location list view
Note: If Location is inappropriate, Use “Search” option to get exact Geographical location.
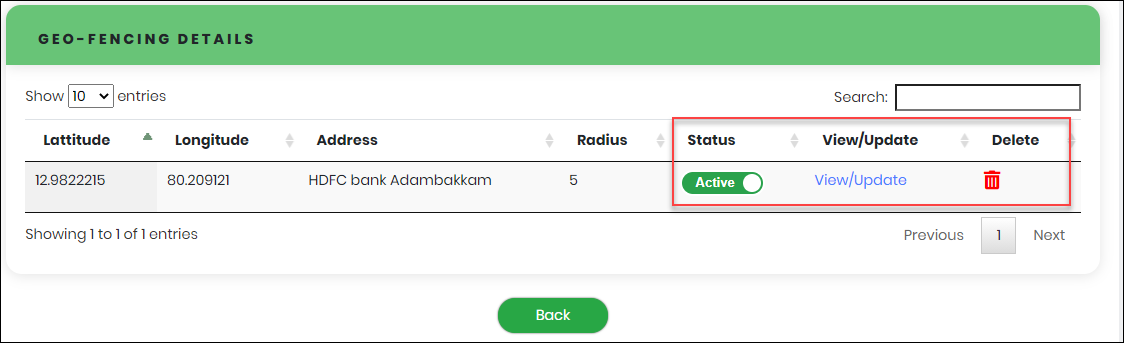
Figure 89 - Geo Fencing Details
In the Geo-Fencing Details, the Organization Administrator can perform below actions, if necessary.
Deleting Devices
- In the Registered Devices list view, click delete icon corresponding to the registered device.
- Click “Confirm” to remove the device from this list.
The system displays below confirmation message.
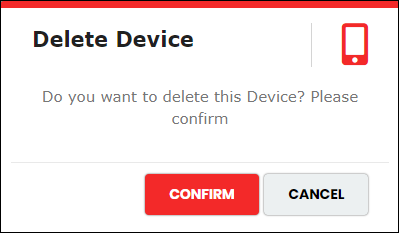
Figure 90 - Delete device confirmation Pop-up
The system throws failure message, if the registered device is default as below.
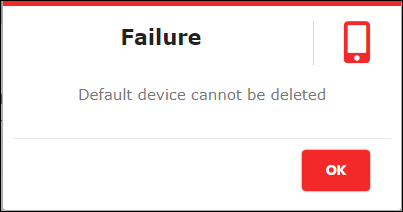
Figure 91 - Delete Failure Pop-up
Reports
Administrators are allowed to generate different reports such as Audit History, Request Log and so on as shown in Figure below. For customized users, based on the privilege given, they can access the reports.
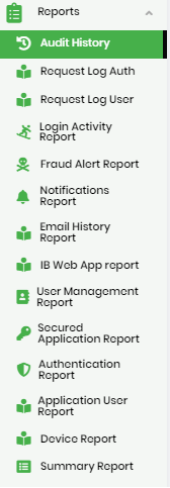
Figure 92 - Reports
Audit History
Generating Audit History
- On expanding Reports menu, click “Audit History” to display Audit History page as shown below.
- Select the “Audit Table” for which audit history has to be generated, from the dropdown menu that includes below options
- Organization
- Portal User
- Secure Application
- Application User
- Device
- Local User
- Password Policy
- Customer Config
- Organization:
- Portal User:
- Secure Application:
- Application User:
- Device
- Local User:
- Password Policy:
- Customer Config:
- Select “From Date” and “To Date” to get report for particular time period.
- Click “Filter” icon to generate the Audit History Report.
- Select a field in the “Select to search” box to refine the Search as shown in Figure below
- Enter minimum 3 characters in the “Search” box to get particular Audit History report.
- The list view displays 10 transactions in a page and can be customized using the drop-down selection as shown below.
- Click to save the search results as PDF File.
- Click to save the search results as Excel File.
- Click
 icon to list the column name to be displayed
 - “Select to Search” drop down varies for each Audit in “Audit table”
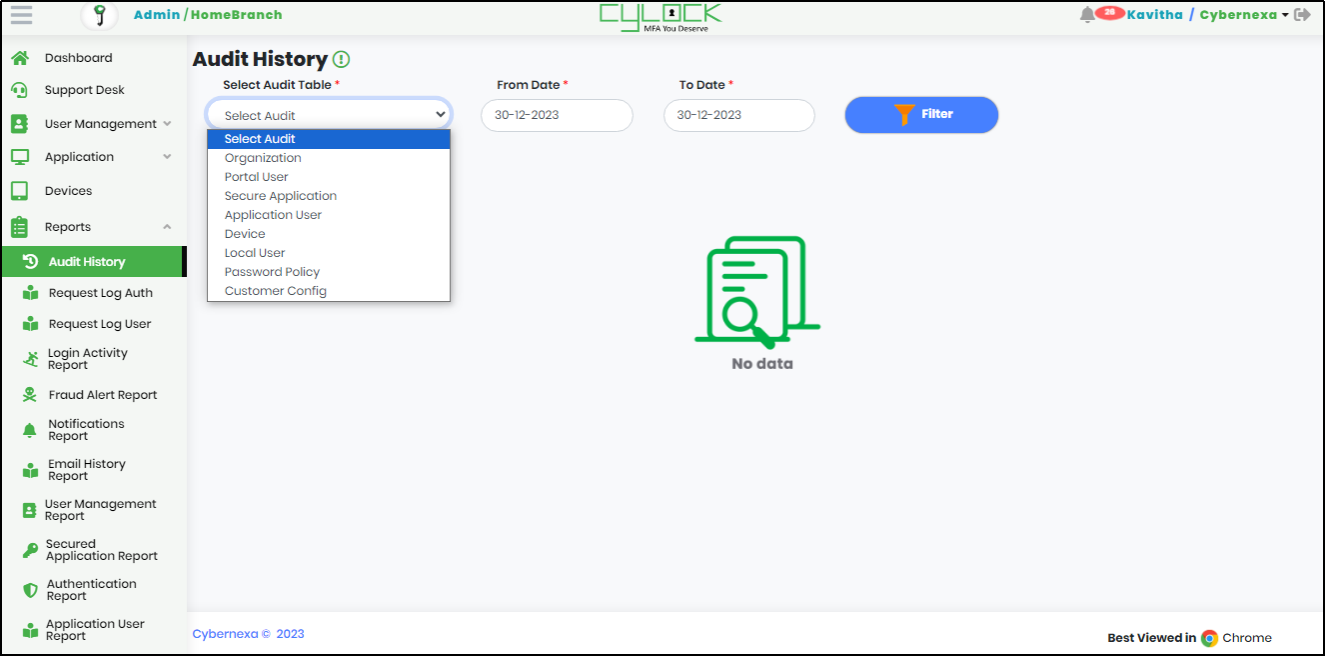
Figure 93 - Audit History screen
Audit Table
Various Audit Reports can be generated based on the Audit Table selection.
Organization Audit History displays below customizable columns that can be checked / unchecked to appear in the report.
Portal User Audit History displays Creation, deletion, updation of portal users that can be checked / unchecked to appear in the report.
Secure Application Audit History displays Creation, Deletion and updation of new application and that can be checked / unchecked to appear in the report.
Application User Audit History displays Creation, Deletion and updation of new application user against a particular application and that can be checked / unchecked to appear in the report.
Device Audit History displays new registration, updation, OS updation of a device and that can be checked / unchecked to appear in the report.
Local Audit History displays Creation, Deletion and updation of local user and that can be checked / unchecked to appear in the report.
Password policy Audit History displays Creation, Deletion and updation of new password policy and that can be checked / unchecked to appear in the report.
Customer Config Audit History displays below customizable columns that can be checked / unchecked to appear in the report.
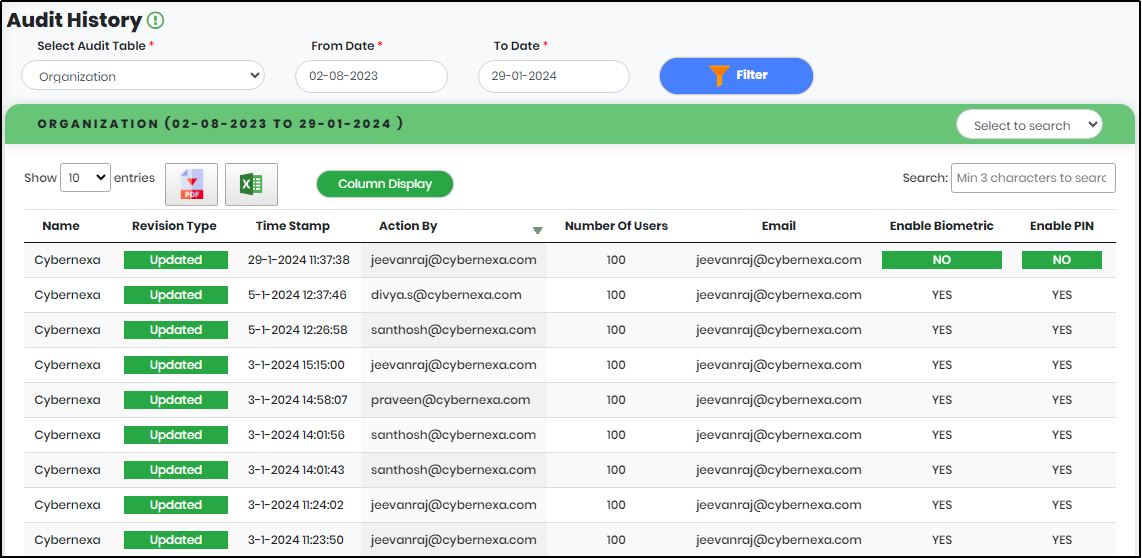
Figure 94 - Audit History list view
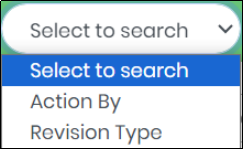
Figure 94.1 - Select to Search Drop-Down
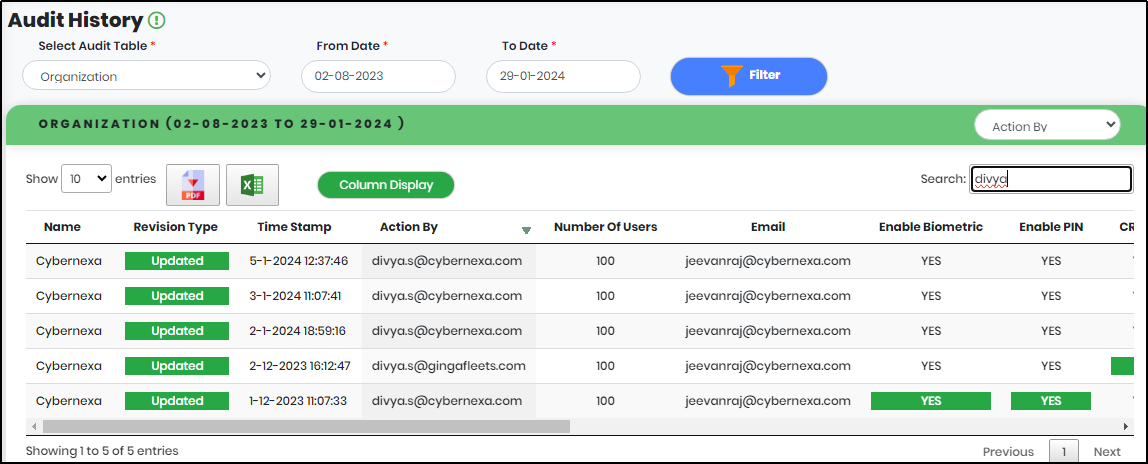
Figure 94.2 - Audit history search result
Note:
Figure 94.3 - List View
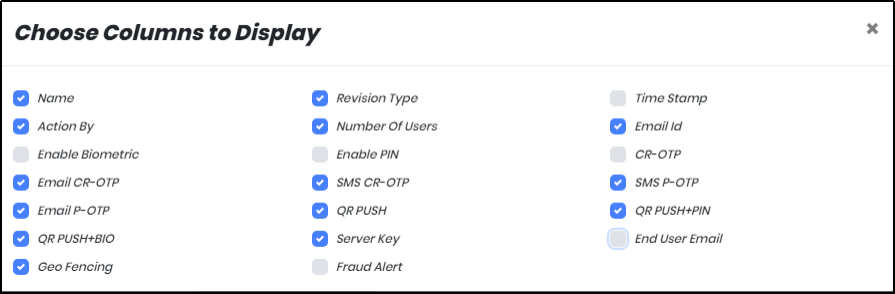
Figure 94.4 - Columns to Display List
Request Log Auth
Generating Request Log
1.On expanding Reports menu, click “Request Log” to display Request Log Auth page as shown below.
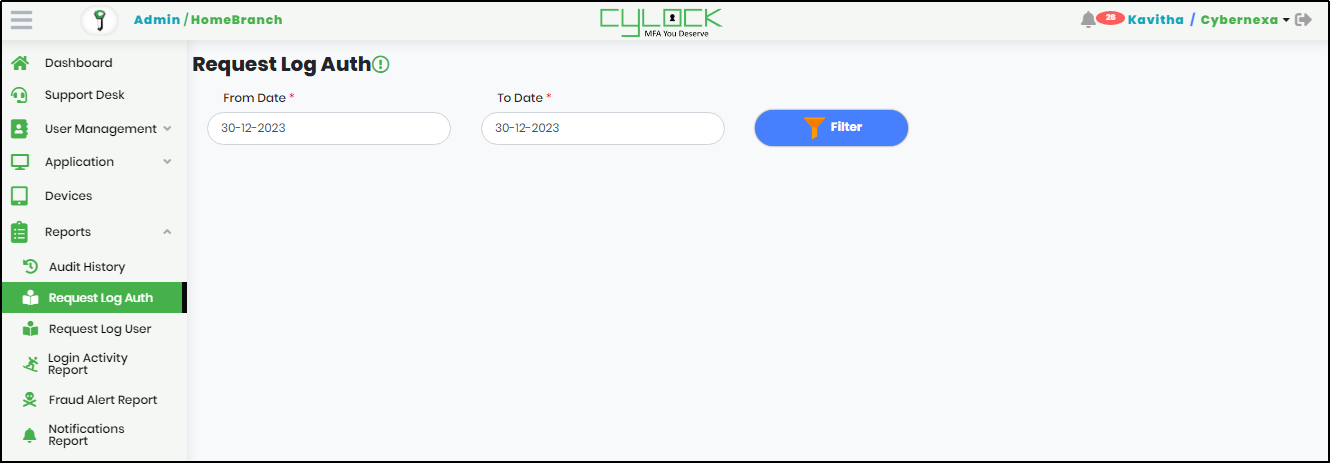
Figure 95 - Request Log Auth
2.In Request Log Auth page, Select “From Date” and “To Date” to get report for particular time period
3.Click “Filter” icon to generate the Request Log Auth Report.
Request Log Auth list includes below columns as shown in Figure below, so as to track the status of User Request
- Application Username
- Request Endpoint
- Request Source
- Transaction Id
- Request time
- Response Time
- Request Post Parameter
- Response Content
- Response Code
- Request User Agent
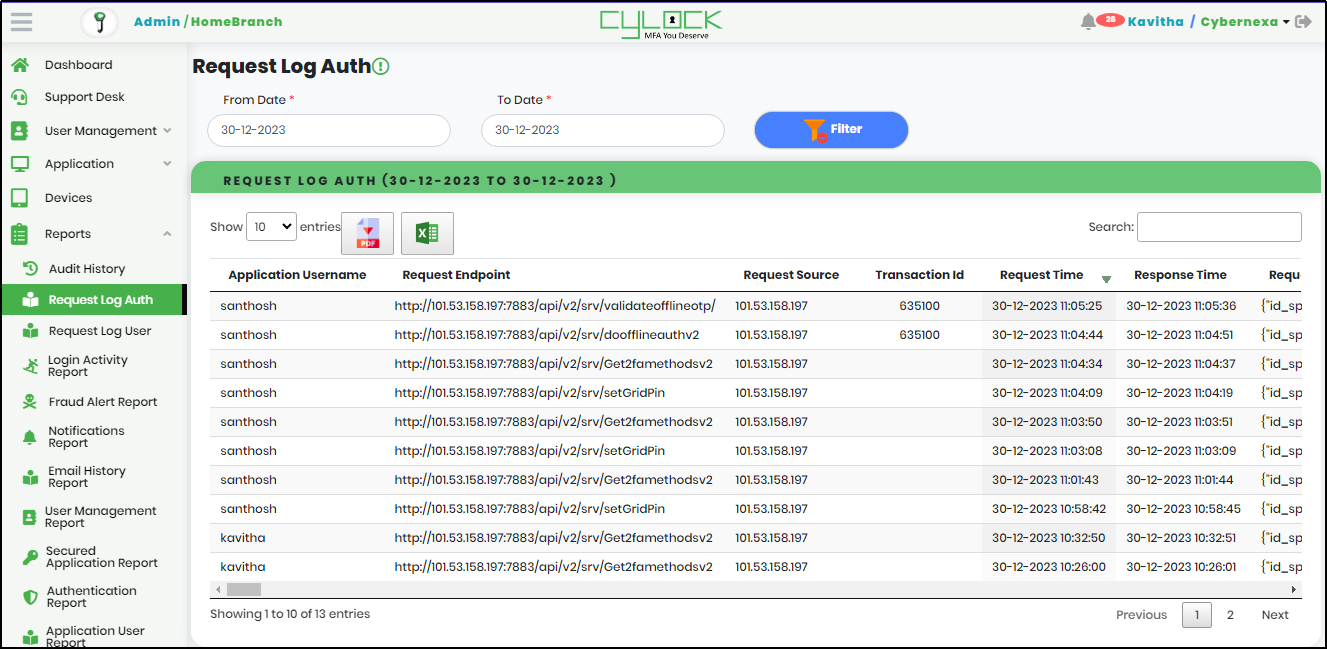
Figure 96 - Request Log Auth List View
4.Enter Username in the Search box to get particular User Information.
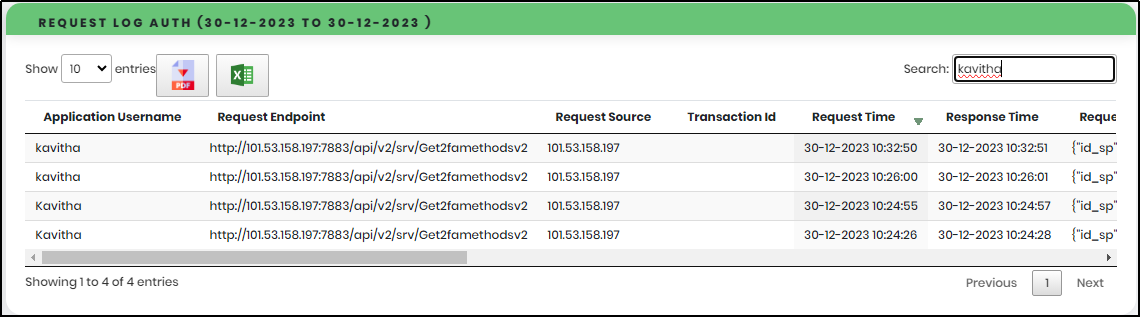
Figure 96.1 - Request Response Log
Note:
- The list view displays 10 transactions in a page and can be customized using the drop-down selection as shown below.
- Click to save the search results as PDF File.
- Click to save the search results as Excel File.
Figure 96.2 - List View
Request Log User
Generating Request log user Report
1.On expanding Reports menu, click “Request Log User” to display Request Log User page as shown below.
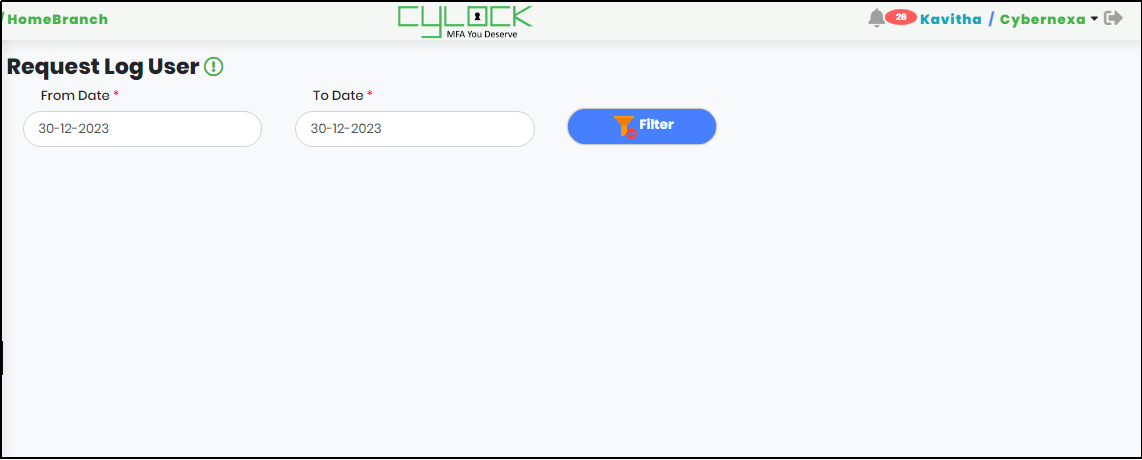
Figure 97 - Request Log User screen
2.Select “From Date” and “To Date” to get Request Log User report for a particular period.
3.Click “Filter” to generate the Request Log User Report.
Figure 96 - Request Log Auth List View
4.Select a field in the “Select to search” box to refine the Search as shown in Figure below
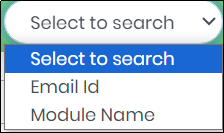
Figure 98.1 - Select to Search Drop-Down
5.Enter minimum 3 characters in the “Search” box to get particular User log report.
Note:
- The list view displays 10 transactions in a page and can be customized using the drop-down selection as shown below.
- Click to save the search results as PDF File.
- Click to save the search results as Excel File.
Figure 98.2 - List View
Login Activity Report
The Login Activity Report provides Login and Logout time stamp of CyLock MFA Portal application by all Users.
Generating Login Activity Report
- On expanding Reports menu, click “Login Activity” to display Login Activity report as shown below.
- Select “From Date” and “To Date” to get Login Activity for a particular period.
- Click Filter to generate the Login Activity Report.
- Select a field in the “Search a field to search” box to refine the Search.
- Enter minimum 3 characters in the “Search” box to get particular User Activity report as shown below.
- The list view displays 10 transactions in a page and can be customized using the drop-down selection as shown below.
- Click to save the search results as PDF File.
- Click to save the search results as Excel File.
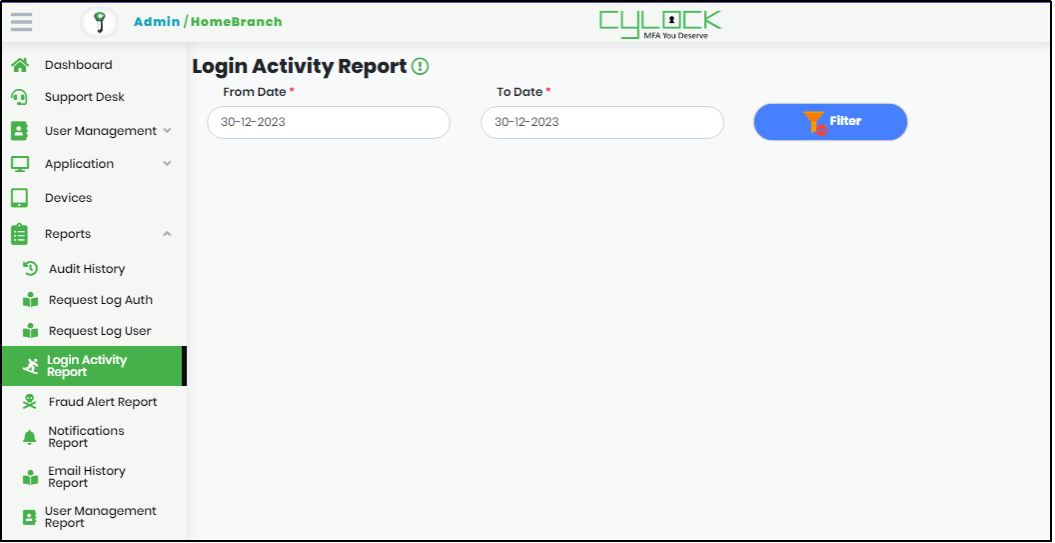
Figure 99 - Login Activity Report Screen
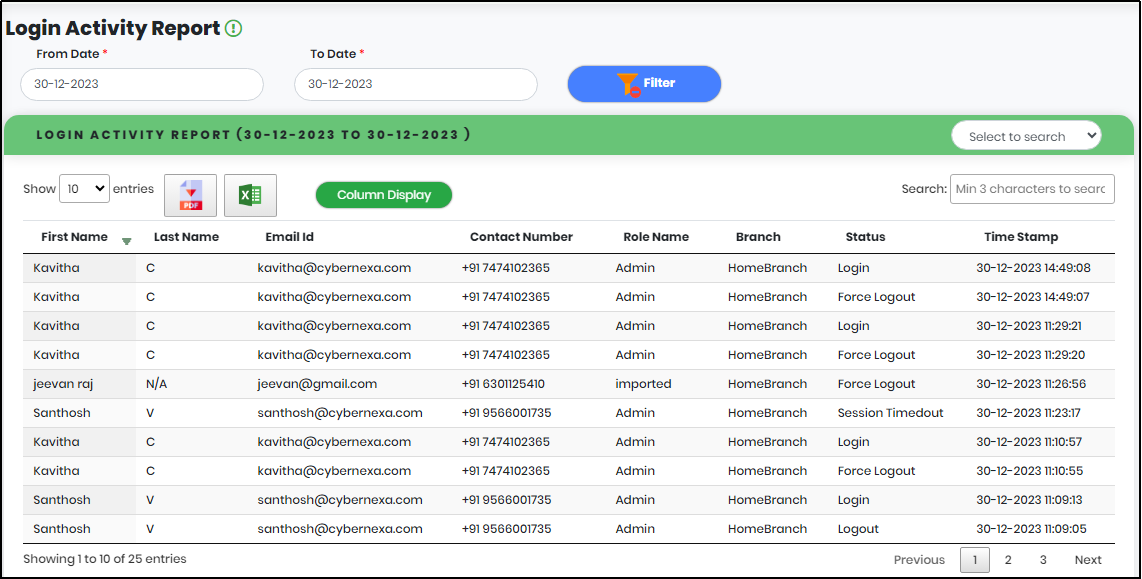
Figure 100 - User Login Activity List view
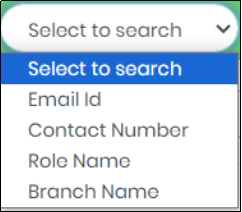
Figure 100.1 - Select to Search Drop-Down
Figure 100.2 - Login Activity Search result
Note:
Figure 100.3 - List View
Fraud Alert Report
Generating Fraud Alert Report
1.On expanding Reports menu, click “Fraud Alert” to display Fraud Alert report as shown below.
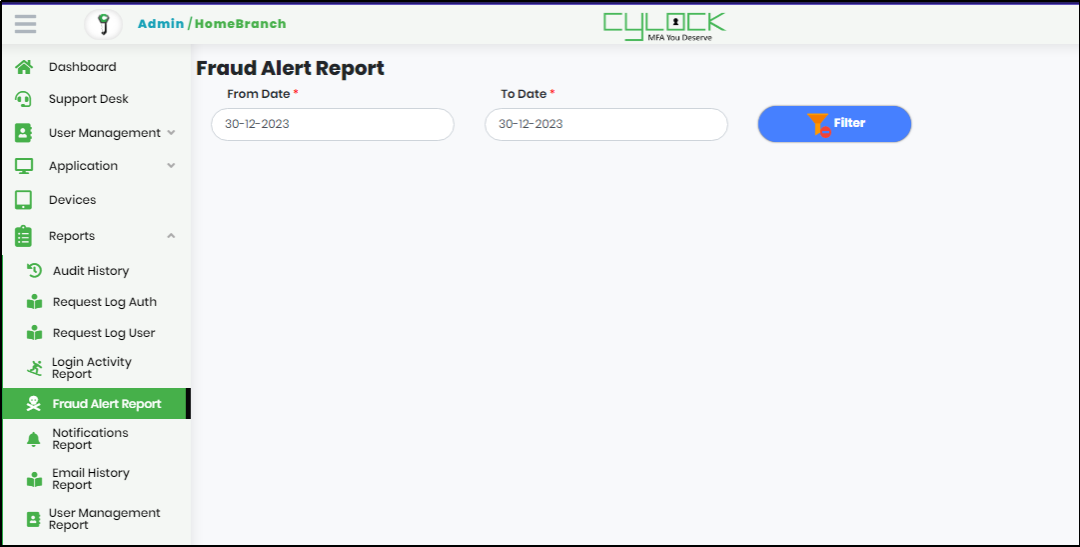
Figure 101 - Fraud Alert Report Screen
2.Select “From Date” and “To Date” to get Fraud Alert for a particular period.
3.Click “Filter” to generate the Fraud Alert Report.
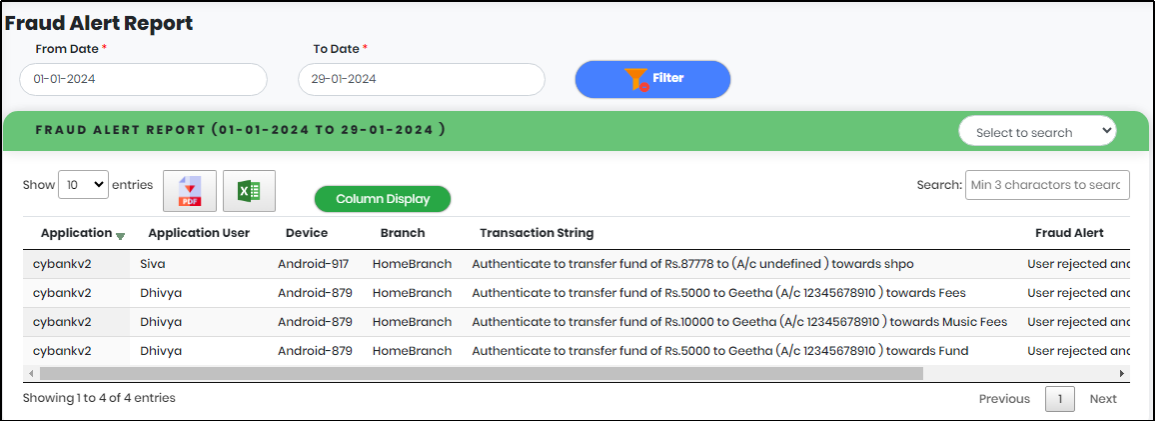
Figure 102 - Fraud Alert Report list view
4.Select a field in the “Select to search” box to refine the Search.
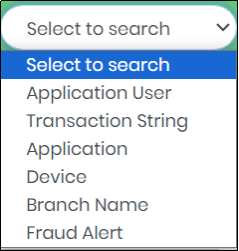
Figure 102.1 - Select to Search Drop-Down
5.Enter minimum 3 characters in the “Search” box to get particular Fraud Alert Activity report.
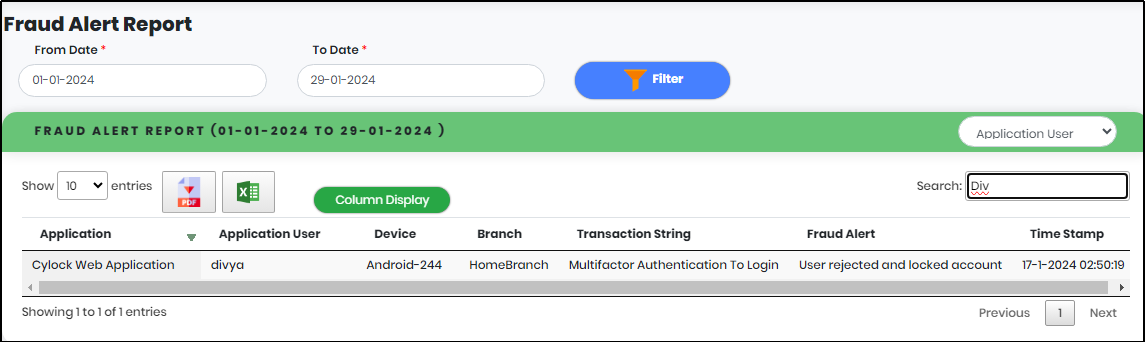
Figure 102.2 - Fraud Alert search result
Note:
- The list view displays 10 transactions in a page and can be customized using the drop-down selection as shown below.
- Click to save the search results as PDF File.
- Click to save the search results as Excel File.
- Click “Column to Display” icon to customize the columns to be displayed.
Figure 102.3 - List View

Figure 102.4 - Columns to Display
Notifications Report
Generating Notifications Report
1.On expanding Reports menu, click “Notification” sub menu to display Notification report as shown below.

Figure 103 - Notification Report Screen
2.Select “From Date” and “To Date” to get Notifications of a particular period.
3.Click “Filter” to generate the Notifications Report.
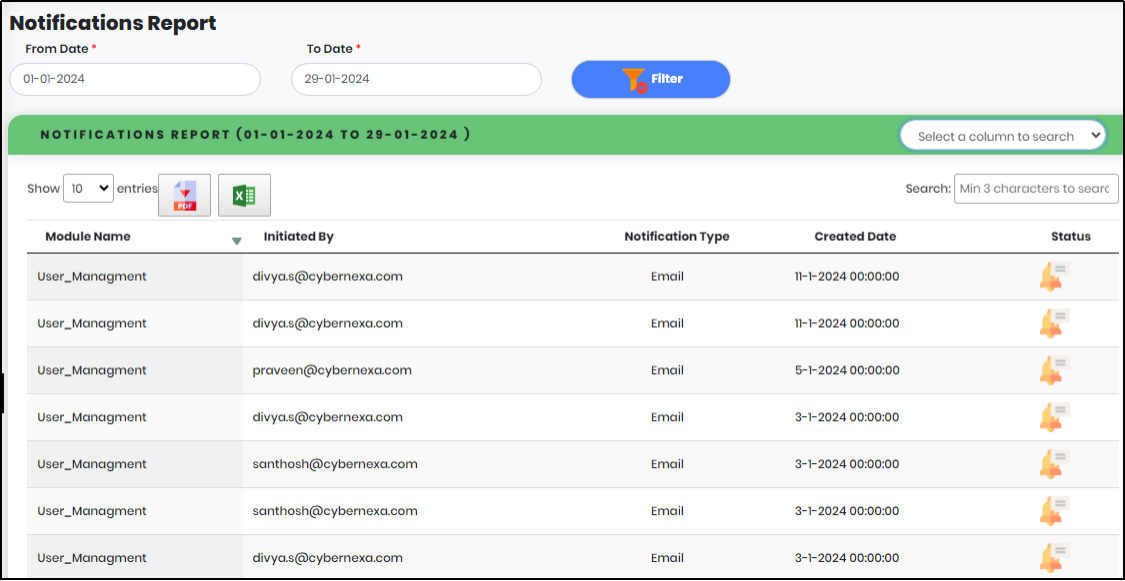
Figure 104 - Notification Report list view
Status icon displays the mail status as shown in Figure 110.1
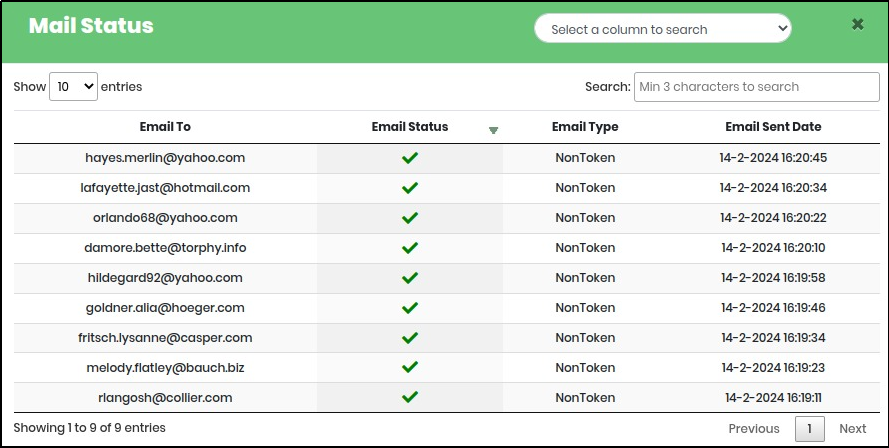
Figure 104.1 - Mail Status Screen
Figure 104.2 - Select to search drop-down
4.Select a field in the “Select to search” box to refine the Search.
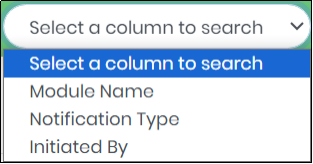
Figure 104.3 - Select a column to search Drop-Down
5.Enter minimum 3 characters in the “Search” box to get particular Fraud Activity report as shown below
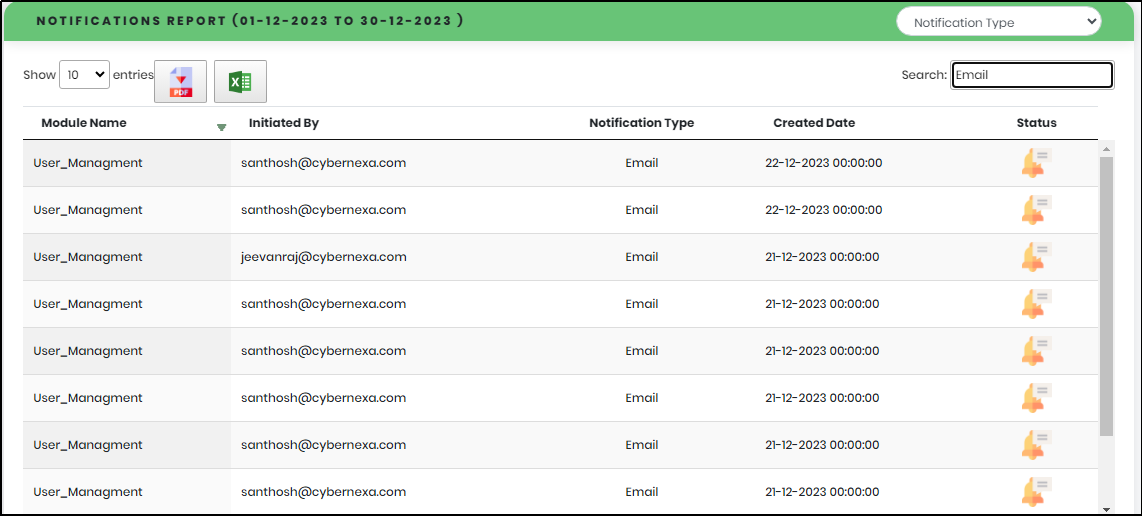
Figure 104.4 - Notifications search result
Note:
- The list view displays 10 transactions in a page and can be customized using the drop-down selection as shown below.
- Click to save the search results as PDF File.
- Click to save the search results as Excel File.
Figure 104.5 - List View
User Management Report
Generating User Management Report
1.On expanding Reports menu, click “User Management” to display User Management report as shown below.
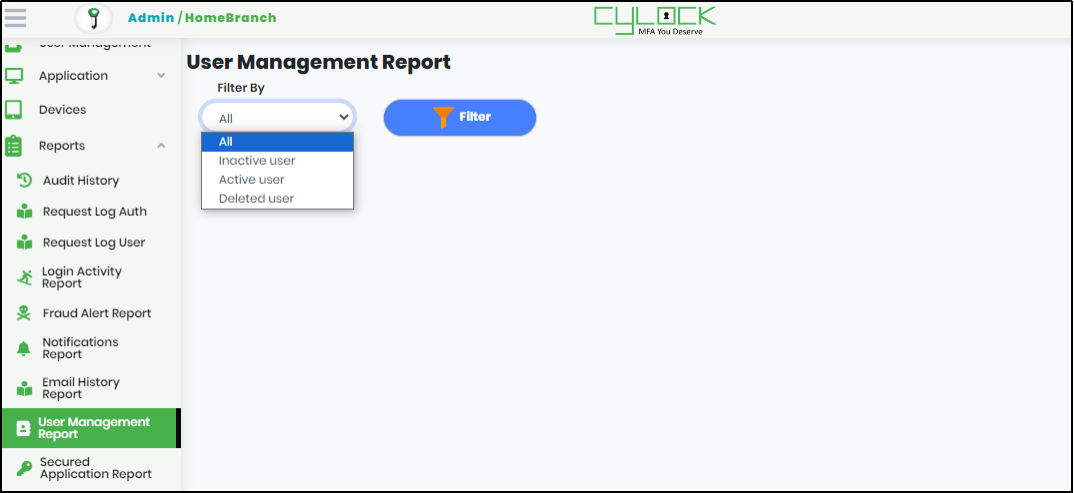
Figure 105 - User Management Report screen
2.Select the type of user from “Filter By” drop-down to display the report of the user.
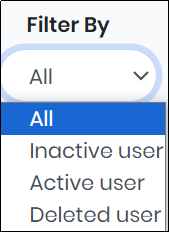
Figure 105.1 - Filter By Drop Down
3.Click “Filter” to generate the User Management Activity of a particular user.
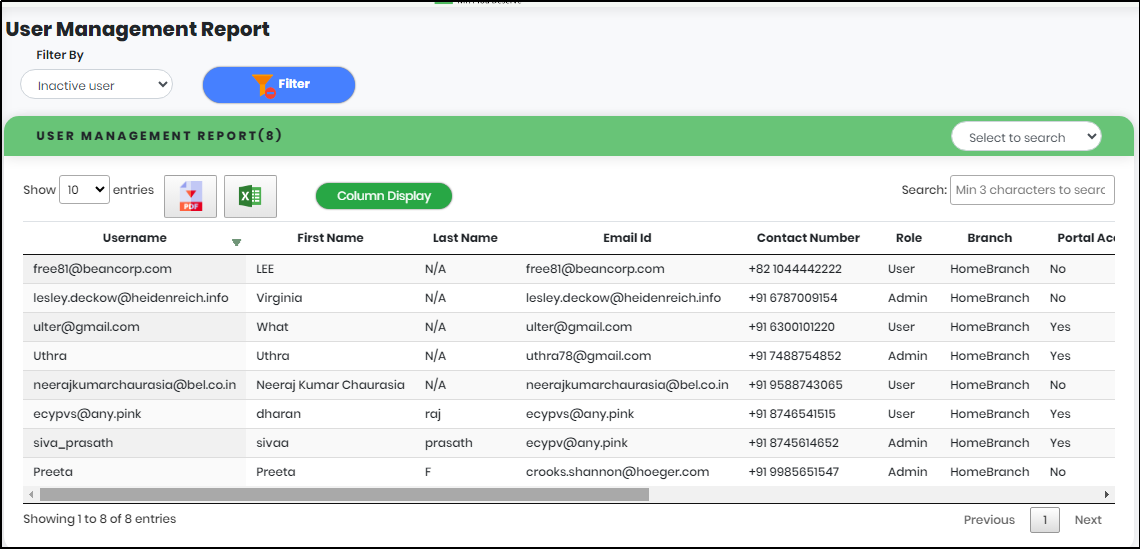
Figure 106 - User Management list view
4.Select a field in the “Select to search” box to refine the Search.
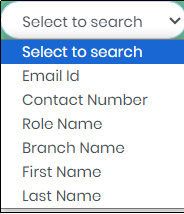
Figure 106.1 - Select to search drop-down
5.Enter minimum 3 characters in the “Search” box to get particular User Management Activity report as shown below.
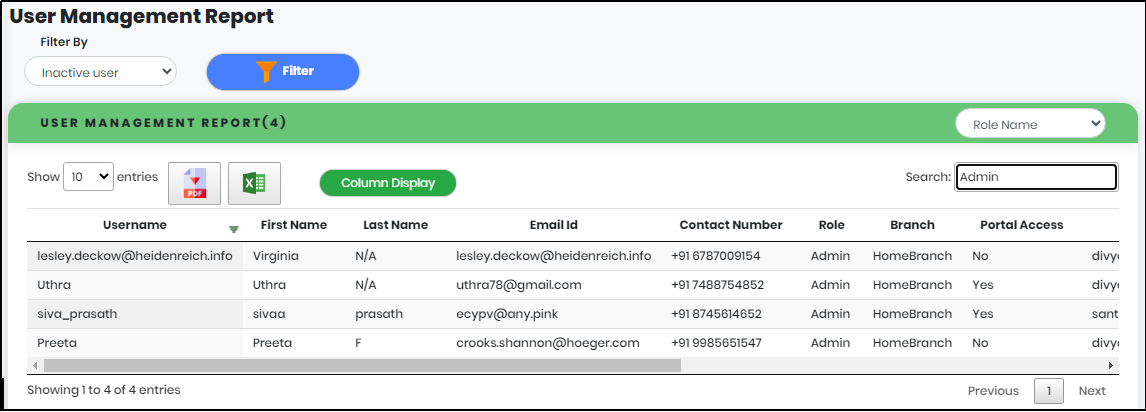
Figure 106.2 - User Management search result
Note:
- The list view displays 10 transactions in a page and can be customized using the drop-down selection as shown below.
- Click to save the search results as PDF File.
- Click to save the search results as Excel File.
- Click “Columns to Display” icon to select the columns that needs to be displayed.
Figure 104.5 - List View

Figure 106.4 - Choose Columns to Display screen
Secured Application Report
Generating Secured Applications Report
1.On expanding Reports menu, click “Secured Application” to display Secured Application report as shown below.
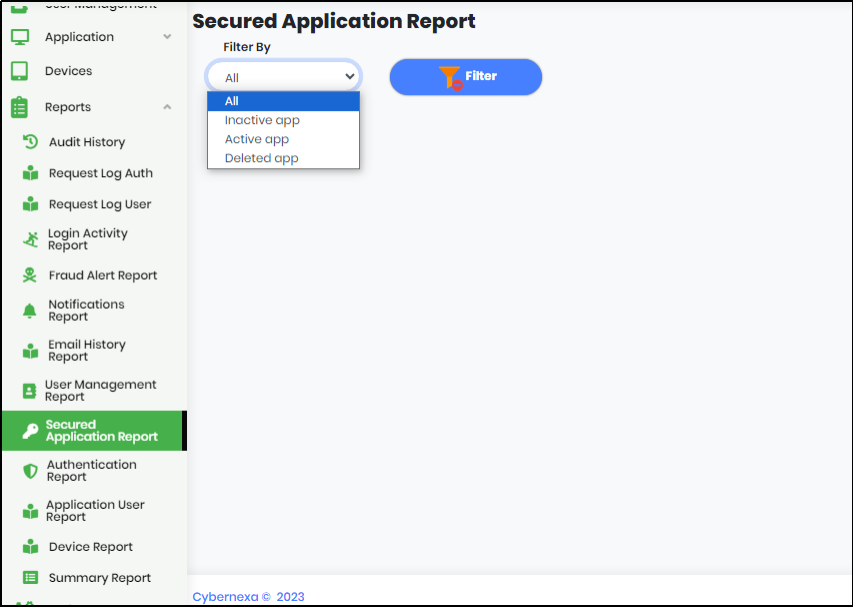
Figure 107 - Secured Application Report Screen
2.Select an application from “Filter By” to get Activity of particular Secured Application.

Figure 107.1 - Filter By drop down
3.Click “Filter” to generate the Secured Application Report.
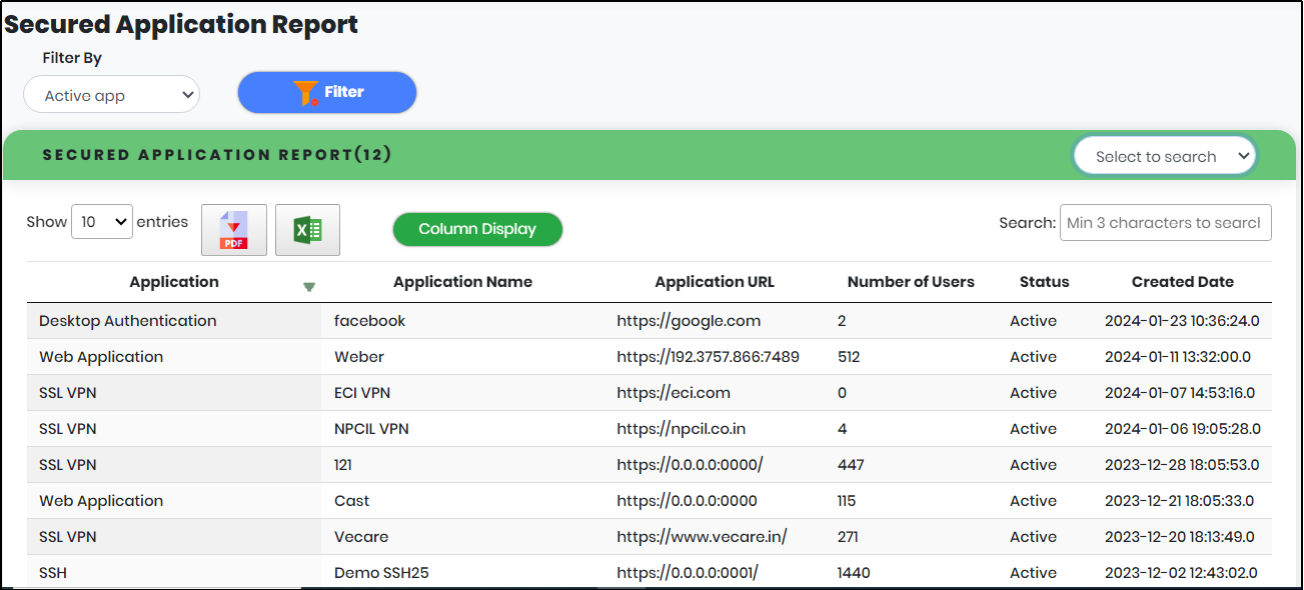
Figure 108 - Secured Application list view
4.Select a field in the “Select to search” box to refine the Search.

Figure 108.1 - Select to search drop down
5.Enter minimum 3 characters in the “Search” box to get particular Secured Application report as shown below.
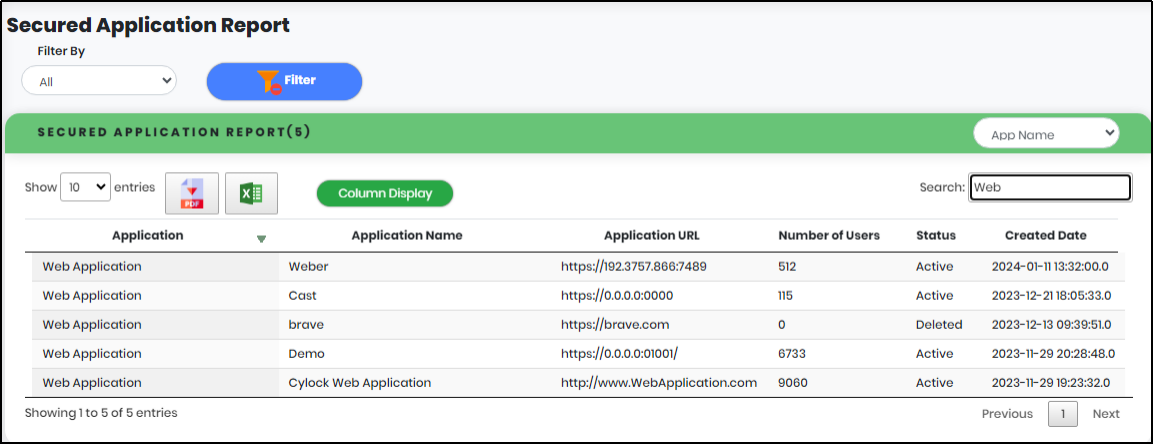
Figure 108.2 - Secured application search result
Note:
- The list view displays 10 transactions in a page and can be customized using the drop-down selection as shown below.
- Click to save the search results as PDF File.
- Click to save the search results as Excel File.
- Click “Columns to Display” icon to select the columns that needs to be displayed.
Figure 108.3 - List View

Figure 108.4 - Choose columns to display screen
Authentication Report
Generating Authentication Report
1.On expanding Reports menu, click “Authentication Report” to display Authentication report as shown in Figure 115.
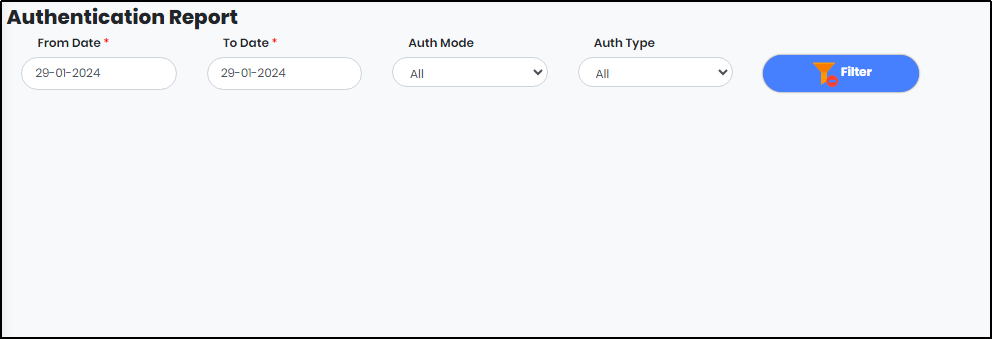
Figure 109 - Authentication report Screen
2.Select “From Date”, “To Date”, “Auth Mode” and “Auth Type” to get Authentication report for a particular period.
3.Click “Filter” to generate the Authentication Report.
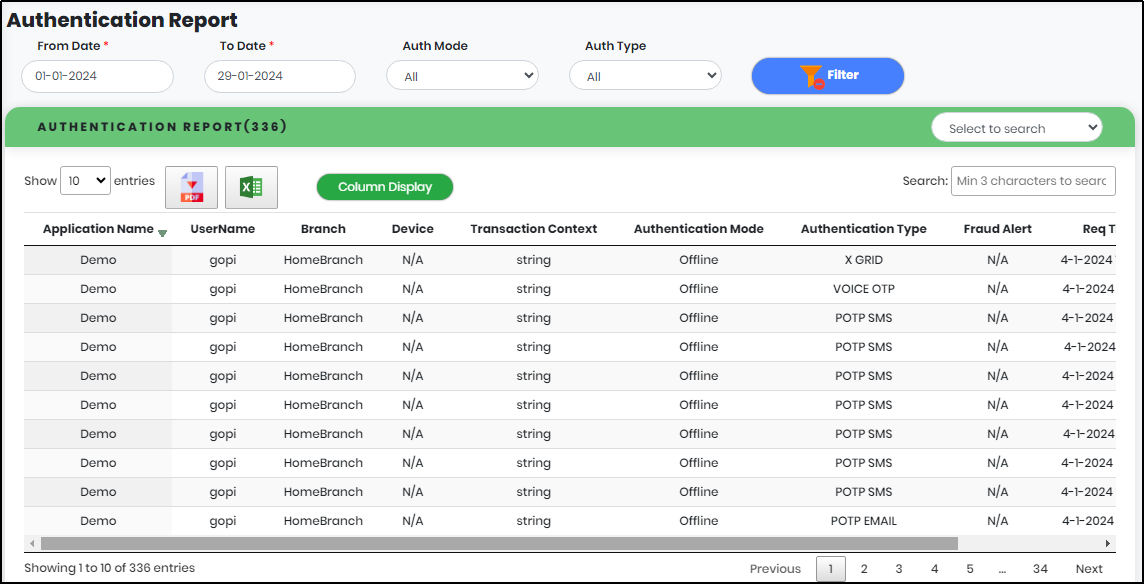
Figure 110 - Authentication report list view
4.Select a field in the “Select to search” box to refine the Search.
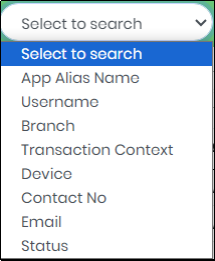
Figure 110.1 - Select to search drop down
5.Enter minimum 3 characters in the “Search” box to get particular Authentication report as shown below.
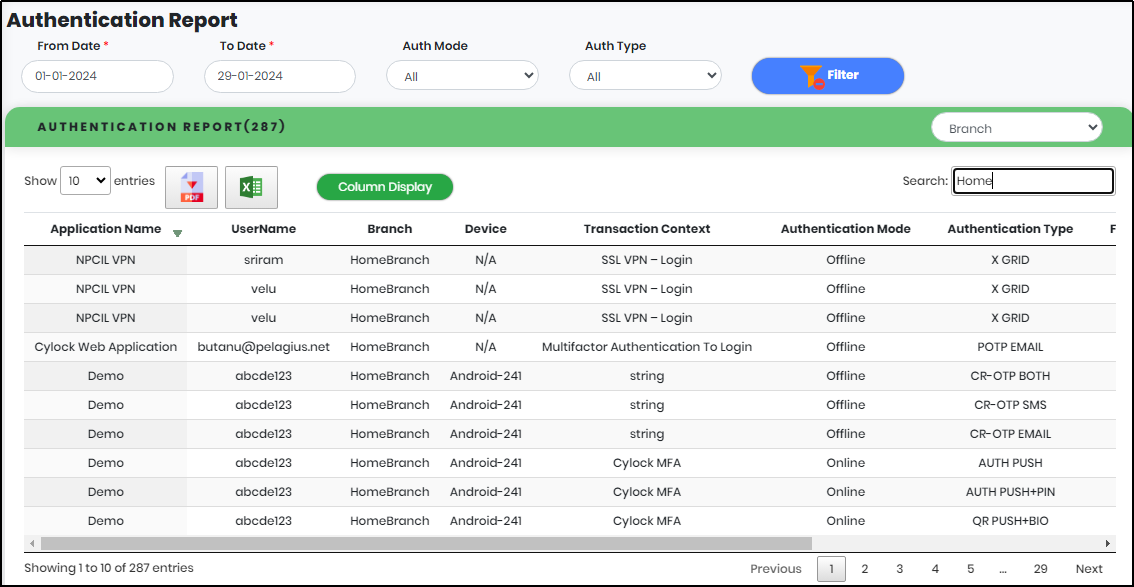
Figure 110.2 - Authentication report search result
Note:
- The list view displays 10 transactions in a page and can be customized using the drop-down selection as shown below.
- Click to save the search results as PDF File.
- Click to save the search results as Excel File.
- Click “Columns to Display” icon to select the columns that needs to be displayed.
Figure 110.3 - List View
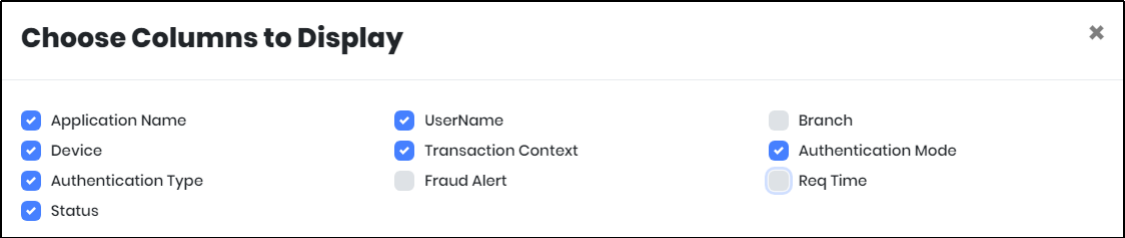
Figure 110.4 - Choose columns to display screen
Application User Report
Generating Application User Report
1.On expanding Reports menu, click “Application User Report” to display Application User report as shown in Figure 125.
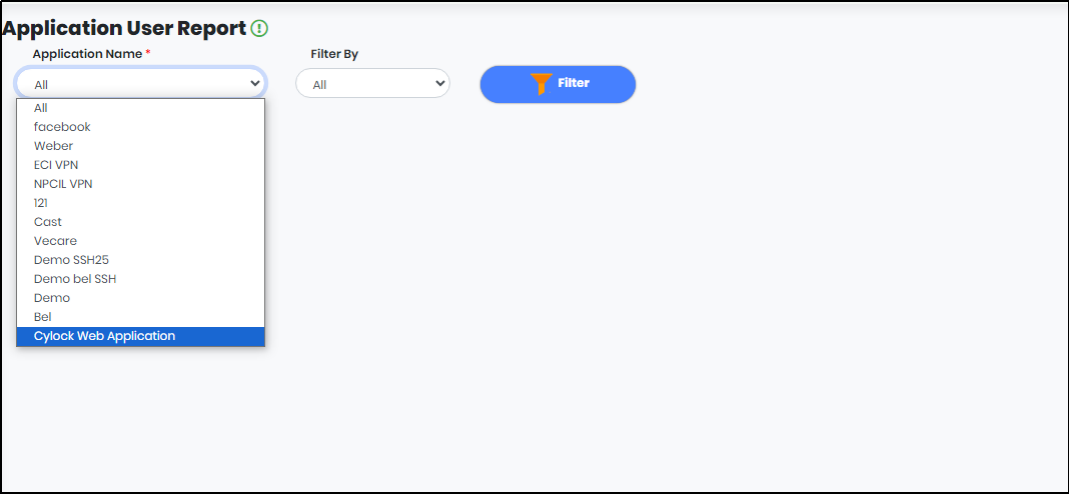
Figure 111- Application User report Screen
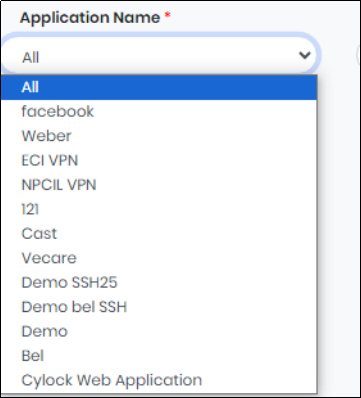
Figure 111.1 - Application Name Drop-Down
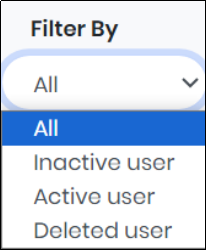
Figure 111.2 - Filter By Drop-Down
2.Select “From Date” and “To Date” to get Application User Activity for a particular period
3.Click “Filter” to generate the Application User Report.
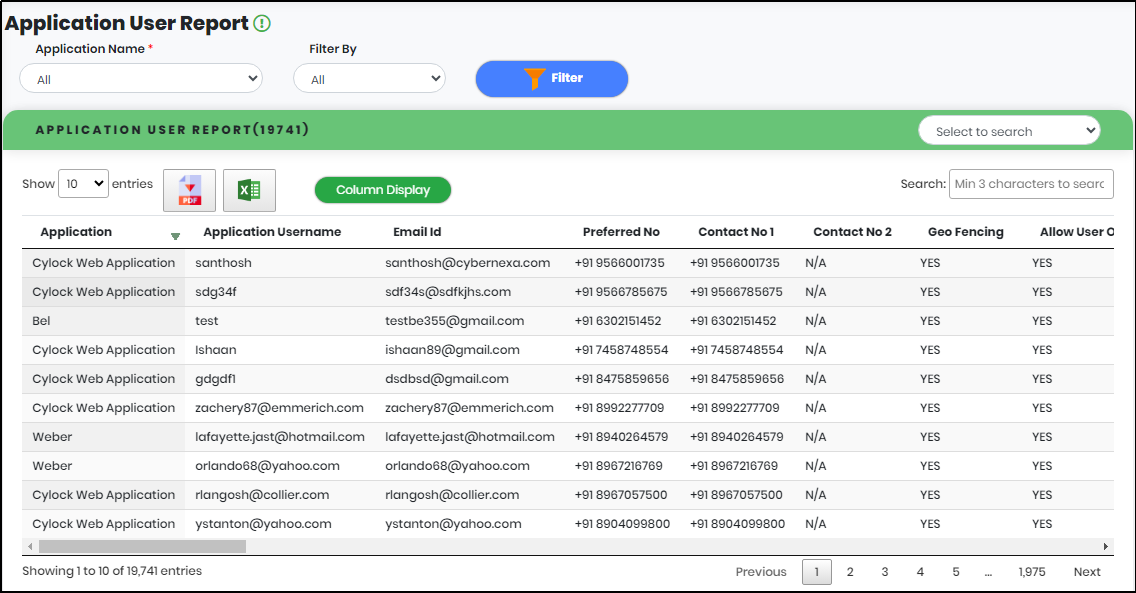
Figure 112 - Application User report list view
4.Select a field in the “Search to search” box to refine the Search.
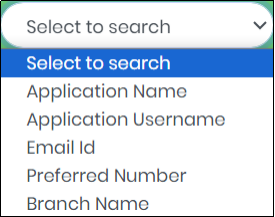
Figure 112.1 - Select to Search Drop-Down
5.Enter minimum 3 characters in the “Search” box to get particular Application User report as shown below.
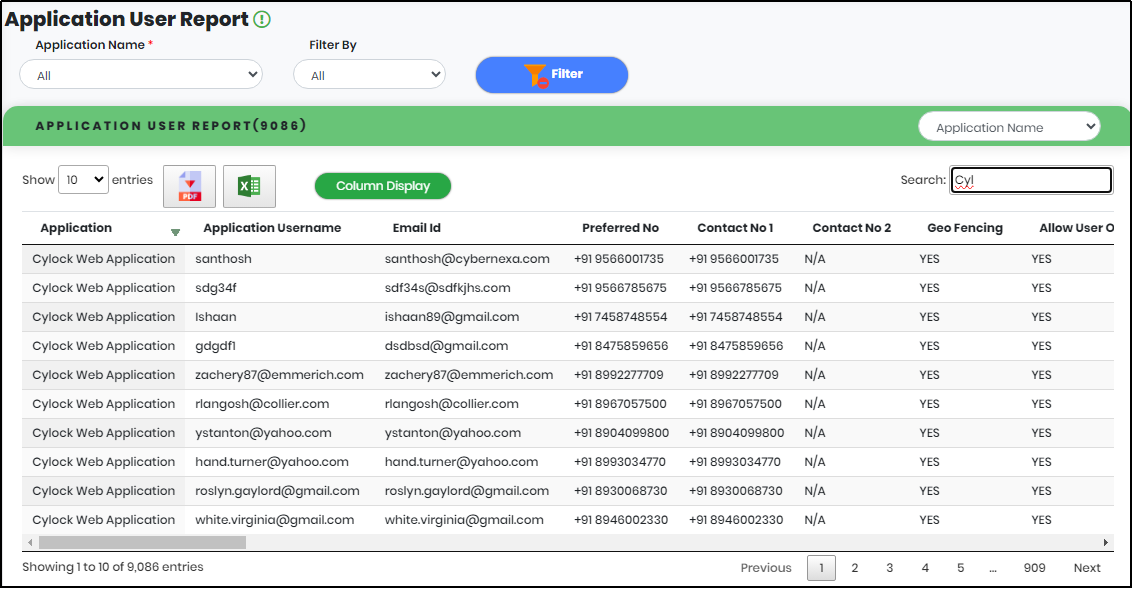
Figure 112.2 - Application User search result
Note:
- The list view displays 10 transactions in a page and can be customized using the drop-down selection as shown below.
- Click to save the search results as PDF File.
- Click to save the search results as Excel File.
- Click “Columns to Display” icon to select the columns that needs to be displayed.
Figure 112.3 - List View
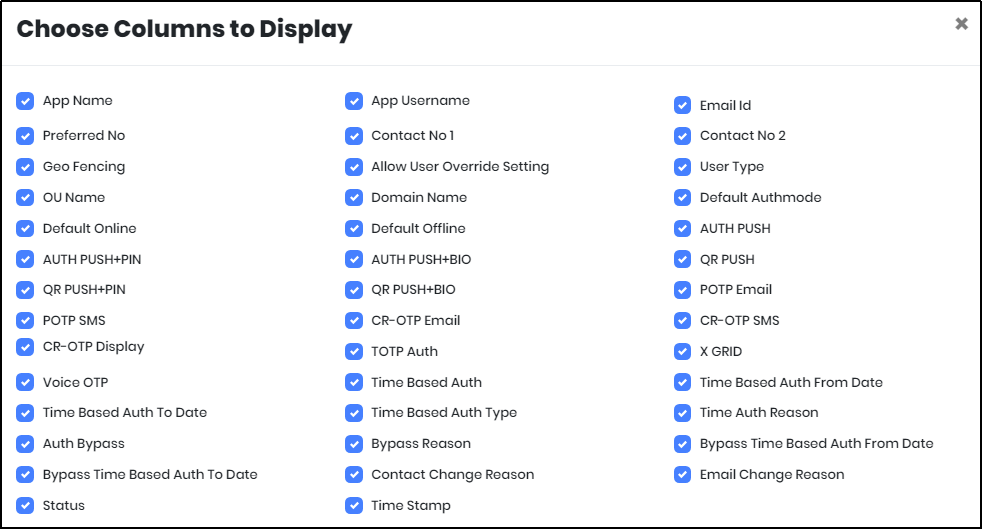
Figure 112.4 - Choose columns to display screen
Device Report
Generating Device Report
1.On expanding Reports menu, click “Device Report” to display Device report as shown in Figure 127.
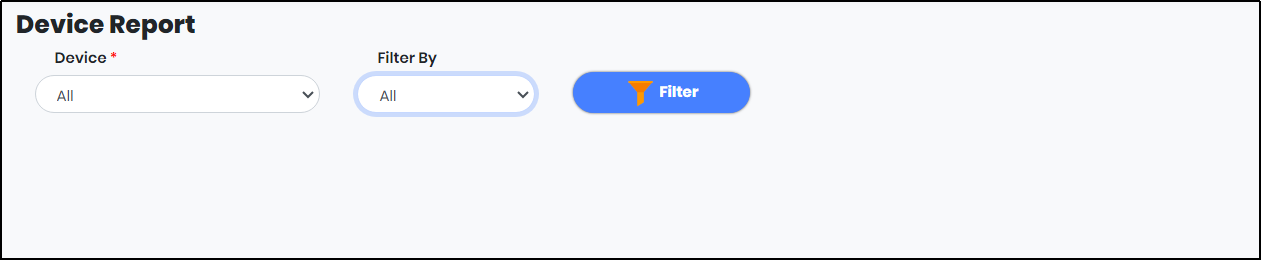
Figure 113 - Device report screen
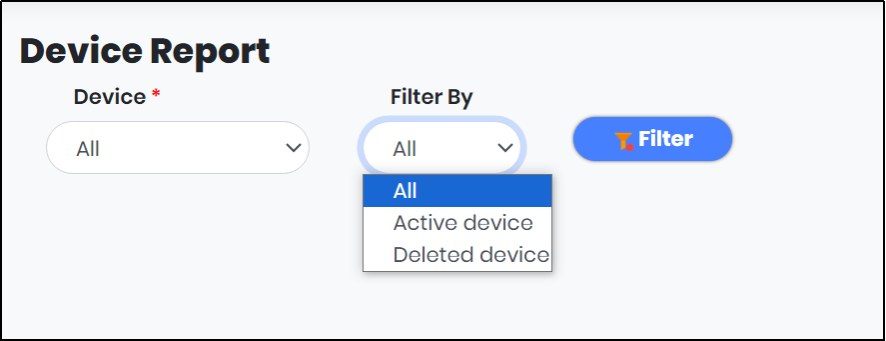
Figure 113.1 - Device Report - Filter By drop down
2.From the “Device” drop-down, select Android/iOS. From “Filter By” List, select Active device or Deleted device.
3.Click “Filter” to generate the Device Report.
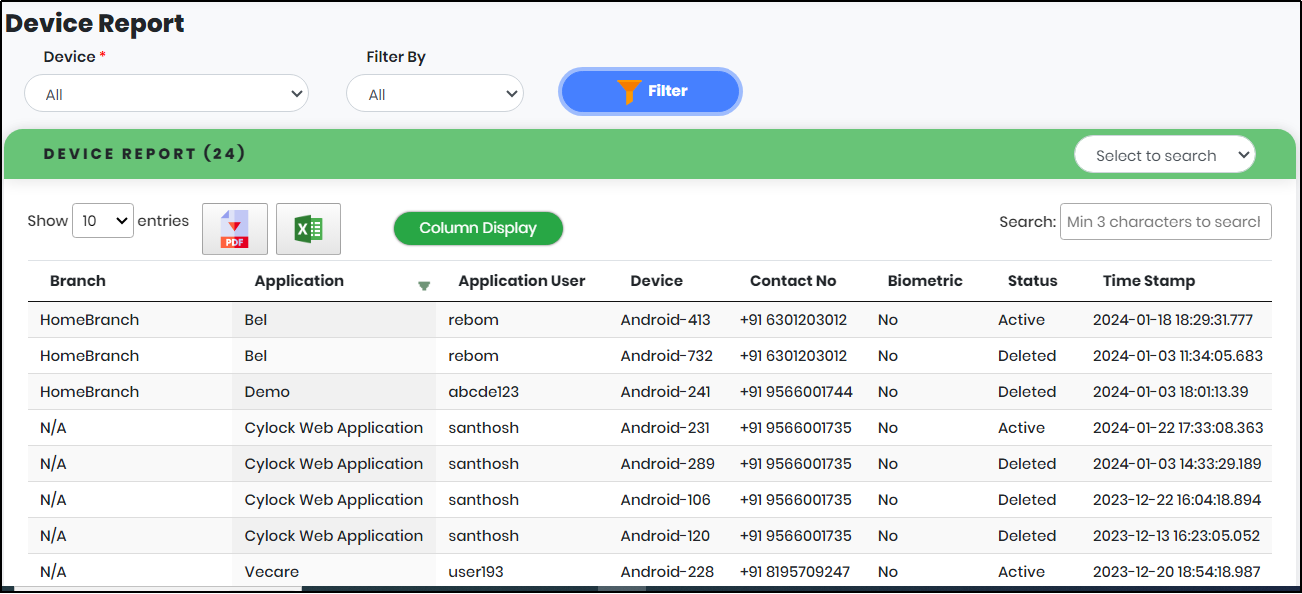
Figure 114 - Device report list view
4.Select a field in the “Select to search” box to refine the Search.
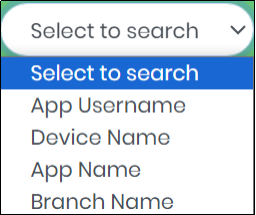
Figure 114.1 - Select to search drop down
5.Enter minimum 3 characters in the “Search” box to get particular User Activity report as shown below.
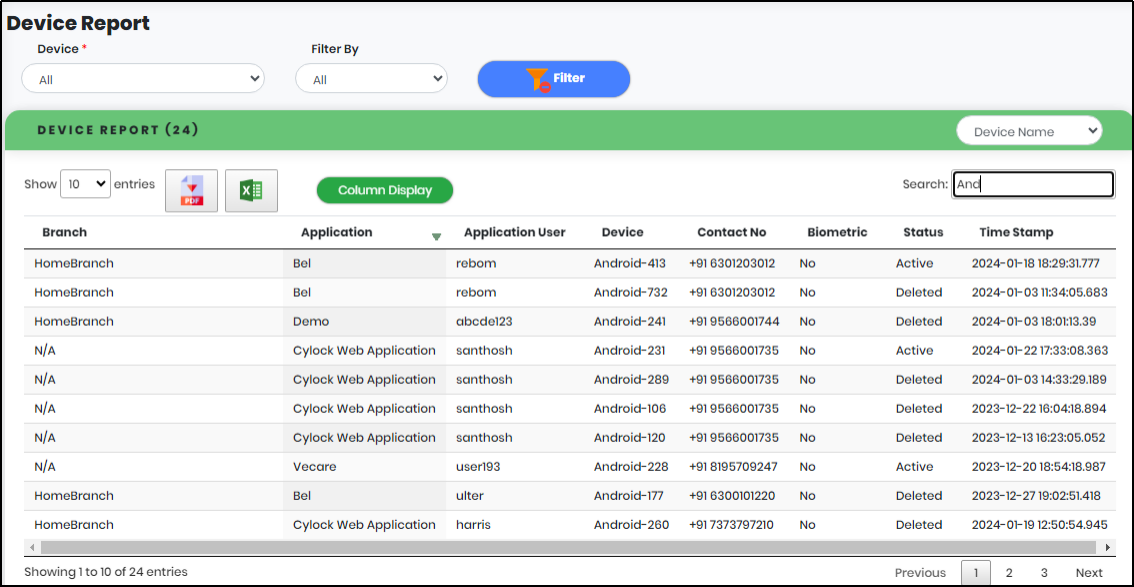
Figure 114.2 - Device report search result
Note:
- The list view displays 10 transactions in a page and can be customized using the drop-down selection as shown below.
- Click to save the search results as PDF File.
- Click to save the search results as Excel File.
- Click “Columns to Display” icon to select the columns that needs to be displayed.
Figure 114.3 - List View

Figure 114.4 - Choose columns to display screen
Summary Report
Generating Summary Report
1.On expanding Reports menu, click “Summary” to display Summary report as shown in Figure 129.
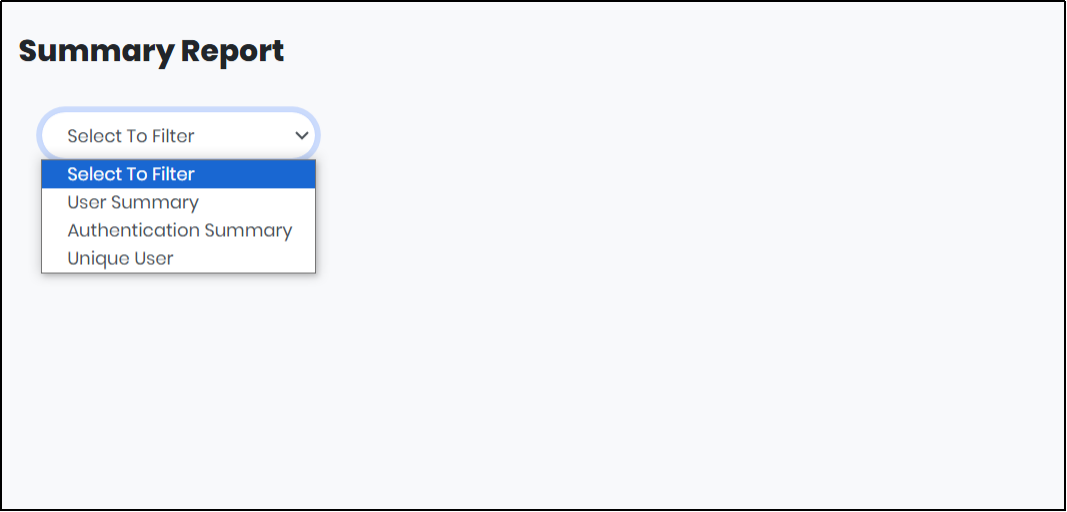
Figure 115 - Summary report screen
2.Select a field from “Select to Filter” drop down. The list has the following:
User Summary: Summary of users - AD or Local, based on
- User Type: Total Users/ AD User/ Local User
- Device Registered: AD User/ Local User
- Device Non-Registered: AD User/ Local User
User Summary Metrics:
- Total Users
- Local Users
- AD Users
- Total Device
Figure 116 - User Summary screen
User Summary report table contains the following:
- First Name
- Last Name
- User Name
- Email Id
- Preferred Number
- OS Name
- User Type
- OU Name
- Domain Name
Select a field in the “Select to search” box to refine the Search.
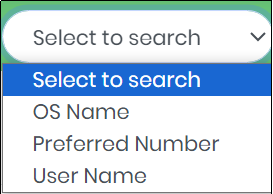
Figure 117.1 - Select to search drop down
Enter minimum 3 characters in the “Search” box to get particular User Activity report as shown below.
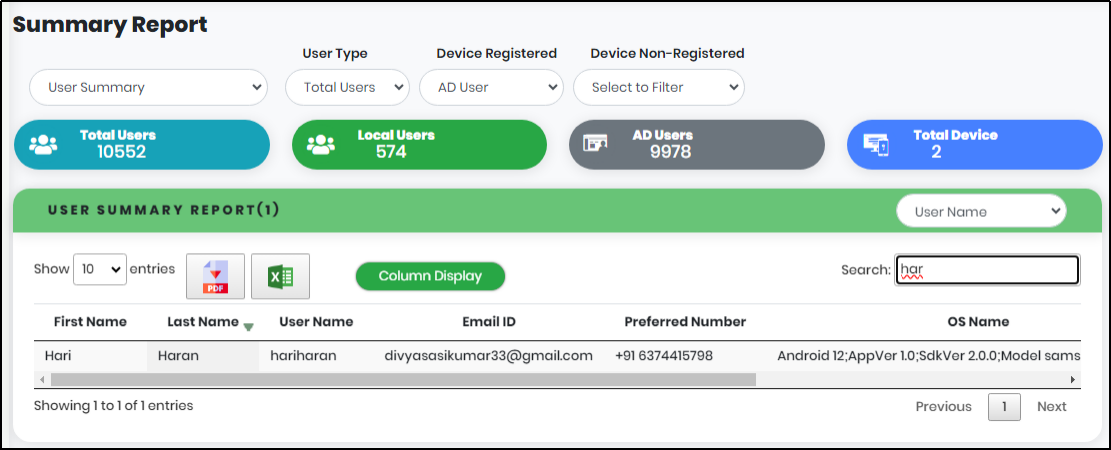
Figure 117.2 - User summary search result
Note:
- The list view displays 10 transactions in a page and can be customized using the drop-down selection as shown below.
- Click to save the search results as PDF File.
- Click to save the search results as Excel File.
- Click “Columns to Display” icon to select the columns that needs to be displayed.
Figure 114.3 - List View

Figure 117.4 - Choose columns to display screen
Authentication Summary:
- Status : Total Authentication/ Success/ Failure
- Auth Mode : Online/ Offline
- Device : Android/ iOS
Select “From Date” and “To Date” then Click “Filter” to generate the Authentication Summary Report for a particular period.
Authentication Summary metrics:
- Total Authentication
- Success
- Failure
- Unique Users
Figure 118 - Authentication Summary Screen
Authentication Summary report table contains the following:
- Application User Name
- Preferred Number
- Device Alias
- Status
- Auth Mode
- Authentication Type
- Request Time
- Response Time
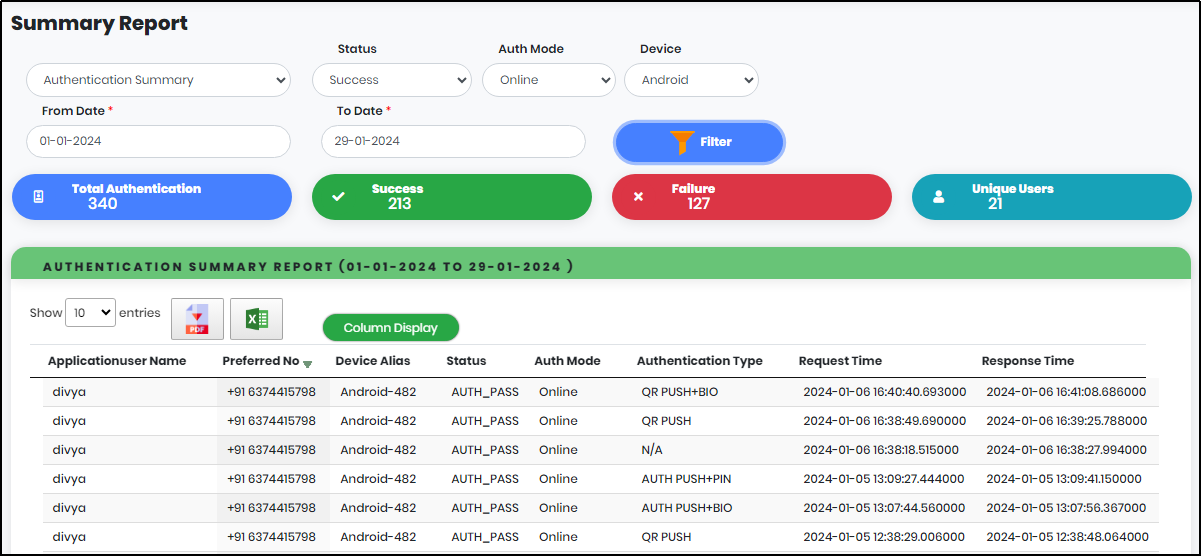
Figure 118.1 - Authentication Summary List view
Note:
- The list view displays 10 transactions in a page and can be customized using the drop-down selection as shown below.
- Click to save the search results as PDF File.
- Click to save the search results as Excel File.
- Click “Columns to Display” icon to select the columns that needs to be displayed.
Figure 118.2 - List View

Figure 118.3 - Choose columns to display screen
Unique User
Select “From Date” and “To Date” then Click “Filter” to generate the Unique user Summary Report for a particular period.
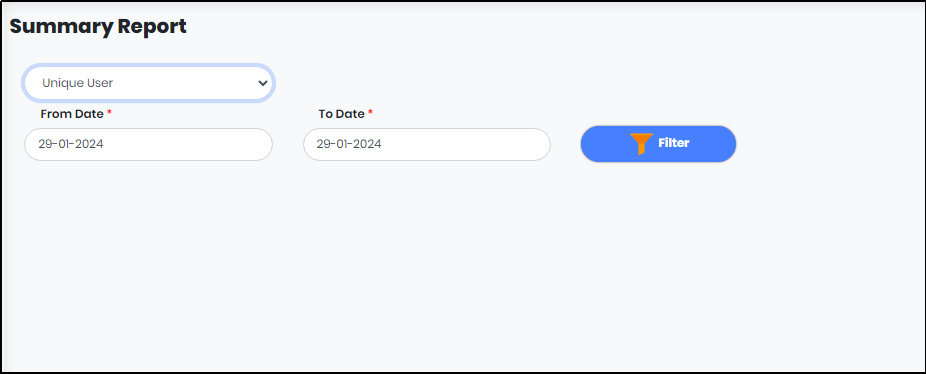
Figure 119 - Unique User summary screen
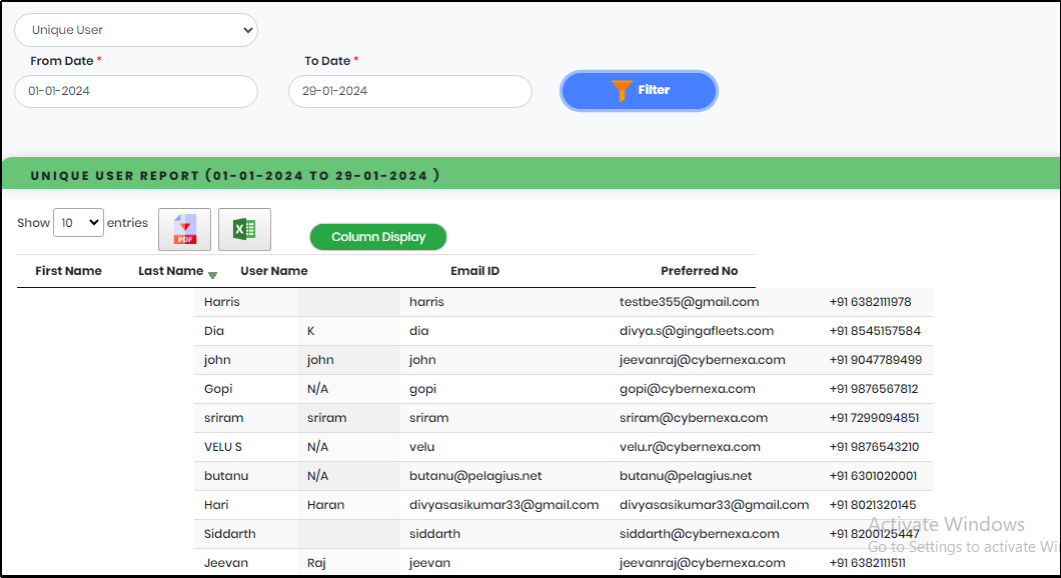
Figure 119.1 - Unique user summary list view
Note:
- The list view displays 10 transactions in a page and can be customized using the drop-down selection as shown below.
- Click to save the search results as PDF File.
- Click to save the search results as Excel File.
- Click “Columns to Display” icon to select the columns that needs to be displayed.
Figure 119.2 - List View

Figure 119.3 - Choose columns to display screen
Role Master
- Add the role name and description on this screen. Once it's done, assign the privileges to the role.
- On clicking the privilege icon, in the role list, which shows the privilege list based on module (User management, Application, Device, Reports and Settings)
- User management has two sub-modules: Portal users and Local users.
- Applications have three sub-modules: Secure application, Application user, and Locked accounts
- Reports have thirteen modules: Audit history, Request log, Login activity report, Fraud alert report, Email history report, User management report, Application user report, Secure application report, Device report, Dashboard report, Notification report, IB web app report and Request log user .
- The device has no sub-module.
- Settings have four sub-modules: Webhook, Authentication settings, Password policy and Configurations.
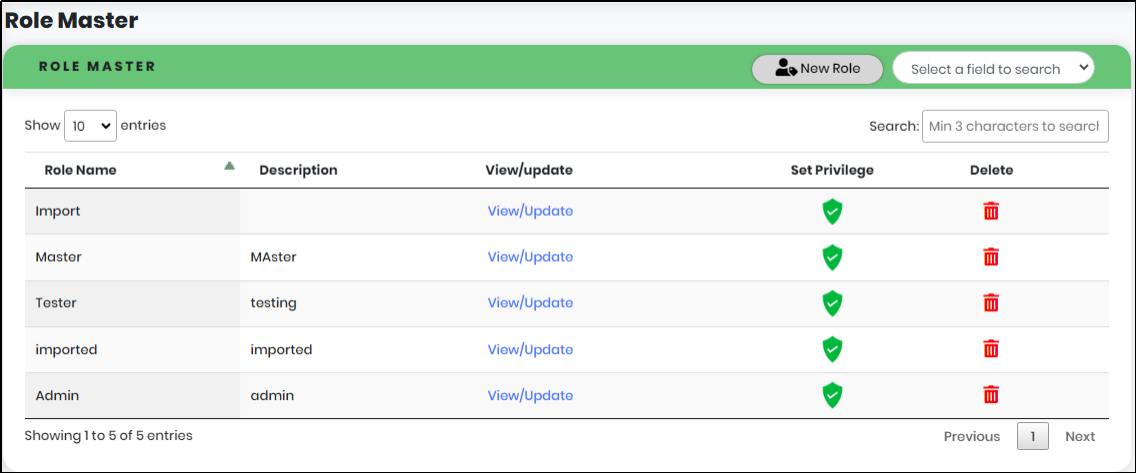
Figure 120 - Role Master Screen
Adding a Role
To add a role click on “New Role” on the Role Master Screen. A new page appears as shown below.
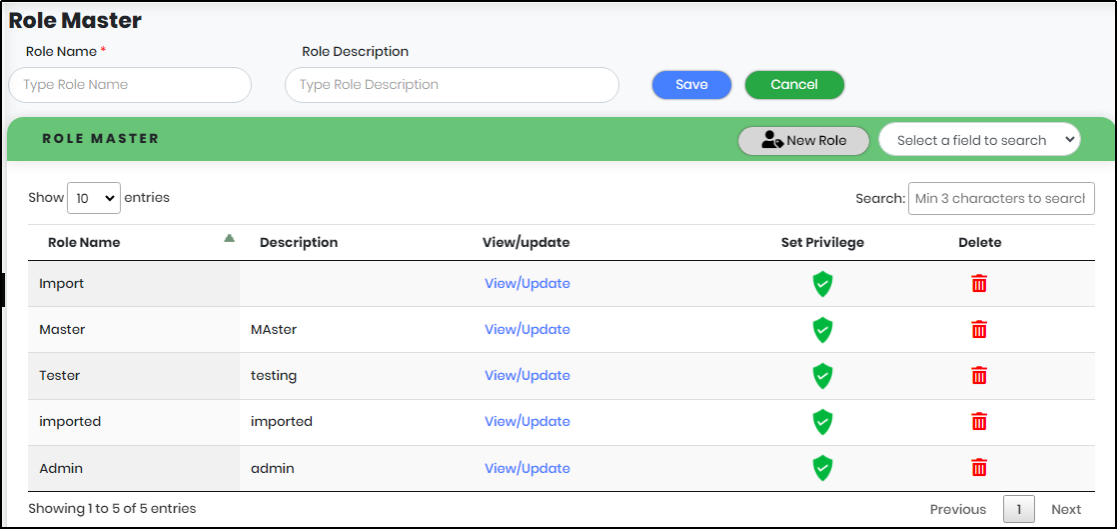
Figure 121 - New Role Screen
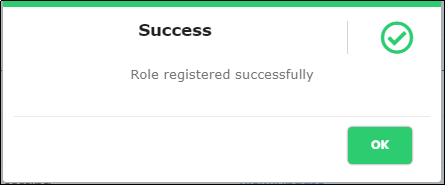
Figure 122 - Role registration success pop-up
Editing a Role
To edit a role click on “View/Update” against the role name on the Role Master Screen. A new page appears as shown below. Do the changes and click on “Update” to save the changes.

Figure 123 - Editing a Role
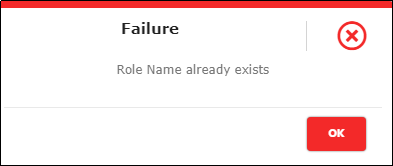
Figure 124 - Role edit failure pop-up

Figure 125 - Role update success pop-up
Set Privilege
To assign privileges to a role, click “Set Privilege”  Icon against the Role Name.
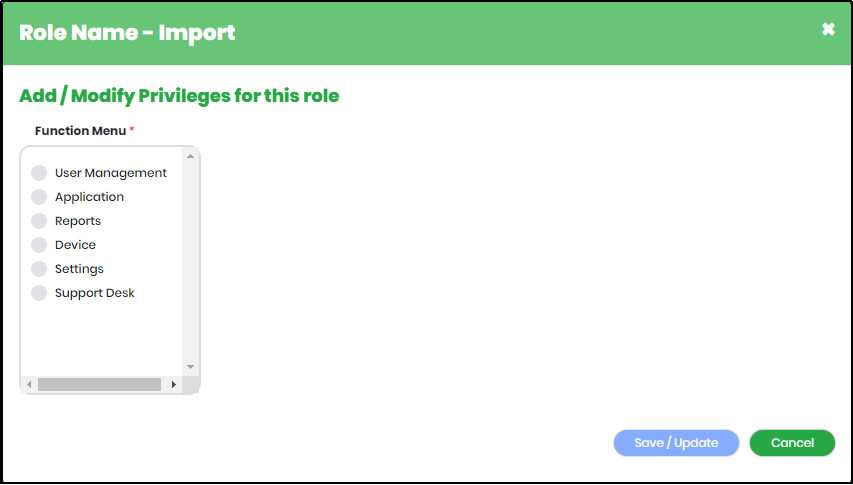
Figure 126 - Add Privilege screen
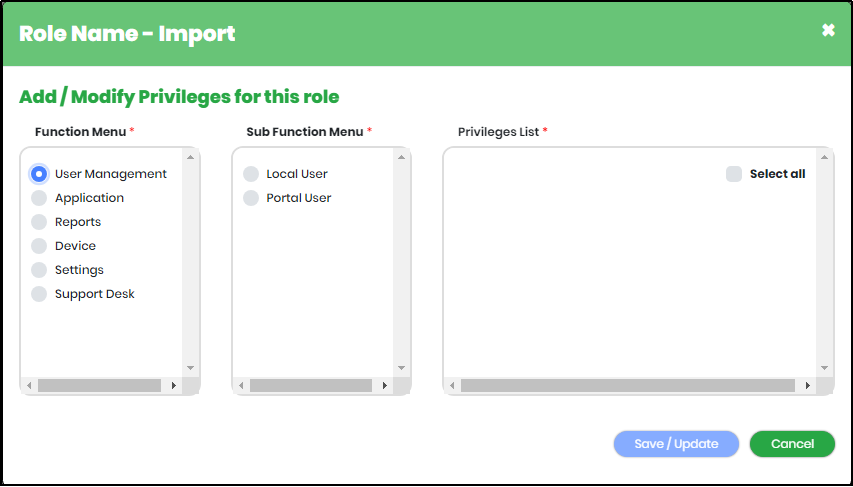
Figure 127 - Add Privilege screen with Function Menus & Sub-function menus
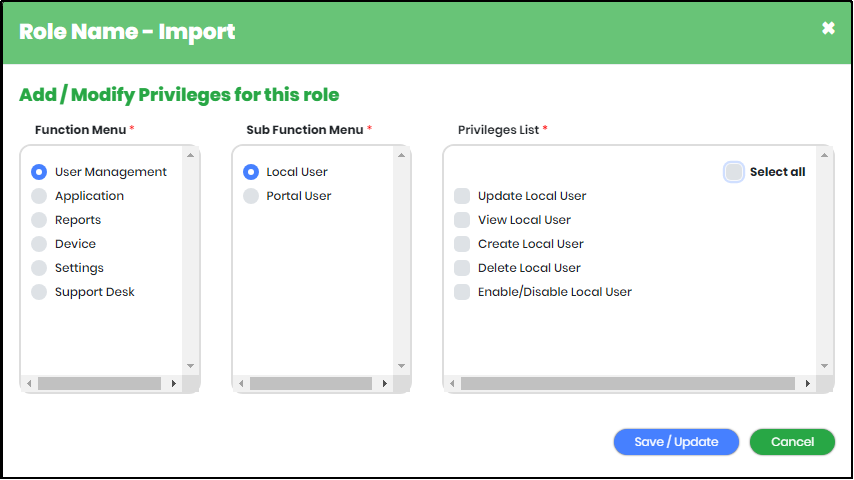
Figure 128 - Add Privilege screen with Function Menus, Sub-function Menus & Privileges List
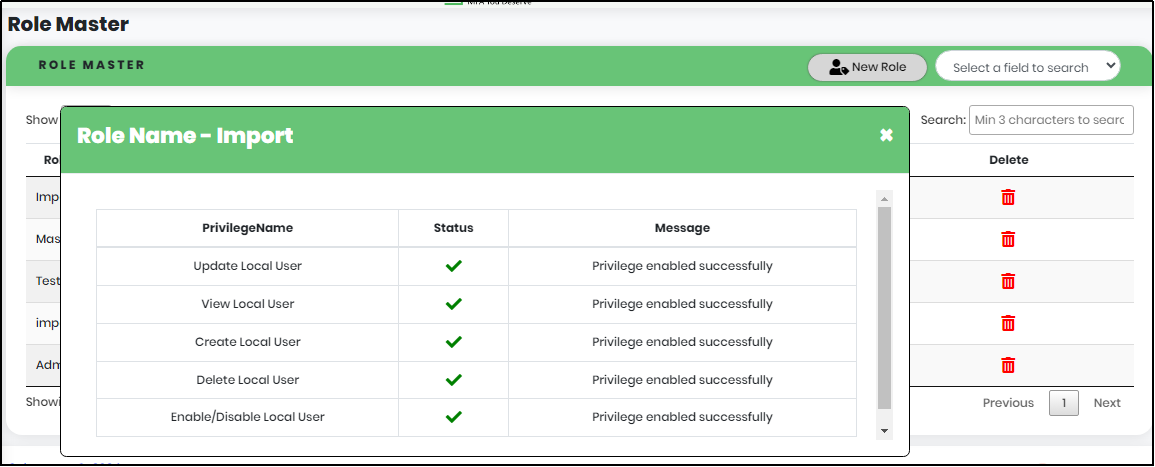
Figure 129 -Role Name import success Screen
Deleting a Role
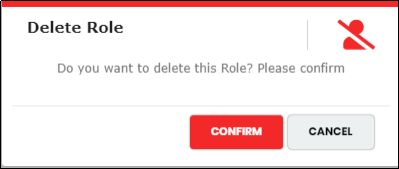
Figure 130 - Delete Role pop-up

Figure 131 - Role Delete Success Message
Searching a Role
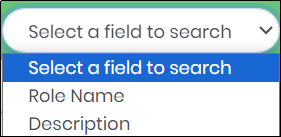
Figure 132 - Select a field to search drop-down
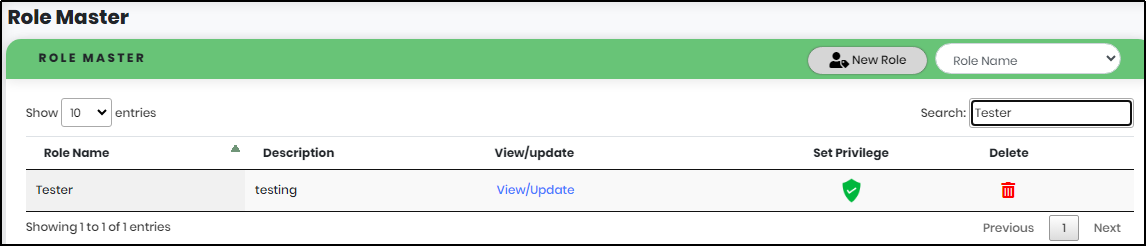
Figure 132.1 - Role search result screen
Note:
- The list view displays 10 transactions in a page and can be customized using the drop-down selection as shown below.
Figure 132.2 - List View
Branch Master
Branch describes the details of a customer branch and allows org-admin to add, update, and delete branches. The branch name and branch code are unique to each customer.
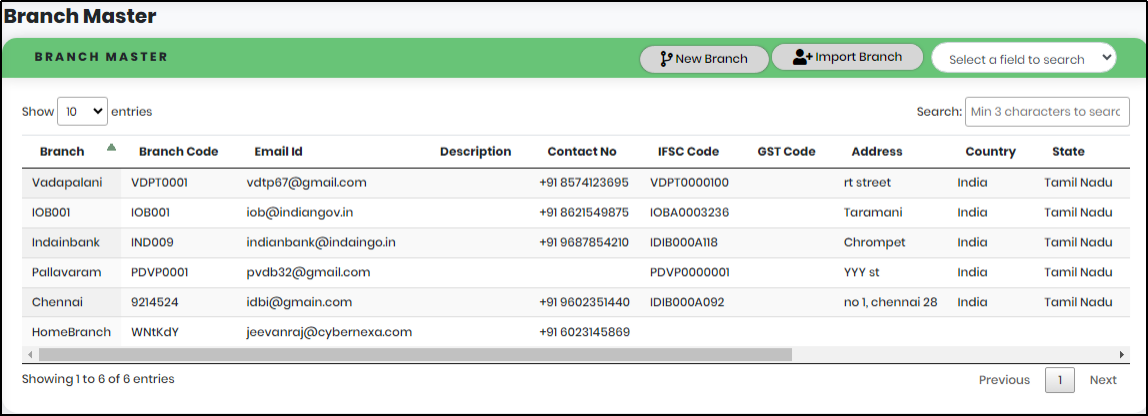
Figure 133 - Branch Master Screen
Adding New Branch
To add a branch click on “New Branch” on the Branch Master Screen. A new page appears as shown below.
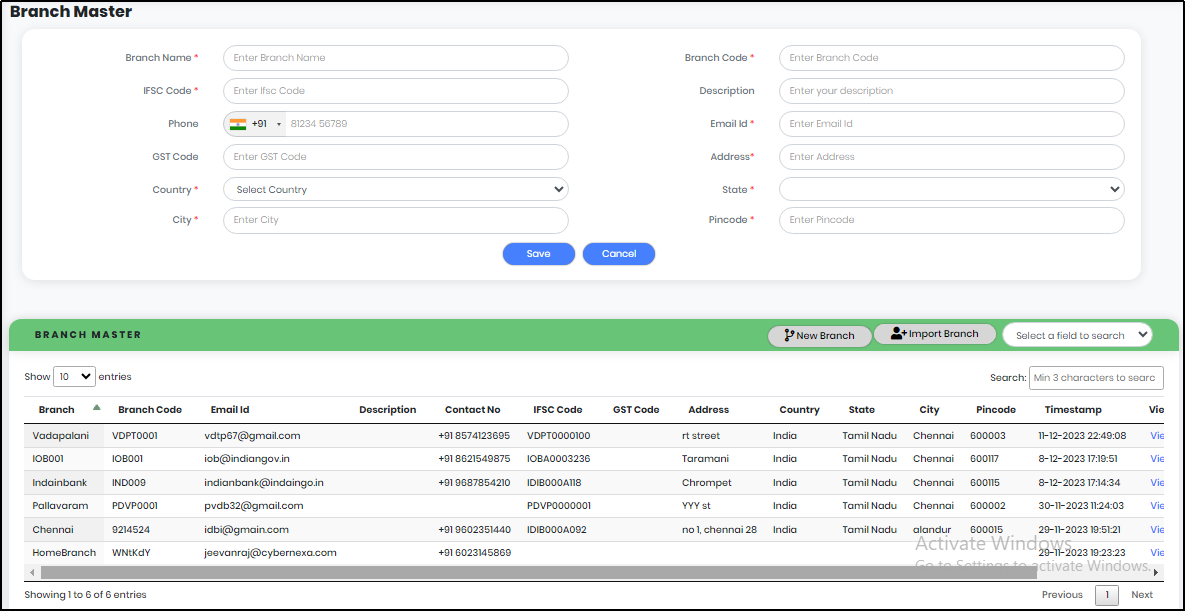
Figure 134 - Adding a new Branch Screen

Figure 135 - Branch registration success Message
Editing Branch
To edit a Branch click on “View/Update” against the Branch name on the Branch Master Screen. A new page appears as shown below. Do the changes and click on “Update” to save the changes.
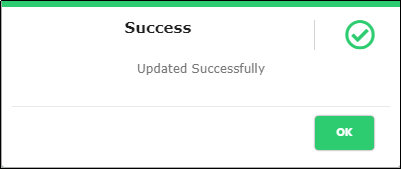
Figure 136 - Branch edit success Message
Importing Branch
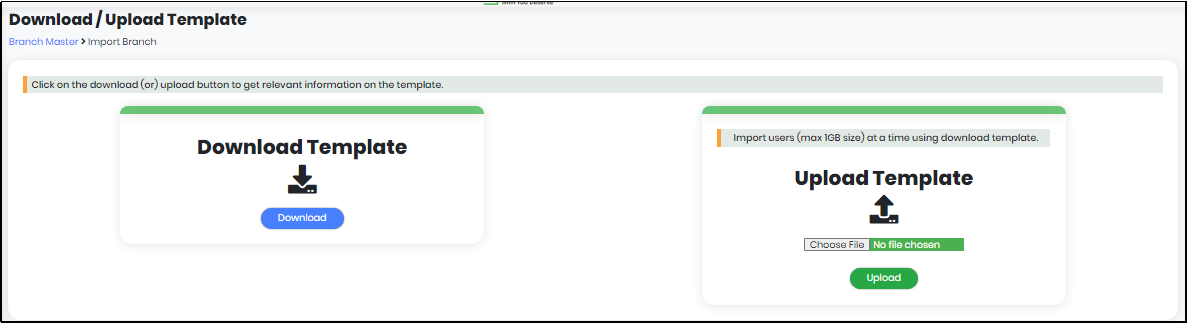
Figure 137 - Importing a Branch
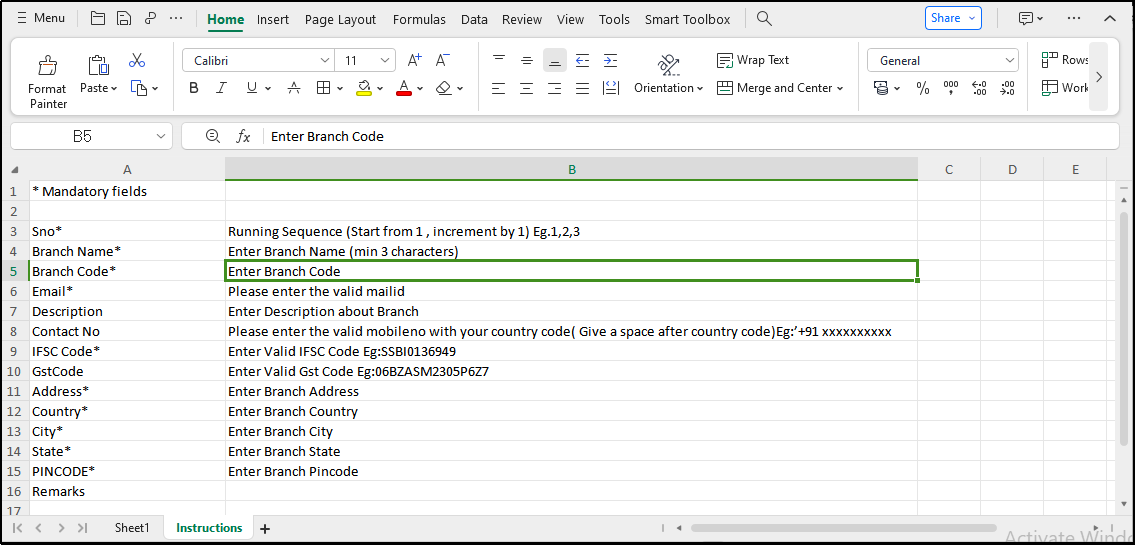
Figure 137.1 - Import Branch Template - Instruction Sheet
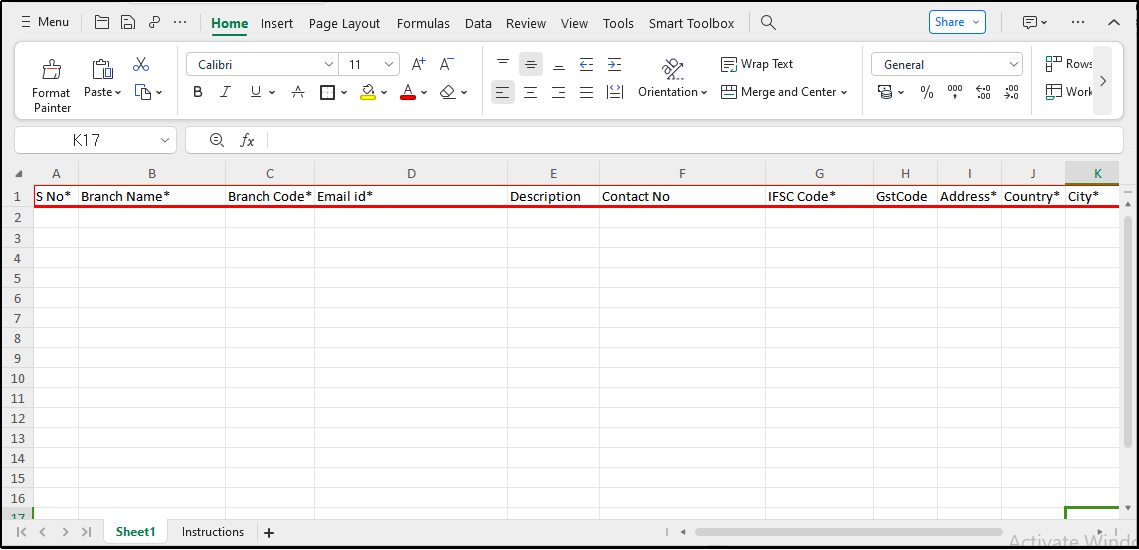
Figure 137.2 - Import Branch Template - Data Entry Sheet
Deleting Branch
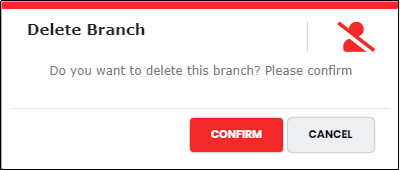
Figure 138 - Deleting a Branch
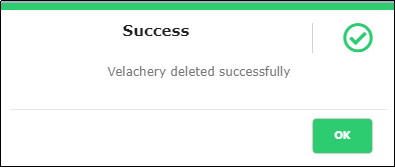
Figure 139 - Branch deleted Success Message
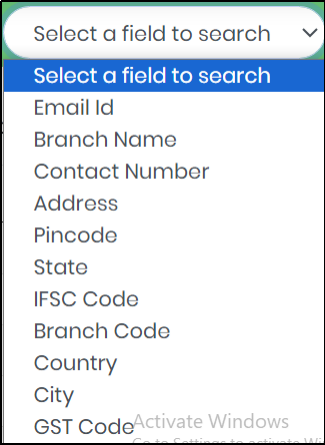
Figure 140 - Select a field to search drop-down
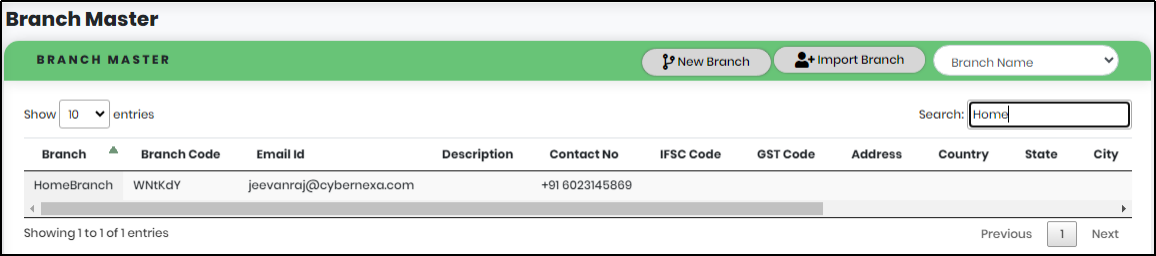
Figure 141.1 - Branch search result screen
Custom Privilege Master
A Custom Privilege Master is used to change the process from normal to maker-checker or maker-checker to normal. To enable maker-checker process, First select the module for which maker checker has to be enabled then select the process to Maker- checker. Then go to Link process user to set maker and checker.
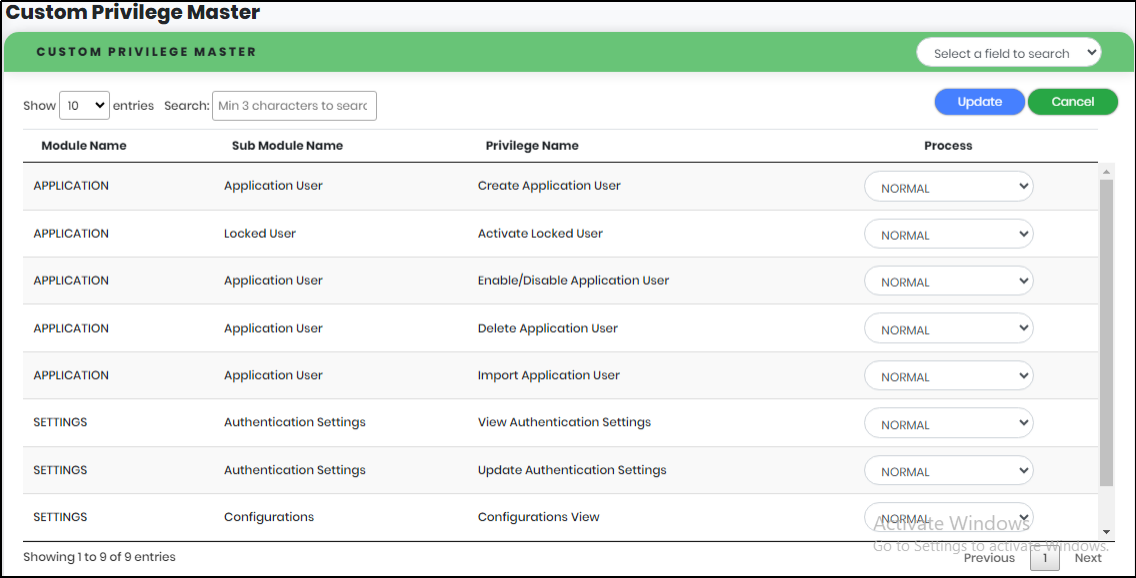
Figure 142 - Custom Privilege Master Screen
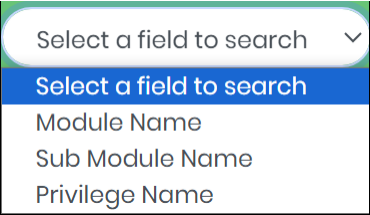
Figure 143 - Select a field to search drop-down
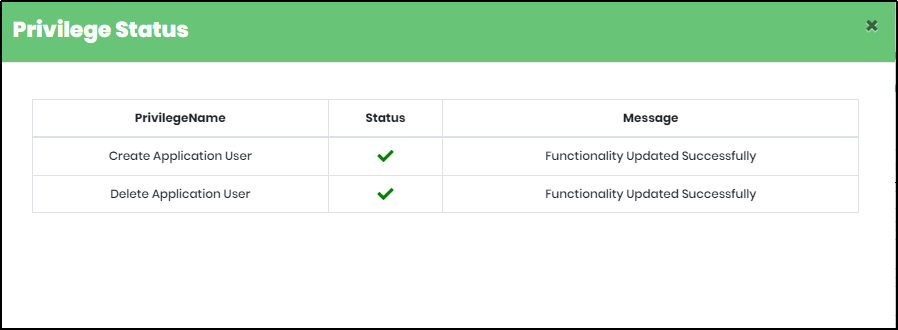
Figure 144 - Privilege status updated screen
Link Process - User
Link Process Master is used to give privileges to maker-checker, so we have to give the module name, sub-module name, branch name, and privilege name. After the user changes the process from normal to maker-checker, he needs to link the user, so he needs to give the module name, sub-module name, branch name, and privilege name.
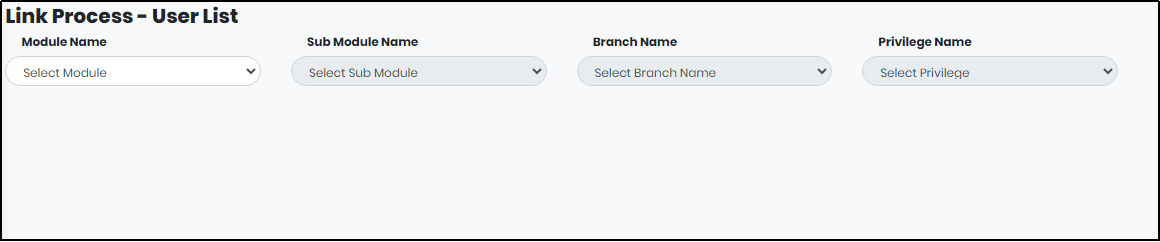
Figure 145 - Link Process - User List screen
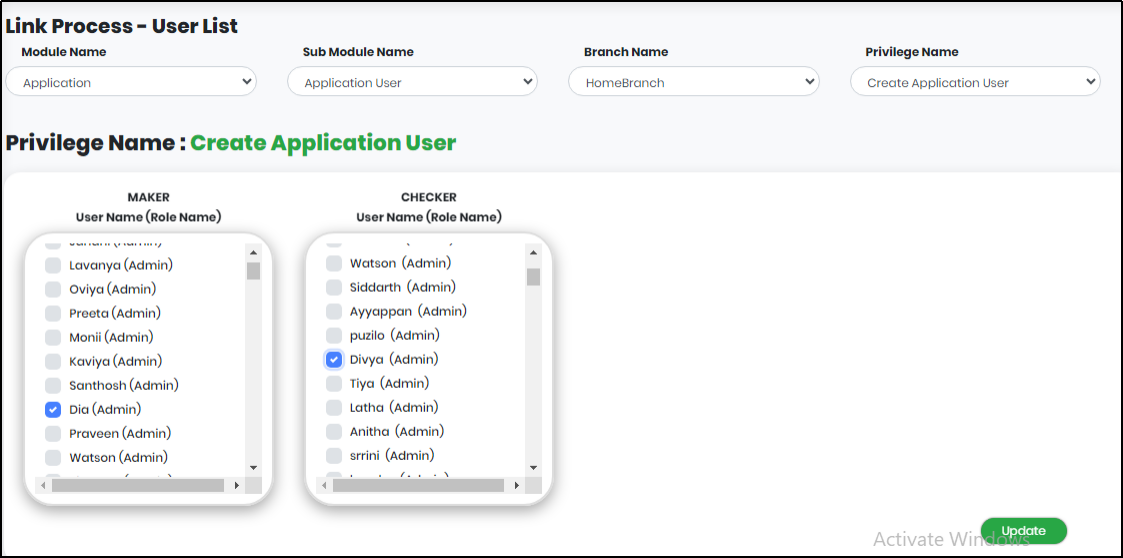
Figure 146 - Setting Maker-Checker for Creating Application User Screen
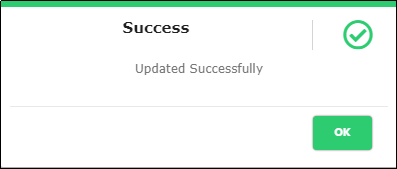
Figure 147 - Link Process Success Message
Note:
When maker tries to create an application user, a notification will be sent to the checker. Only when the Checker approves the request, Maker will be able to Create Application User. If not, the Maker cannot create the Application User.
Settings
The Organization Administrator is allowed to do required settings to all Users across all Applications. If customized user have role privilege, then they can change the settings.
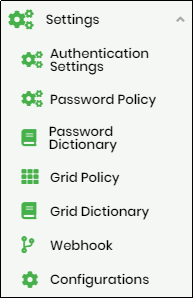
Figure 148 - Settings options
Authentication Settings
The Organization Administrator is allowed to do required authentication settings to all Users across all Applications. If customized user have role privilege, then they can change the authentication settings.
| Field | Description | Validation |
|---|---|---|
| Account Limit | A user account limit in an Organization can be specified | 250 is set as default |
| Device Limit | Number of Devices allowed per User | 2 is set as default |
| Online Authentications |
|
Select online authentications so as to make them available for User preferences. |
| Offline Authentications |
|
Select offline authentications so as to make available for User preferences |
| Other Features |
|
Select other features as desired |
Click “Update” to save all changes. Click “Back” to navigate to Homepage Dashboard.
Note:An End User with Portal Access cannot be created or updated when “Allow End User Login” is disabled and the End user is restricted from logging into the Portal.
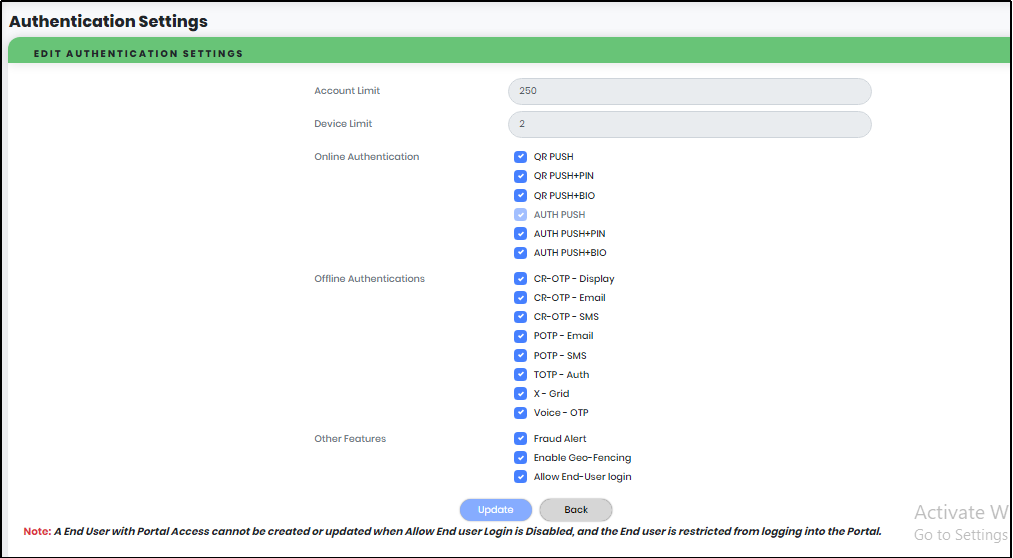
Figure 149 - Authentication Settings Screen
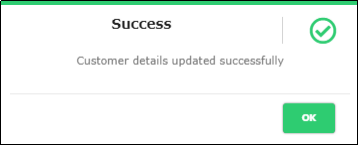
Figure 150 - Authentication Update Success Message
Password Policy
Password Policy is used to implement the configuration for the portal user or local user.
- Policy Name : User have to enter the policy name
- Policy Code : Displays the Password policy code
- Account Type: User chosen Account type will be displayed
- Status: Shows whether the Password policy is Active or Inactive
- View/Update : To View/Update the User Password Policy
- Delete: To delete a Password Policy
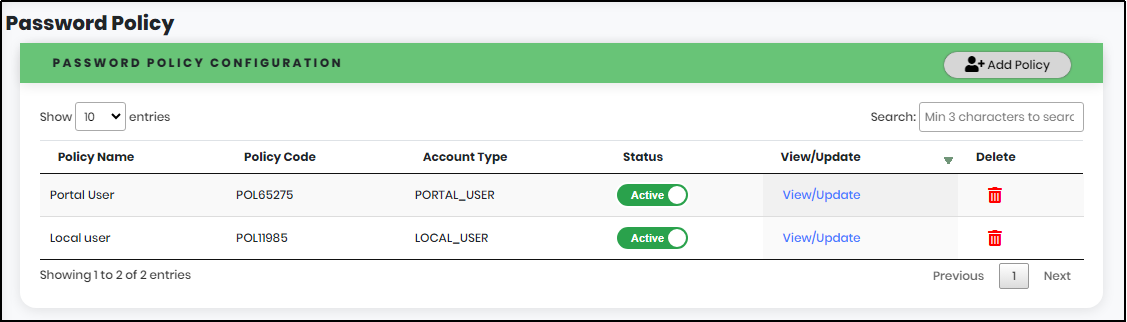
Figure 151 - Password Policy Screen
Create New Password Policy
To create a policy, click “Add Policy” button as shown in above figure. “New Password Policy” screen appears as shown below.

Figure 152 - New Password Policy Screen
- Policy Name : User have to enter the policy name
- Account Type : Select the Account Type by using the drop-down box
- Restrict Characters : Restrict the Characters, Special character, uppercase, lowercase, numeric, must begin with
- Restrict Repetition: Number of old passwords to be restricted during password reset
- Expiry Date : Password expires in after the set date.
- Restrict Length : Minimum , Maximum length of the characters
Update Password Policy
To change Password Policy, make the required changes and click on “Update”.

Figure 153 - Password Policy Update Success Message
Note:If you don’t want to make any change, click “Cancel”
Active/Inactive Password Policy
To make a Policy Active/Inactive, click the Toggle button under Status.
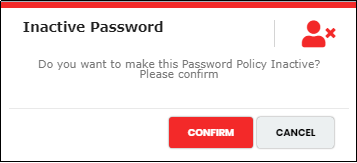
Figure 154 - Password Policy Inactive pop-up
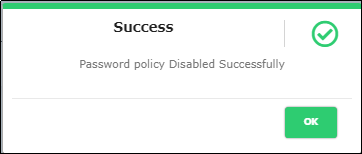
Figure 155 - Password Policy Disabled Success Message
Delete Password Policy
To delete a policy, Click the “Delete” Icon against the password policy to delete the policy.
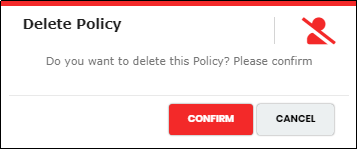
Figure 156 - Delete Policy Pop-up
Note:
- Enter minimum 3 characters in the “Search” box to get particular Password Policy.
- The list view displays 10 transactions in a page and can be customized using the drop-down selection as shown below.
Figure 156.1 - List View
Password Dictionary
A password dictionary is used to prevent brute-force attacks.
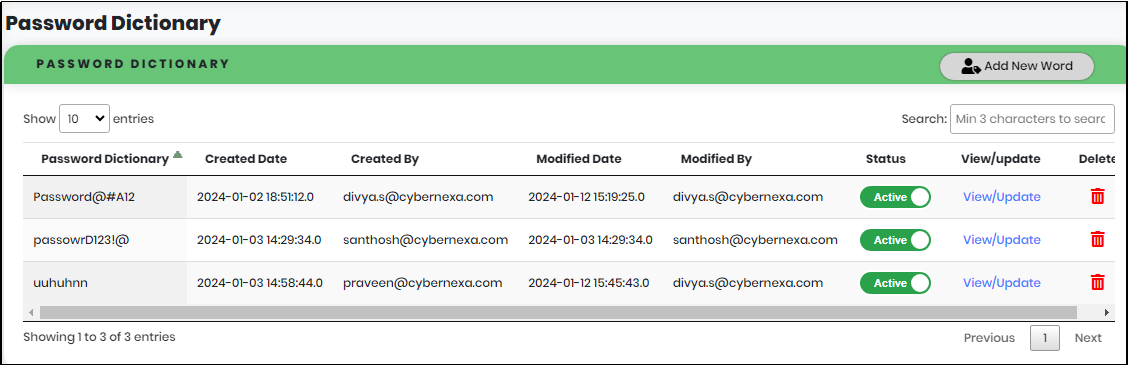
Figure 157 - Password Dictionary Screen
Create a Password Dictionary
To create a password Dictionary, Click “Add New Word” button. “New Word” text box appears as shown below. Enter the desired password and click “Save” to save the Password.
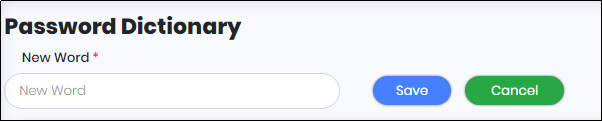
Figure 158 - New Password Dictionary Screen

Figure 159 - Password Dictionary Created Success Message
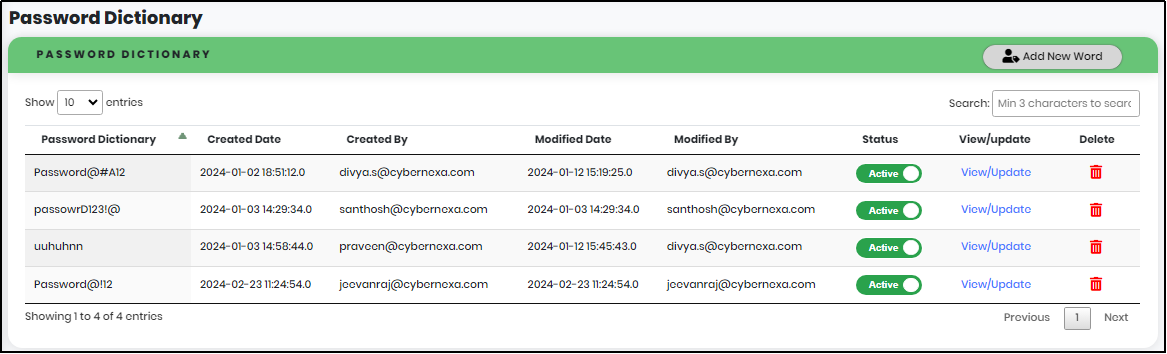
Figure 160 - New Password Dictionary Added
Update a Password Dictionary
To make any changes to the dictionary, click “View/Update” link against the dictionary and make the required changes and then click on “Update” to save the new changes.

Figure 161 - Password Update Screen
Active/Inactive Password Dictionary
To Inactive a Password Dictionary, Click the “Active Toggle” button under Status Menu against the password dictionary to make it Inactive. Click the same toggle button to make it Active.
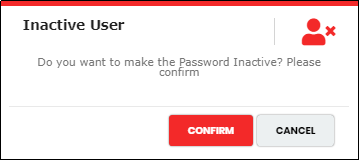
Figure 162 - Inactive Password pop-up
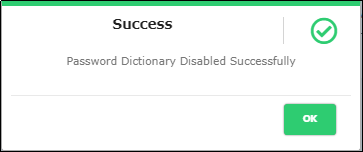
Figure 163 - Inactive Password Success Message
Figure 164 - Active Password pop-up

Figure 165 - Active Password Success Message
Delete a Password Dictionary
To delete a password dictionary, click the “Delete” icon against the Password Dictionary.
Figure 166 - Delete Password Dictionary pop-up

Figure 167 - Delete Password Dictionary Success Message
Grid policy
Figure 168 - Grid Policy Screen
Figure 169 - Edit Grid Policy Screen
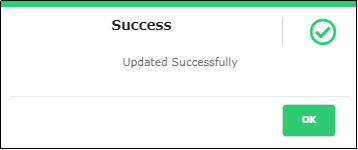
Figure 170 - Grid Policy Update Success Message

Figure 171 - Grid Policy Delete pop-up
Figure 171.1 - List View
Grid Dictionary
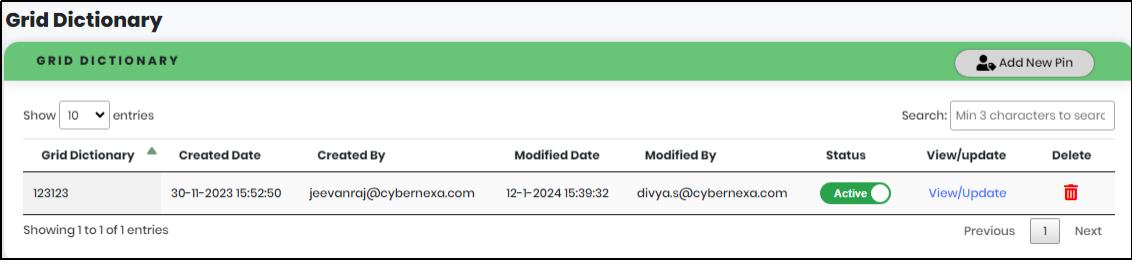
Figure 172 - Grid Dictionary Screen
Create new Grid Dictionary
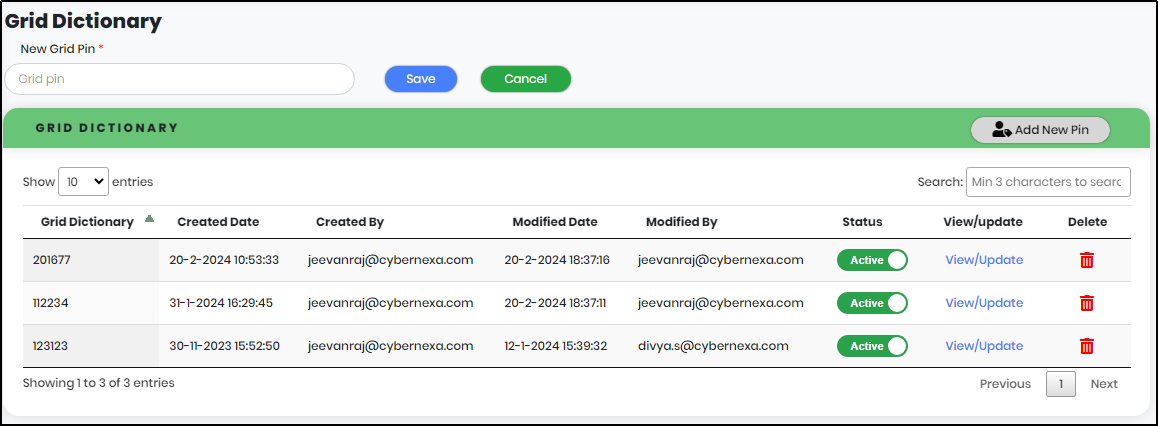
Figure 173 - New Grid PIN Screen

Figure 174 - Grid Pin Saved Success Message
Edit Grid Dictionary
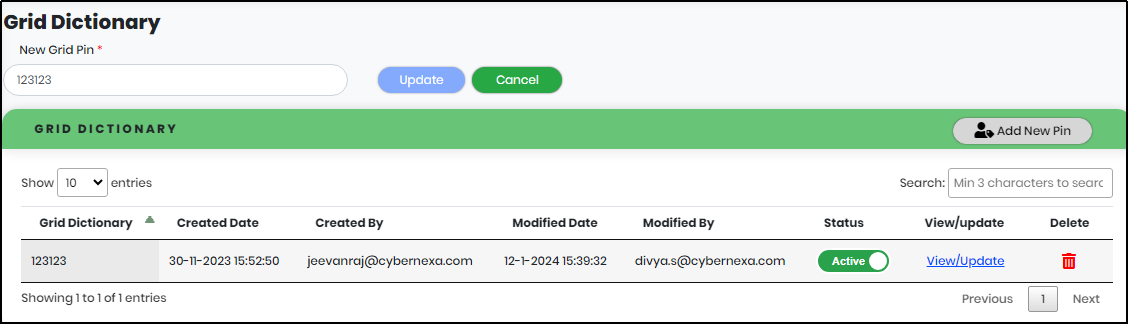
Figure 175 - Grid Pin Update Screen

Figure 176 - Grid Pin Update Success Message
Active/Inactive Grid Dictionary
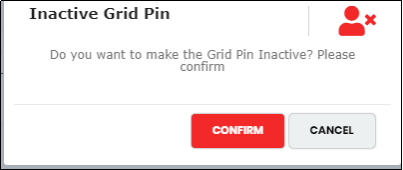
Figure 177 - Grid Pin Inactive pop-up
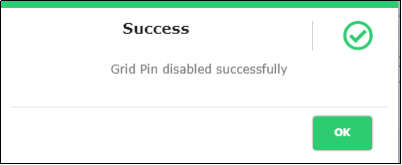
Figure 178 - Grid Pin Inactive Success Message

Figure 179 - Grid Pin Inactive pop-up

Figure 180 - Grid Pin Inactive pop-up
Delete Grid Dictionary
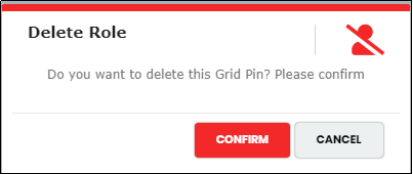
Figure 181 - Grid Pin Inactive pop-up
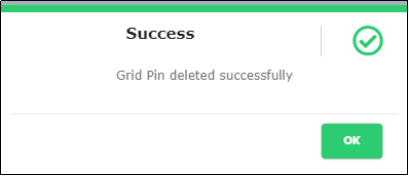
Figure 182 - Grid Pin Inactive pop-up
Webhook
Webhook facilitates communication with third-party applications by sending instant web notifications every time an event occurs in CyLock. With Webhooks, one can configure HTTP URLs and receive notifications related to each authentication. This page will display the list of configured Webhook URLs for the logged in customer. It will be available only for organization administrators.
- Click on the Webhook from Settings, and it shows the Webhook list Page as shown below.
- Click on “New Webhook” button, you will be taken to “New Webhook” screen.
- Enter the required details and save it.
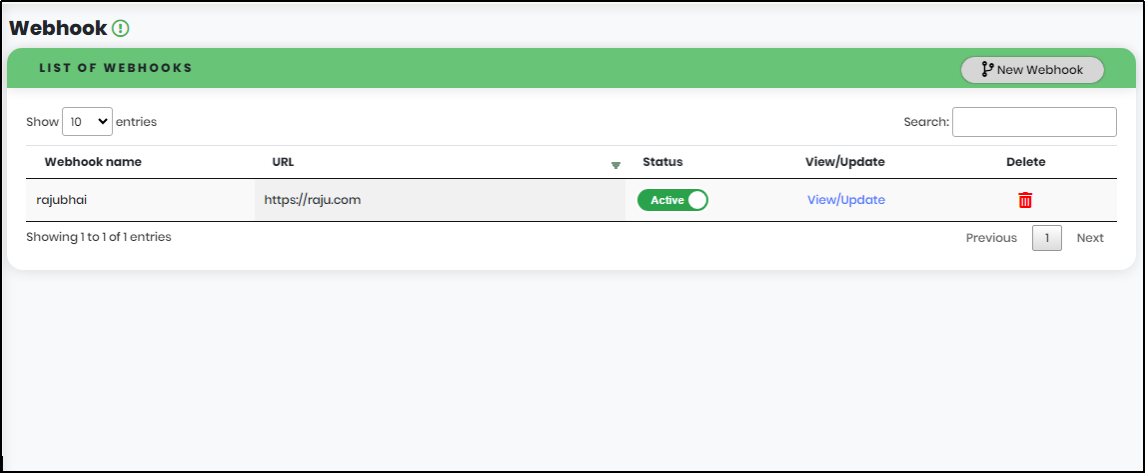
Figure 183 - Webhook List Screen
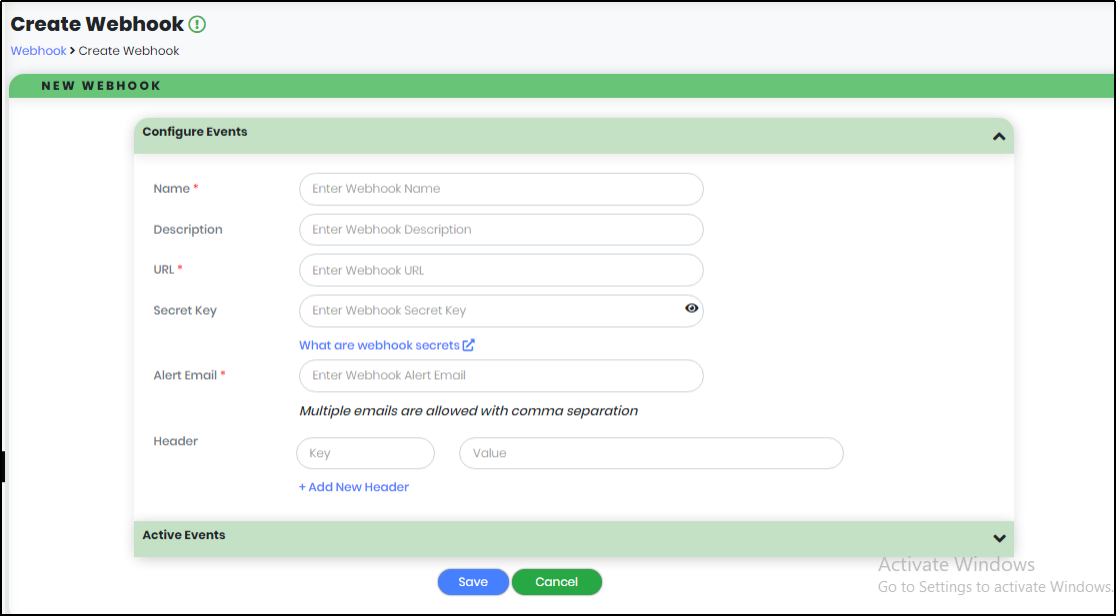
Figure 184 - New Webhook Page
- Name: Required; Name of the Webhook
- Description: Description for Webhook
- URL: Required; Enter the URL where you want to receive the Webhook payload when an event is triggered. We recommend using an HTTPS URL.
- Secret Key: Enter a Secret for the Webhook endpoint. The secret is used to validate that the Webhook is from CyLock. Do not expose the secret publicly.
- Alert Email: Required; In the Alert Email field, enter the email address to which the notifications should be sent in case of Webhook failure. You will receive Webhook deactivation notifications to this email address. Multiple emails are allowed with comma separation.
- Header: Enter key & Value for Header. Multiple Headers can be added.
- Active Events: Select the required events from the list of Active Events.
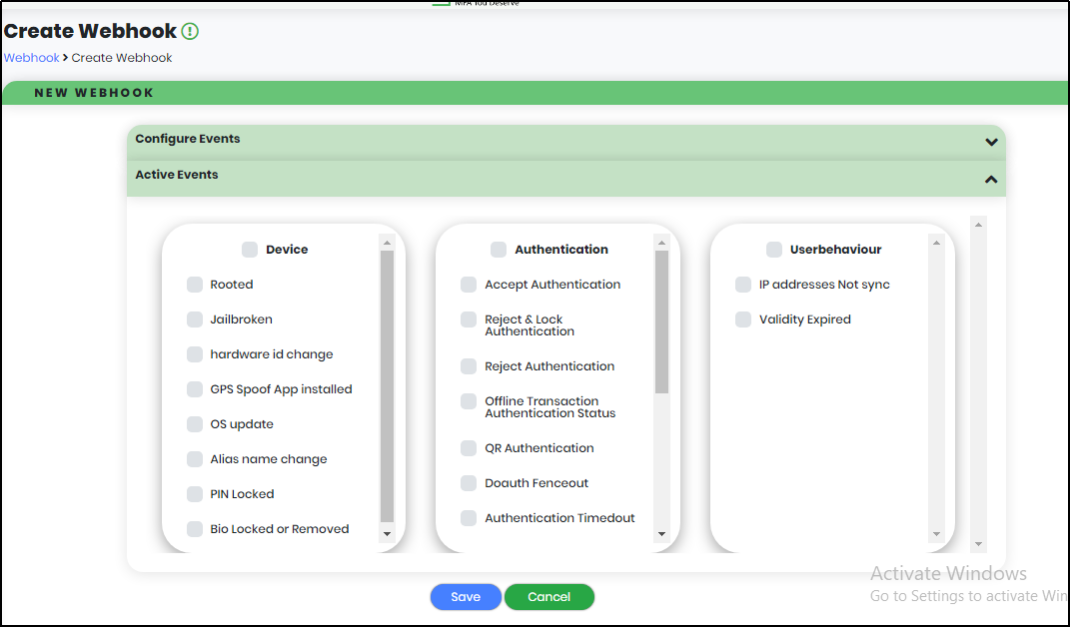
Figure 184.1 - New Webhook Page - Active Events
| Device | Authentication | User Behaviour |
|---|---|---|
|
|
|
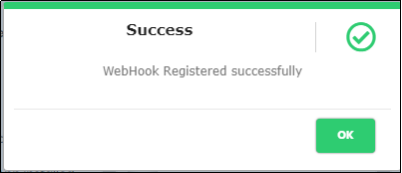
Figure 185 - Webhook Registered Success Message
In the Webhook list view, click “Delete” icon corresponding to the Webhook Name. The system displays the below confirmation message to delete the Webhook Name.
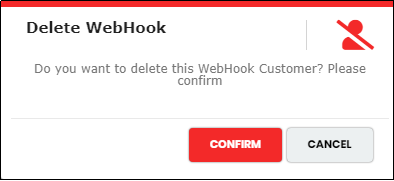
Figure 186 - Webhook Delete Confirmation Pop-up
Note:Click “CONFIRM” to delete the WebHook. Click “CANCEL” to cancel the deletion
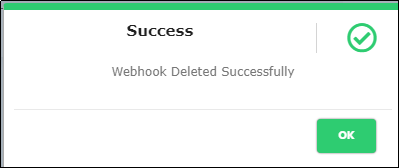
Figure 187 - Webhook Deletion Success Message
Configuration
Org admin/Customized user with privileges can only Update Customer based configurations. Configurations cannot be added, made active or inactive or deleted.
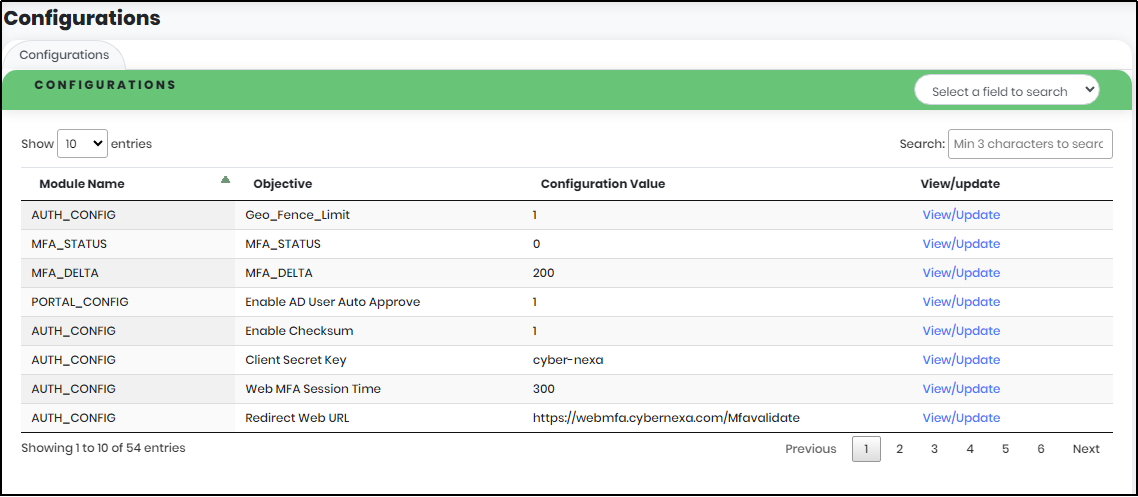
Figure 188 - Configurations Screen
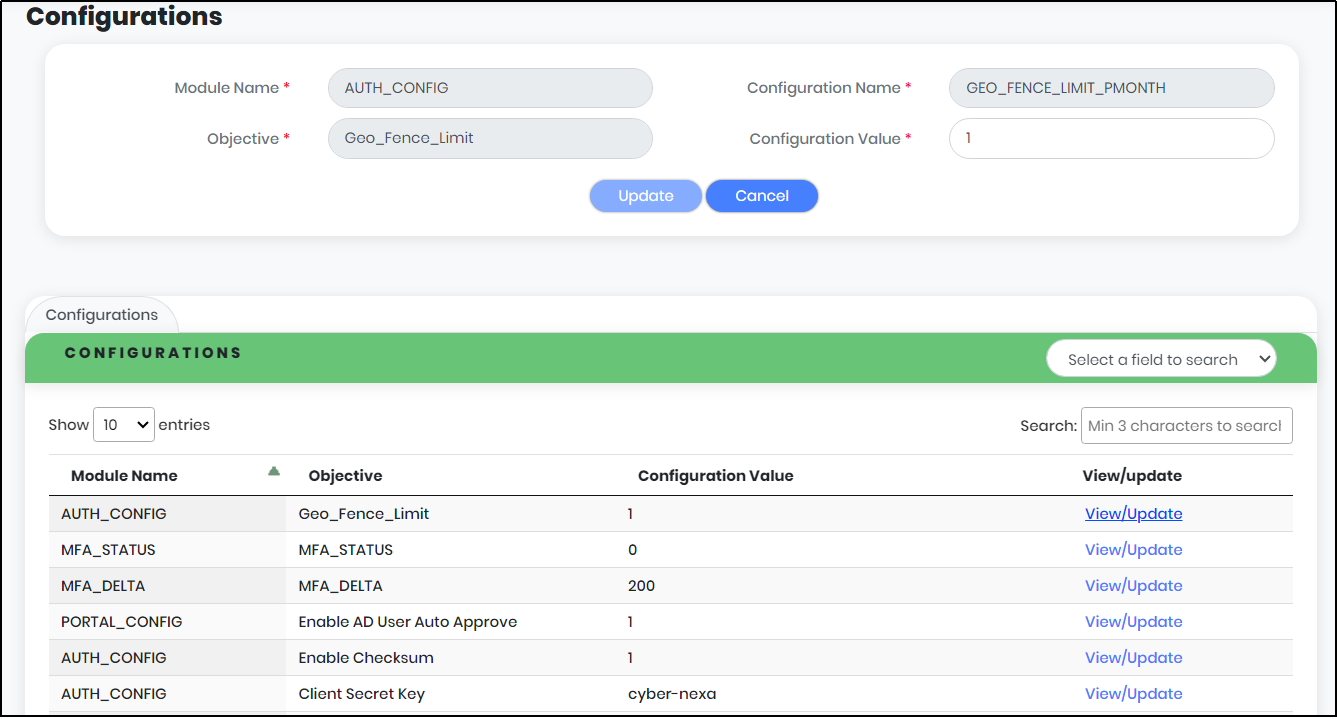
Figure 189 - Geo-Fence Auth_Config Screen
Figure 189.1 List View
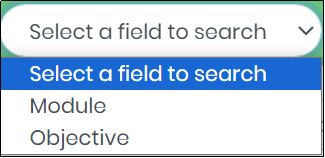
Figure 189.2 Select a field to search drop-down
Annexure 1
Application User can perform below tasks
Installing CyLock MFA application in mobile device
- Install CyLock apk to mobile device of the Application User from Google Play store/ Apple App store as shown in Figure 194
- Mobile app displays as shown in Figure 194.1.
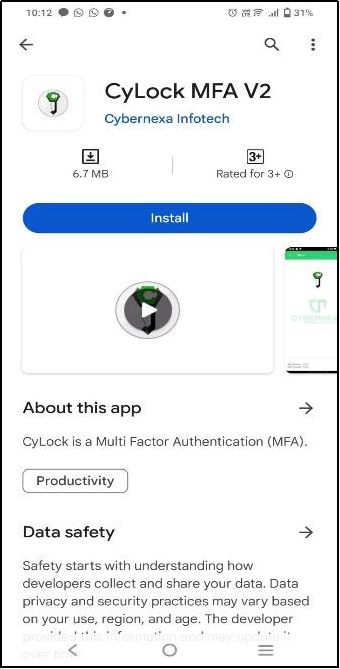
Figure 190 – CyLock App Installation screen
Figure 190.1 Mobile Device with CyLock App
Registering Mobile device for authenticating Applications
- Clicking the CyLock application in the mobile device, the app opens and asks for permissions as shown in Figure 195.1 & 195.2
- Click “Add User” icon to initialize the camera.
- Scan the QR code sent to the registered email of the Application User as shown below.
- Device adds the Application as shown below.
- Home
- Authenticator
- History
- Notifications
- Home Screen
- About Screen
- CR-OTP
- DELETE
- CHANGE PIN
- QR AUTH
- TOTP
- Authenticator
- History
Figure 191.1 - Permission 1/3
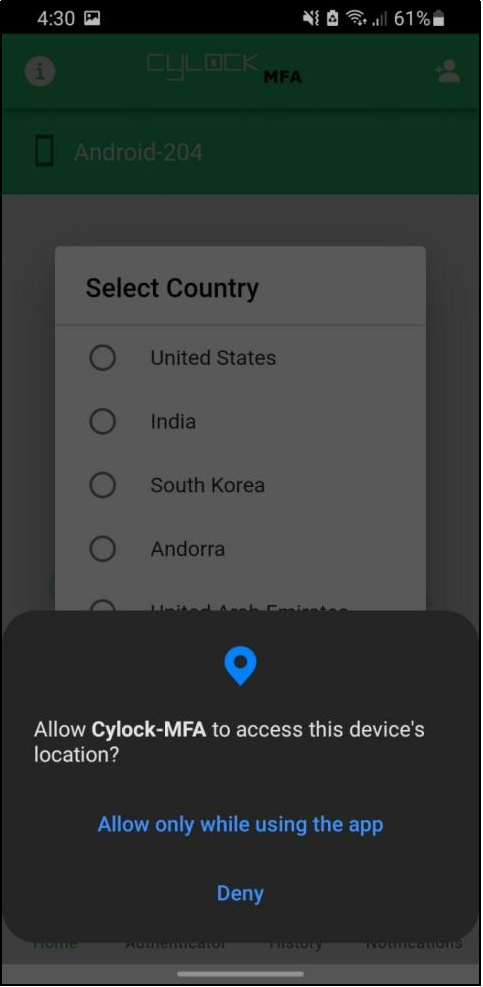
Figure 191.2 - Permission 2/3
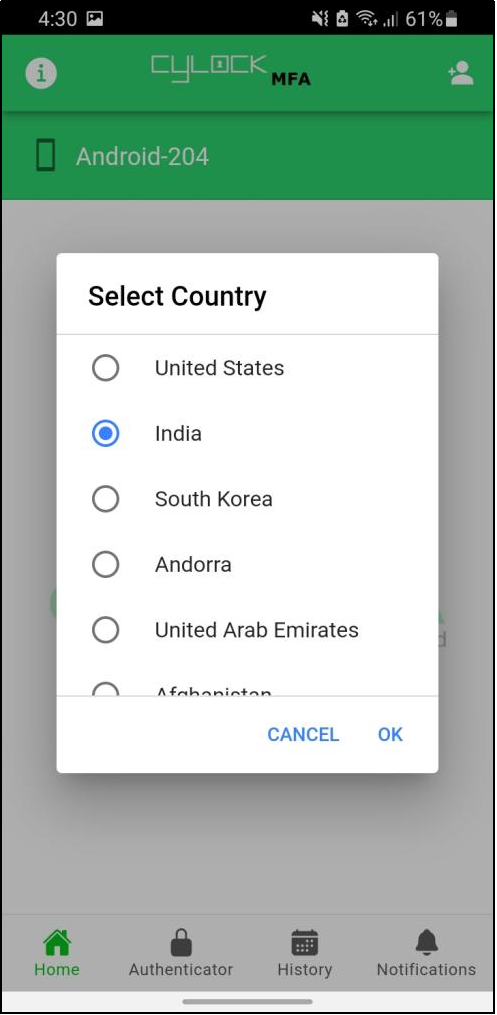
Figure 193 - Select Country Screen
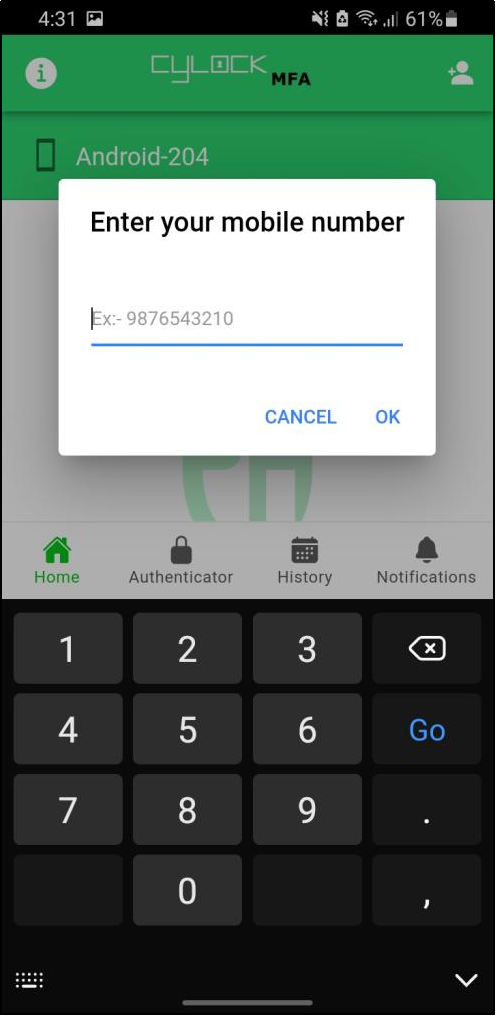
Figure 194 - Enter Mobile number Screen
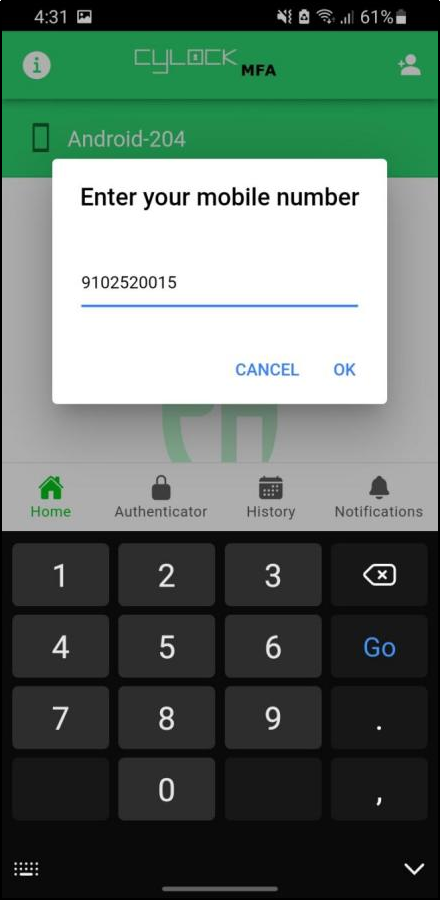
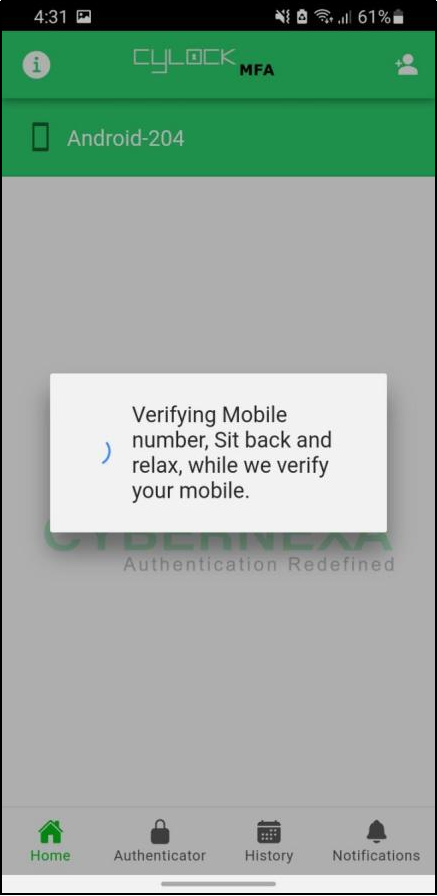
Figure 195 – Device Binding
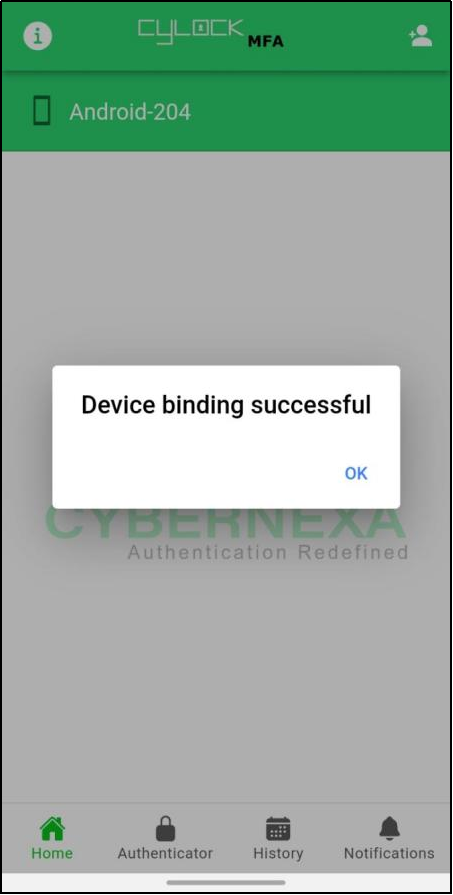
Figure 196 - CyLock MFA App Homepage
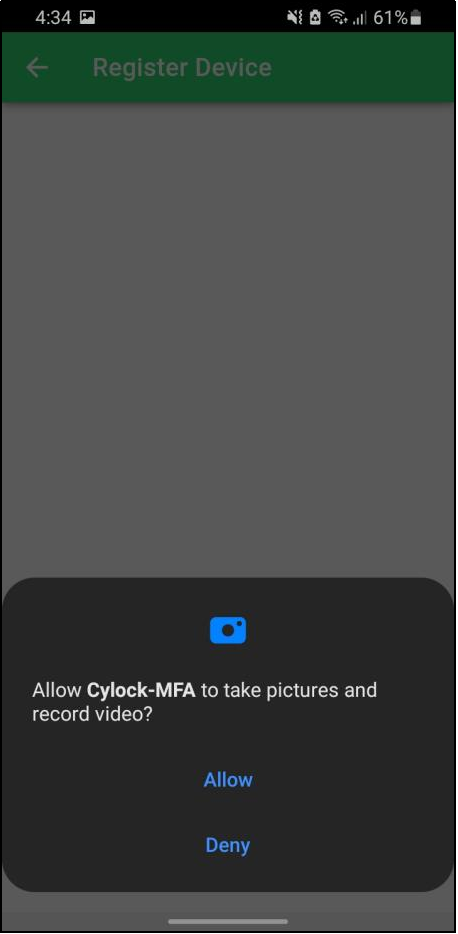
Figure 197 – Allow Permission
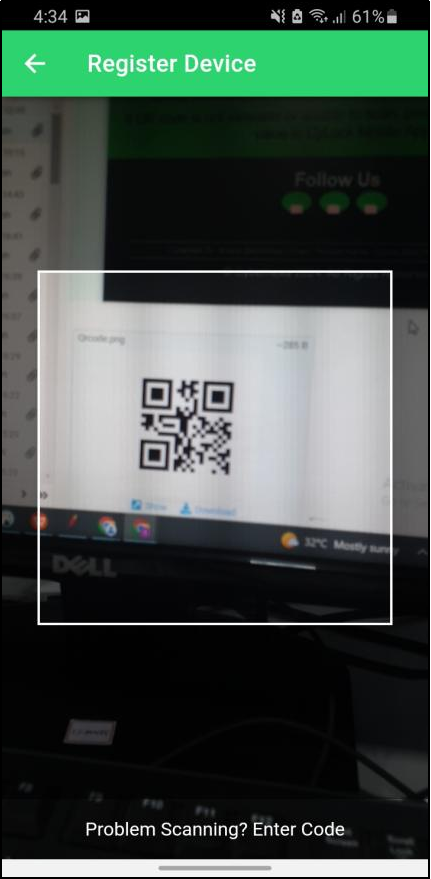
Figure 198 – Scan QR
Note: If problem occurs during scanning process, Application User can use the Token in email for registration as shown in figure 59.
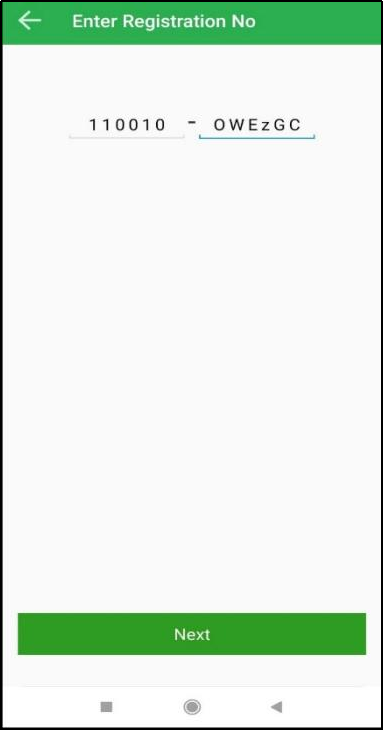
Figure 199 - Enter Registration No screen

Figure 200 - Set PIN for account
Enter “PIN” of 6 digit Numbers.
Click “Finish” icon to complete registration.
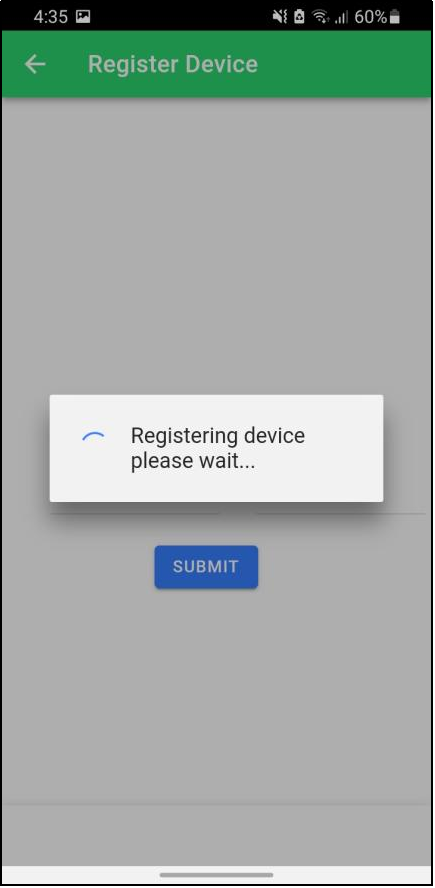
Figure 201 – Registering device
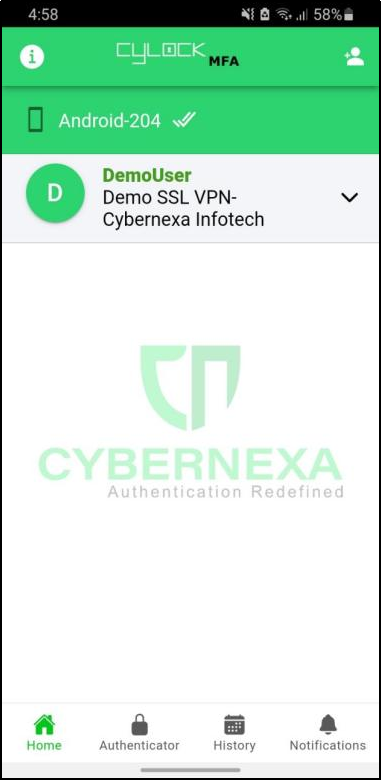
Figure 202 - Home Screen
Home screen of the app is displayed as shown below
The app includes below screens
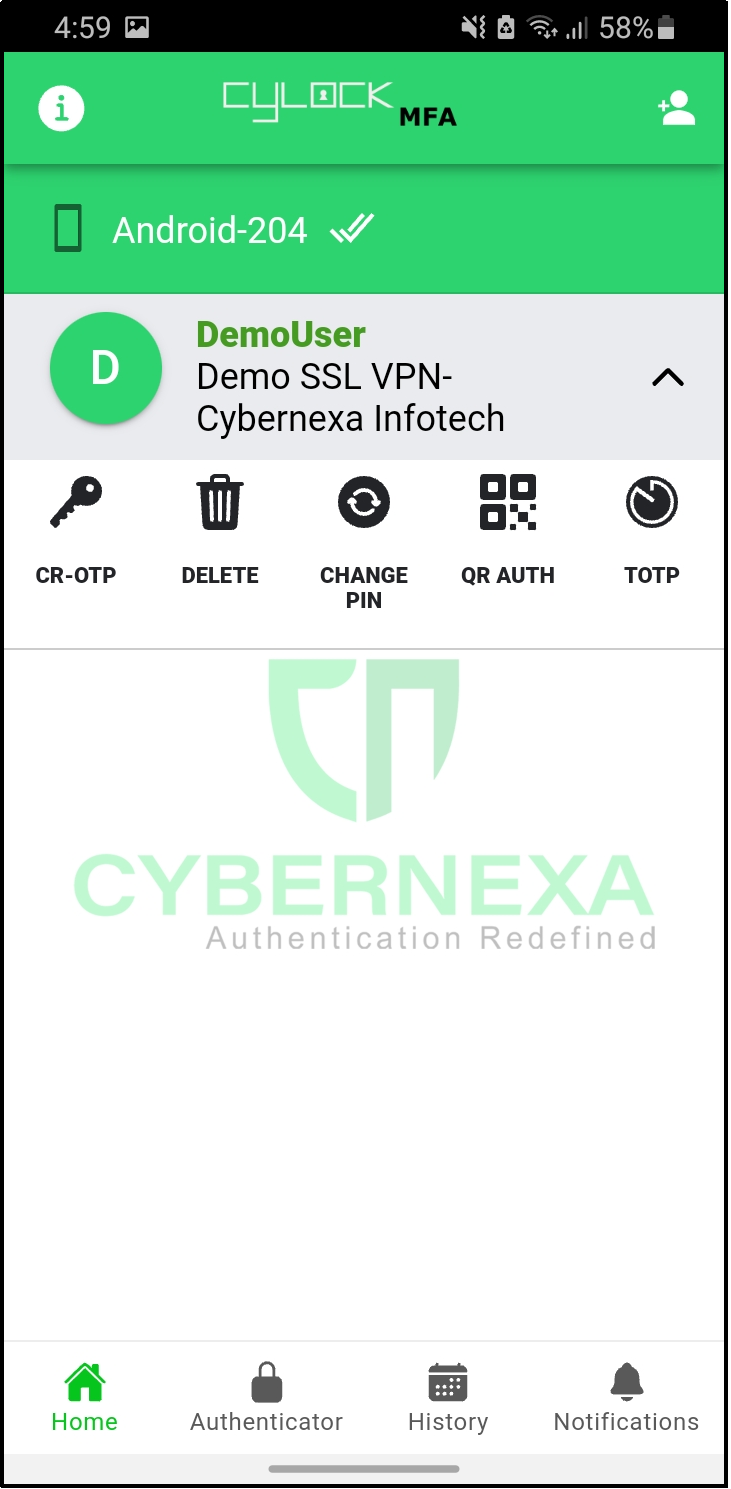
Figure 203 – CyLock User Info
On clicking “Visit Us” button, app navigates to Cybernexa website to get more information about the app.
Click “Delete” option, it navigates to Authentication page as shown in below Figure and checks for location.
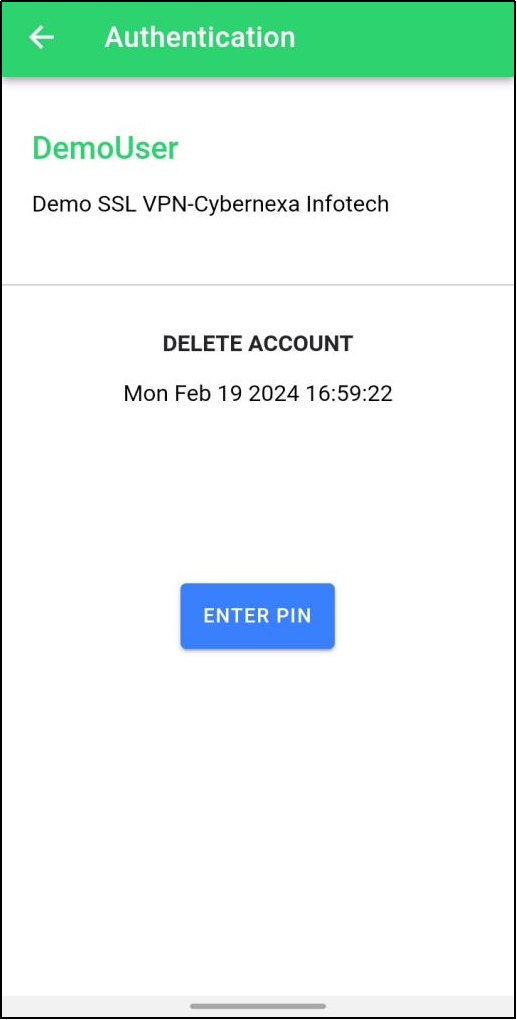
Figure 204 – Delete Account
Click “Enter PIN” to enter your PIN and click to delete the application from your registered Mobile Device.
Click “Change PIN” to change the PIN Number. The Change PIN Screen appears as shown in below Figure
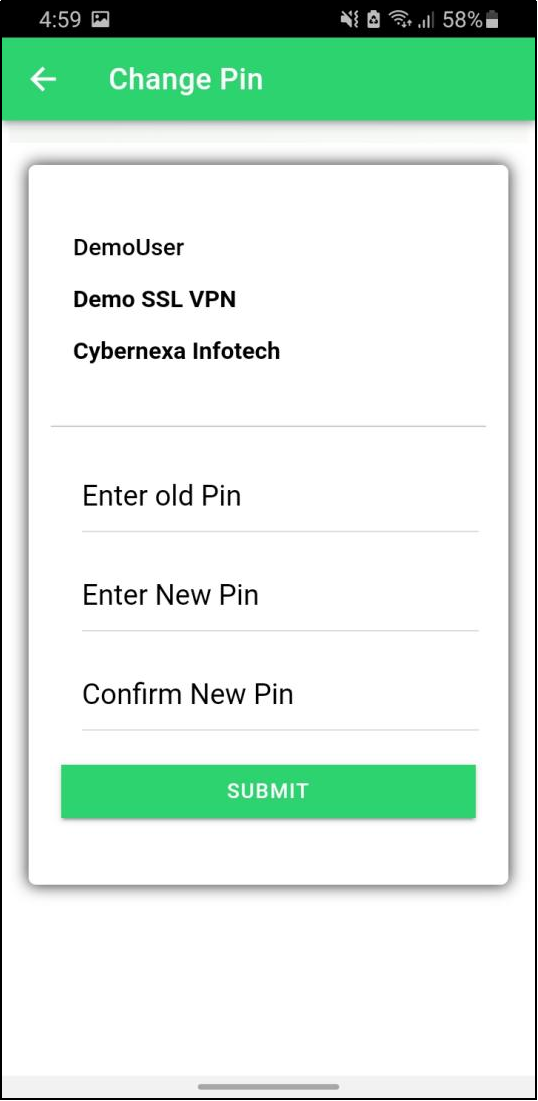
Figure 205 – Change PIN
This provides history of login date and time of the User.
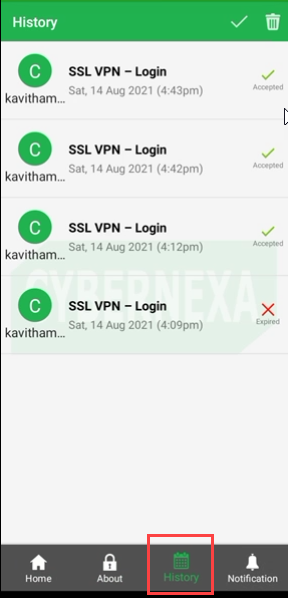
Figure 206 - History Screen
Accessing Application using various authentication
Applications that are secured using CyLock MFA can be accessed through various authentications.
Here is an example of accessing SSL-VPN, one of the applications secured using CyLock MFA, during authentication process. Below are the authentications explained in detail.
- Push Notification
- Email CR OTP
- Email Plain OTP
Push Notification
- After opening FortiClient, click “Remote Access” to display the login screen.
- Click
 gear icon, to navigate to New VPN connection screen.
 - Enter all details as required.
- Click “Save” all details.
- Enter Password as
followed by “,1” - Touch the notification to navigate to authentication screen as below.
- Enter PIN and select “Accept” to establish SSL-VPN connection.
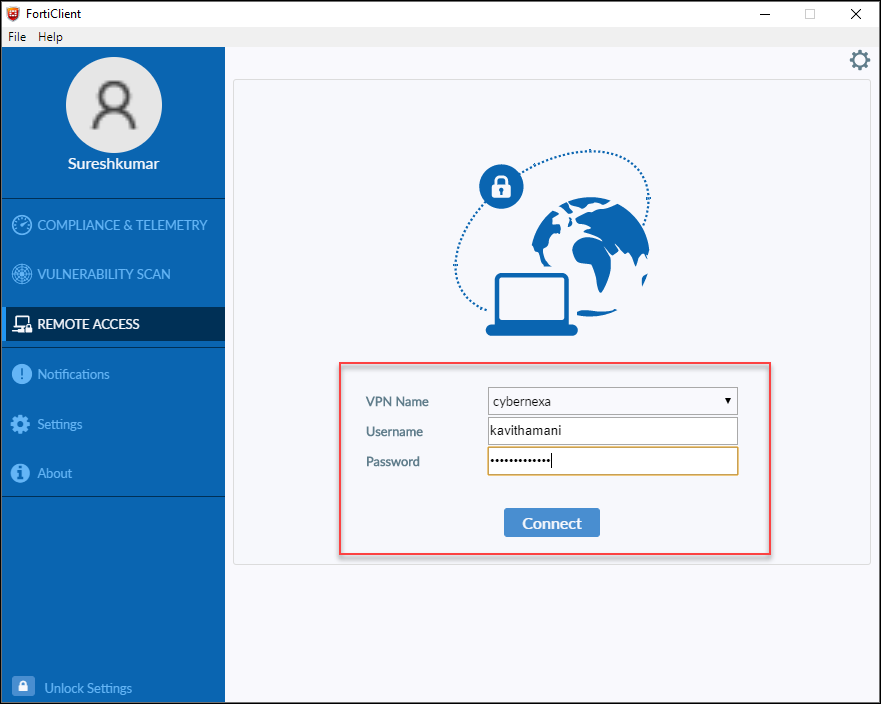
Figure 207 - Fortinet Login Screen
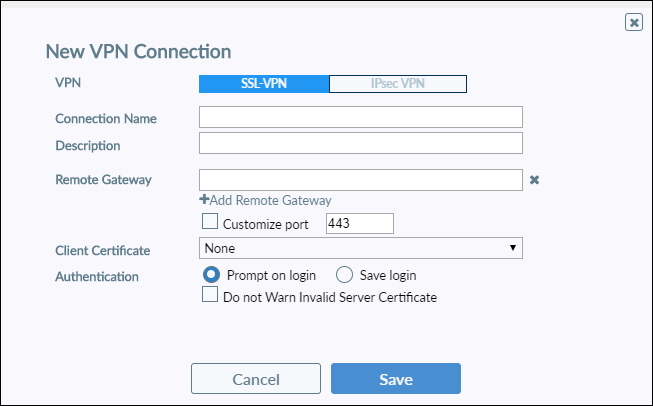
Figure 208 - New VPN Connection Screen
FortiClient navigates to Remote Access login Screen with VPN name and Username displayed by default
The system sends Push Notification to the mobile device as below.
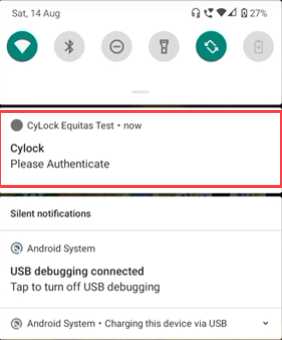
Figure 209 - Push Notification
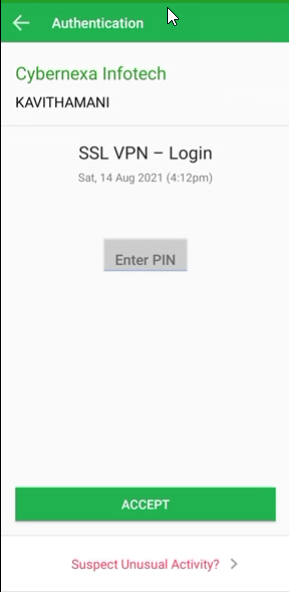
Note: Swipe “Suspect Unusual Activity” to select “Reject” or “Reject and block” option, if suspect fraudulent action.
Email CR OTP
- In the Remote Access login screen of FortiClient as in figure 61,, enter Password as
followed by “,2”. - In the Mobile device, click the Application name, to display CR-OTP, DELETE, CHANGE PIN, QR AUTH and TOTP options as shown below.
- Click “CR-OTP” to navigate to Get OTP screen as shown below.
- Enter CR OTP sent to email, in Enter Code.
- Click “ENTER PIN” to type pin set during registration as shown in figure 74.
- After PIN validation, click GET OTP to generate “Response OTP” as shown below..
- Enter Response OTP from device to “Answer” textbox in Forticlient.
- Click “Ok” to establish VPN Connection.
The system sends CR OTP to registered Email id as below sample screenshot.
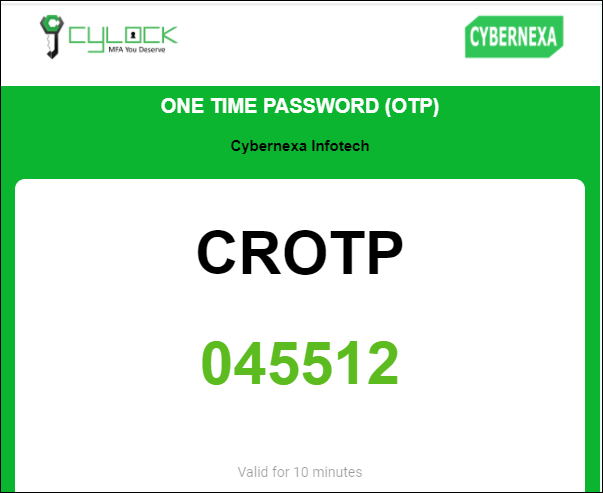
Figure 71 - Sample CR OTP in Email
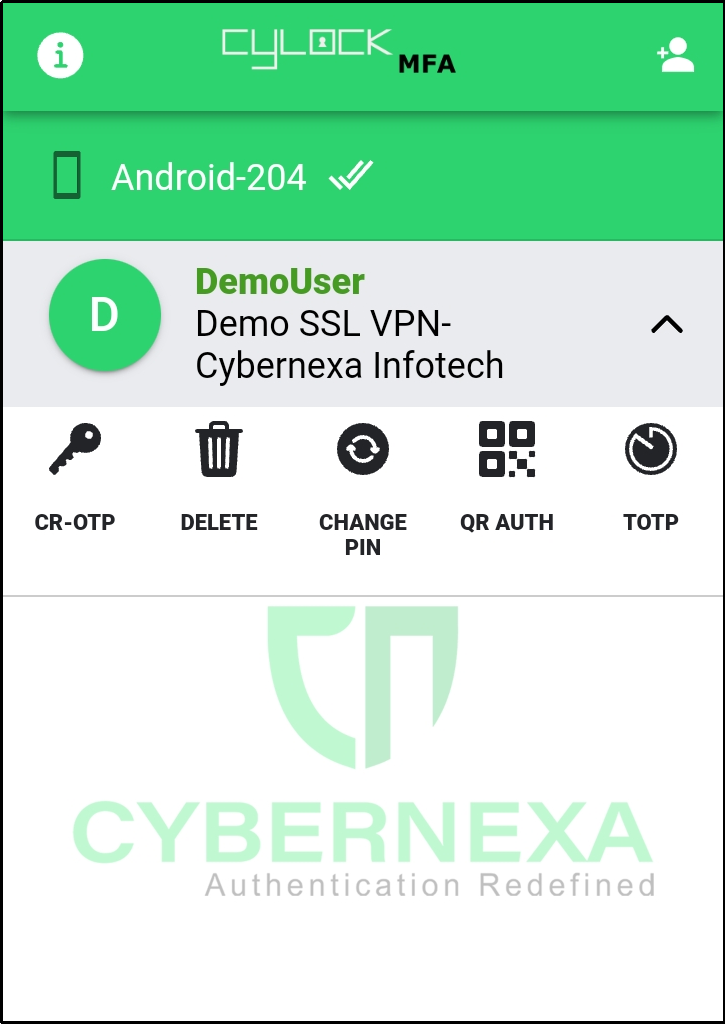
Figure 72 - Application for authentication
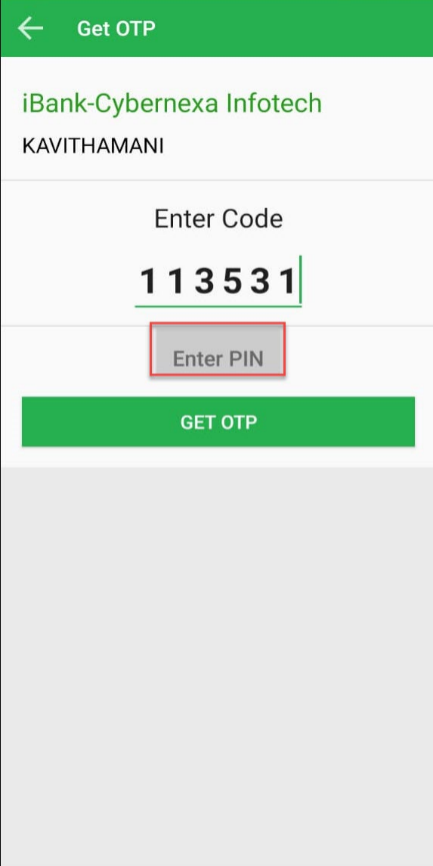
Figure 73 - Get OTP screen
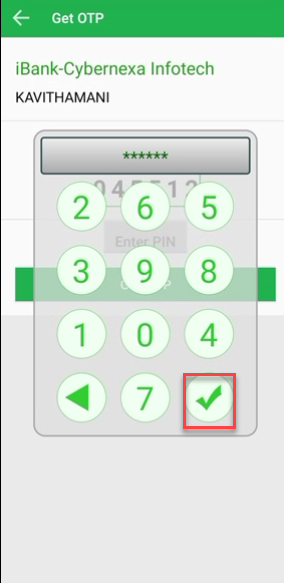
Figure 74 - Enter PIN popup
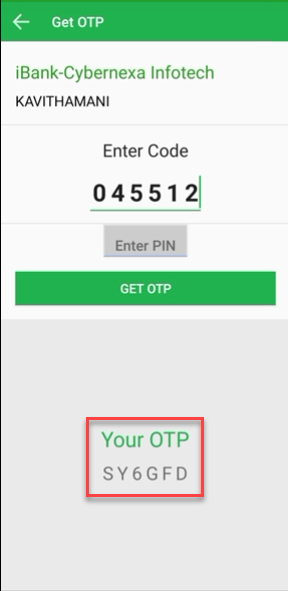
Figure 75 - Response OTP generated
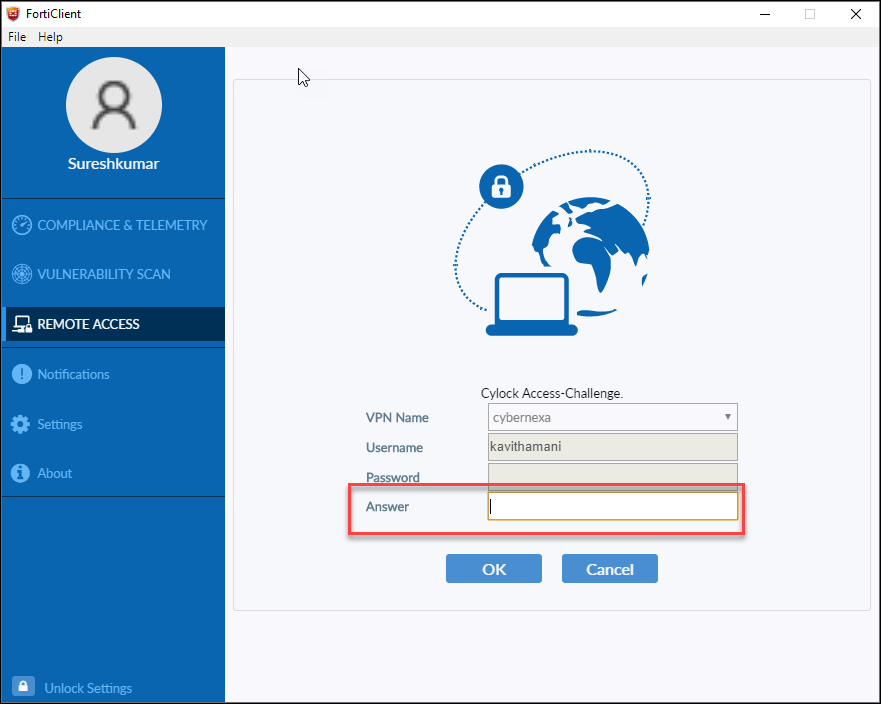
Figure 76 - FortiClient Login screen
Email Plain OTP
- In the Remote Access login screen of FortiClient as in figure 61, enter Password as password followed by “,3”.
- Enter Plain OTP from Email to “Answer” textbox in Forticlient.
The system sends Plain OTP to registered Email id as below sample screenshot.
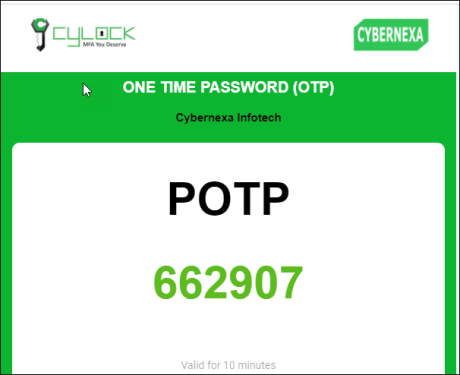
Figure 77 - Sample Plain OTP in Email
Figure 78 - FortiClient Login screen
Click “Ok” to establish VPN Connection.

