Overview
CyLock MFA enables strong Multi-Factor Authentication for any firewall based SSL VPN user login. CyLock MFA integrates with the firewall through CyLock MFA RADIUS proxy component installed in a server within the organization’s local network.
The CyLock MFA RADIUS proxy component enables any firewall with RADIUS protocol support to carry out a strong Multi-Factor Authentication (MFA) during remote login to remote network through SSL VPN.
Supported Devices:
Firewall Devices: Fortinet FortiGate, Cisco ASA, Palo Alto and any firewall device which support RADIUS authentication.
Architecture Overview
CyLock MFA RADIUS proxy component needs to be installed within your network to enable MFA during SSL VPN login process. First factors (user login credentials) can be authenticated with an on-premise AD / LDAP / LDAP or against CyLock MFA local store. A typical deployment architecture and process is shown below.
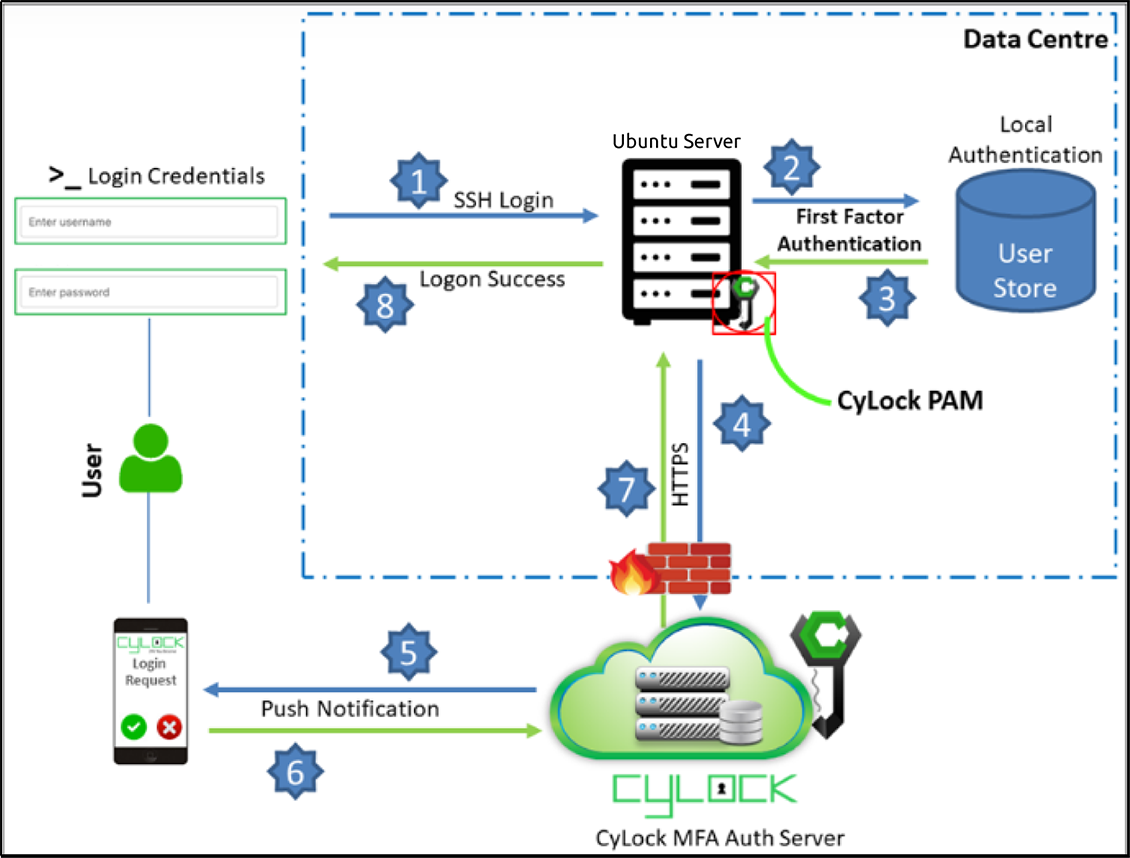
Figure 1: Deployment Architecture Block diagram of integrating Fortinet Firewall with CyLock RADIUS Proxy
Note:
- CyLock MFA Proxy server communicates with CyLock MFA Auth Server on TCP port 443
- Any firewall configuration to restrict access to CyLock MFA Auth Server through destination IP address or IP address ranges is not recommended as the IP addresses may change to provide service high availability
Prerequisites
- Securing an application requires an active CyLock MFA account. (Refer “Getting Started: Guide to CyLock MFA” to start using CyLock MFA to protect your applications).
- Login to “CyLock MFA Portal”
- Navigate to Application menu in the left menu panel
- Click “Add Application” button to secure an application. Locate and select “SSL VPN” from the list of application names. Click “+Secure” button to configure CyLock MFA for SSL VPN. Enter the details as requested and click “Save” button. Before leaving the page copy Application Key and Application ID, which are required during CyLock MFA RADIUS Proxy component installation. See “Securing an Application” for more information about protecting applications in CyLock MFA.
- Node.JS to be installed in the server where the CyLock MFA RADIUS Proxy component will be deployed.
- Download the CyLock MFA RADIUS Proxy component from the URL
https://downloads.cybernexa.com/downloads/CyLock_radius_proxy.zip
.
- Follow the instructions in “CyLock MFA RADIUS Proxy Installation” section to enable Multi-Factor Authentication (MFA) for SSL VPN user login.
- Verify Microsoft AD / LDAP / LDAP is installed and configured for authenticating first factors of users.
- Download CyLock MFA Mobile App from Android or iOS store.
- Register SSL VPN user using CyLock MFA Mobile app.
CyLock MFA RADIUS Proxy Installation
CyLock MFA RADIUS Proxy component will receive incoming RADIUS requests from your firewall during SSL VPN login. The proxy component will then perform the primary authentication (first factor authentication) either with your internal AD / LDAP / LDAP server or CyLock MFA local store, and then contact CyLock MFA Auth server for second factor authentication.
CyLock MFA RADIUS Proxy can be installed on a physical or virtual host within your network. We recommend a system with at least 4 vCPU, 200 MB disk space, and 4 GB RAM. Proxy supports the following operating systems:
- Windows Server 2008 or later (Server 2016+ recommended)
- CentOS 7 or later (CentOS 8+ recommended)
- Red Hat Enterprise Linux 7 or later (RHEL 8+ recommended)
- Ubuntu 16.04 or later (Ubuntu 18.04+ recommended)
- Debian 7 or later (Debian 9+ recommended)
Install Node.JS in the server where the CyLock MFA RADIUS Proxy component will be installed.
Download the CyLock MFA RADIUS Proxy component. Refer Prerequisites section above. After downloading, copy/move the Proxy Component to the respective server.
Configuring CyLock MFA RADIUS Proxy component
Go to the folder where the Proxy component has been copied. Extract the CyLock_radius_proxy.zip. After extracting, follow the below steps to configure the component.
On Windows or Linux machine go to the respective folder where the proxy component was copied & extracted.
MFA Configuration:
Open the cyconfig.js file in CyRadius Folder with administrative privileges and change the following properties:
| # |
Property Name (key) |
Description (value) |
| 1 |
url |
Enter Auth URL (Ex - https://demoauth.cybernexa.com/api/v2/srv/)
Contact the CyLock Support Team to get the Auth Server URL.
|
| 2 |
id_sp |
Customer ID value. Refer point #4 in Prerequisites section. |
| 3 |
Authorization |
API Key value. Refer point #4 in Prerequisites section. |
| 4 |
radius_secret |
Enter the encrypted RADIUS secret key. To obtain encrypted secret key please refer ‘Key Encryption Process’ section.
|
Note: Do not modify the key in the key-value pair.
AD / LDAP Configuration:
To enable RADIUS Proxy component, communicate with MS AD / LDAP server or LDAP server, configure the adconfig.js file.
Open the adconfig.js file in CyRadius Folder with administrative privileges and edit the following properties:
| # |
Property Name (key) |
Description (value) |
| 1 |
Open_ldap_server |
Enter your open ldap server URL (ex: ldaps://ldap.cybernexa.com)
|
| 2 |
domain |
Provide your AD / LDAP domain name. |
| 3 |
url |
For secured LDAP:
ldaps://computername.domain.com or else simply use
For normal LDAP:
ldap://computername.domain.com
|
| 4 |
baseDN |
AD / LDAP Domain name |
| 5 |
Password |
AD / LDAP server Administrator user’s encrypted password. To obtain the encrypted AD/LDAP Password please refer ‘Key encryption Process’ section. |
Note: Do not modify the key in the key-value pair.
Key Encryption Process:
Encrypting RADIUS Secret Key and AD / LDAP Password.
a. After Unzip the radius_proxy.zip file. Go to the secure_cred directory and execute the "secure_cred.js" file using the command below
(i).node secure_cred.js
- Enter Customer ID (ID_SP): Get the ID_SP Key from the CyLock Portal. Refer Point #4 in Prerequisites Section.
- Enter Authorization Key: Get the API Key from the CyLock Portal. Refer Point #4 in Prerequisites Section.
- Enter Radius Secret: This Secret key is for communication between Firewall and RADIUS Proxy server.
- Enter AD / LDAP Admin Secret: Enter Your AD / LDAP Admin Password Refer Figure 2.
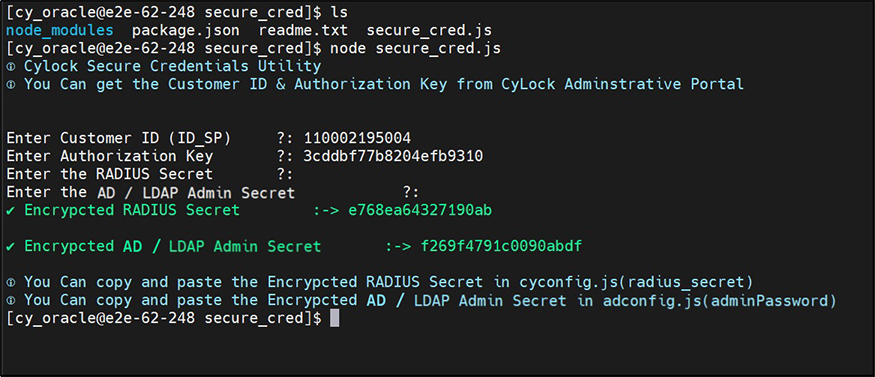
Figure 2: RADIUS and LDAP Admin Secret key encryption
You can copy and paste the Encrypted RADIUS Secret in cyconfig.js on radius_secret parameter.
You can copy and paste the Encrypted AD / LDAP Admin Secret in adconfig.js on password parameter.
Note:The RADIUS Secret and AD / LDAP Password should always be encrypted.
Starting CyLock MFA RADIUS Proxy
Manual Start (Windows and Linux):
- Open terminal window
- Go to the folder where CyLock MFA RADIUS proxy component was copied
- Execute the command “node radius.js”
Auto Start (Linux):
To start the component automatically create and run as service
For creating service file follow the below steps:
- Open terminal window
- Execute
vi/etc/systemd/system/cylockradiusservice.service
- Copy paste the below contents to the file
//*****Start of the file*****
[Unit]
Description=cylockradiusservice
After=syslog.target
After=network.target[Service]
User=cylock_iam
//Replace with your system user name
Type=simple
[Service]
Restart=always
StandardOutput=syslog
StandardError=syslog
//Provide the path of the CyLock MFA RADIUS proxy component (server.js)
WorkingDirectory=/home/cylock_iam/package/
//Provide the path of the CyLock MFA RADIUS proxy component (server.js)
ExecStart=/usr/bin/node /home/cylock_iam/package/server.js
SyslogIdentifier=cylockradiusservice
[Install]
1.WantedBy=multi-user.target
//******End of the file******
- 4.Save and exit vi editor by entering the following command
a.:wq!
- 5.Enable the service by entering the following command
a.systemctl enable cylockradiusservice.service
- 6.Start the service by entering the following command.
a.systemctl start cylockradiusservice.service
Note:For Windows OS, create a service for the batch file (.bat) using nssm.exe utility and start the service.
Configuring Firewall Settings
CyLock MFA integrates with your firewall device based VPN via RADIUS to add Mlti-Factor Authentication (MFA) to SSL VPN logins. In this context your firewall device will act as RADIUS client and the CyLock MFA RADIUS Proxy component as the RADIUS server.
1.Log in to the Fortinet’s FortiGate administrative interface by typing ip address of Fortinet firewall appliance ip address in address bar in the browser.
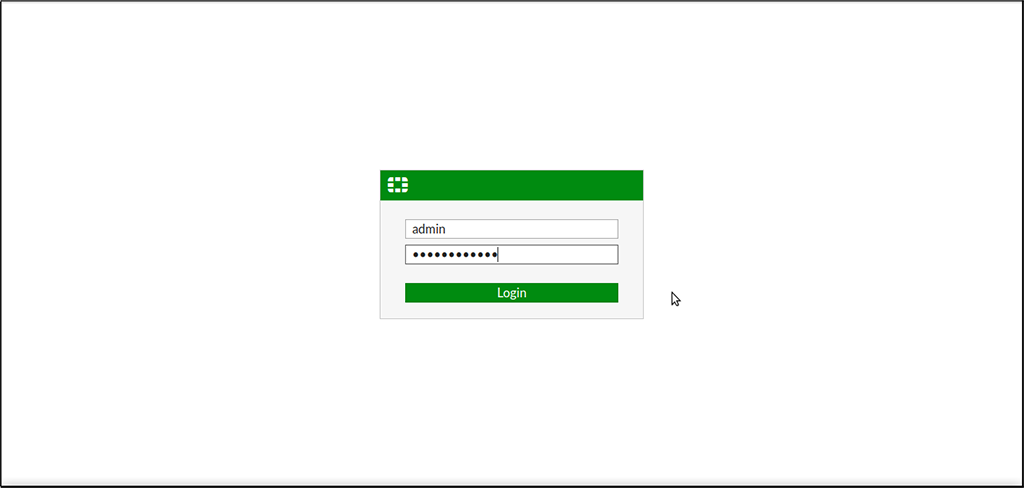
Figure 3: Fortinet Administrative console
2.Configure RADIUS server.
- Click the User & Device section in the left navigation panel and click on RADIUS Servers.
- Click the ‘Create New’ button to create a new RADIUS server.
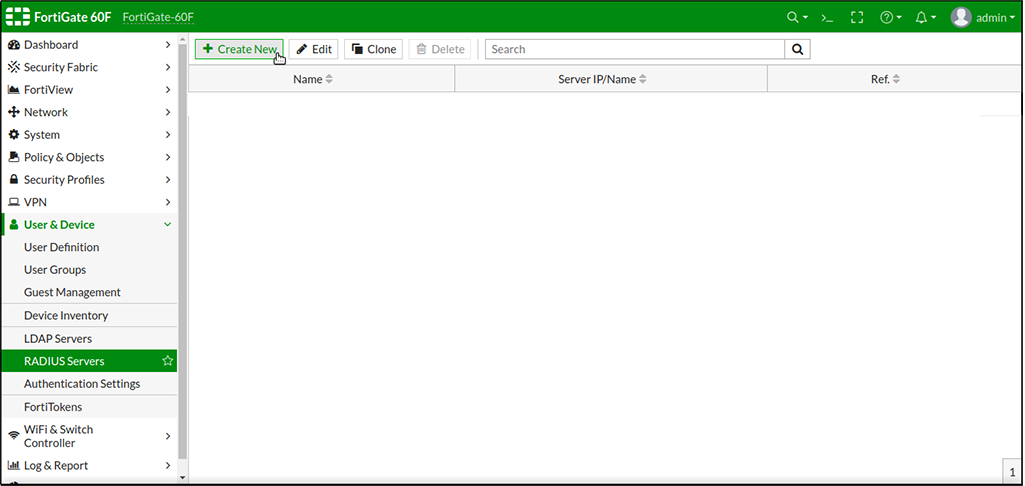
Figure 4 : Adding RADIUS Server
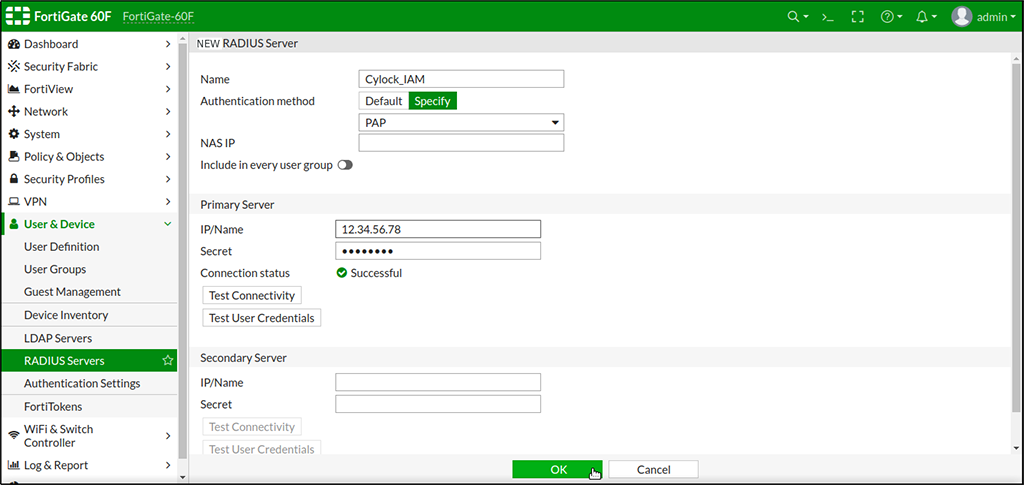
Figure 5: Configuring RADIUS Server
- Enter the Radius server (CyLock Authentication Proxy) IP Address and Secret key and Test the connectivity Status.
- Click the OK button to create the new RADIUS server.
3.Associating the RADIUS Server to the SSL VPN group:
Click on the ‘User Groups’ under ‘Users & Device’ drop down menu
Here you can see existing VPN Group.
Click on Add and then Click OK. Refer Figure 6.
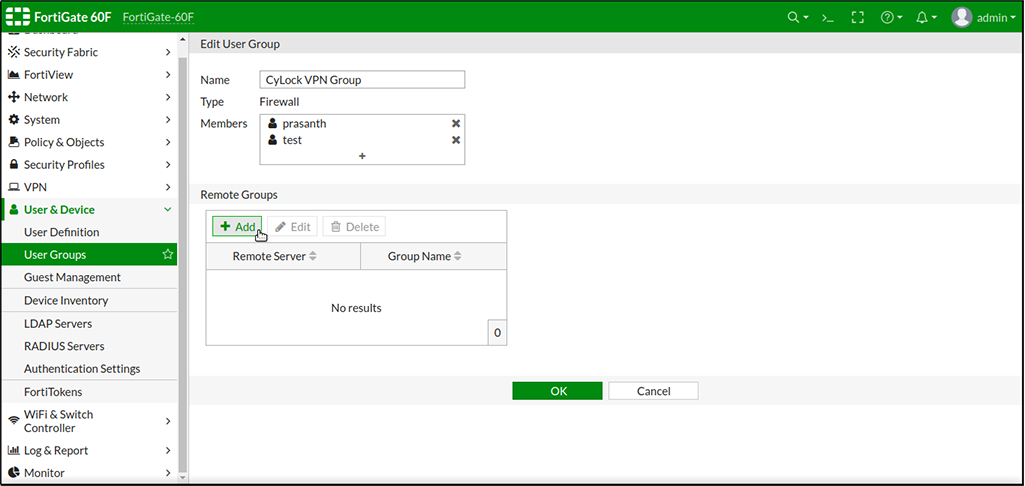
Figure 6: Associating RADIUS server to VPN
Click on the drop down of Remote Server. Refer Figure 7.
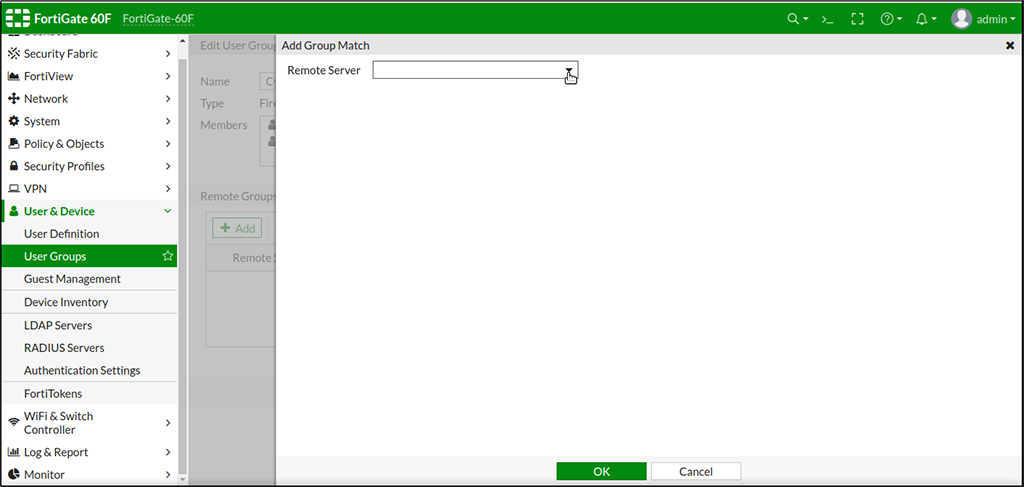
Figure 7: Clicking Remote server drop down
Select the Configured RADIUS Server as shown in the Figure 8 and Click OK.
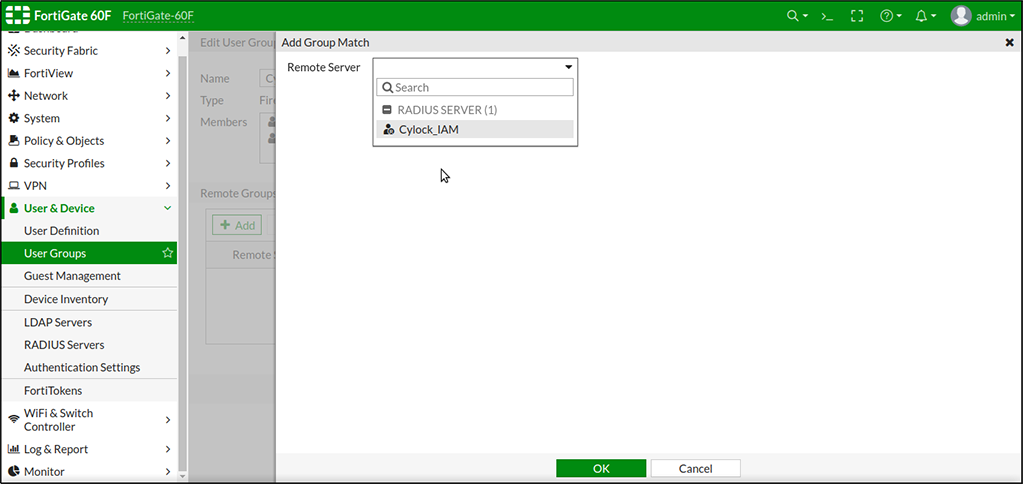
Figure 8: Selecting configured RADIUS server
Then in Groups, Select ‘Any’ and Click OK.

Figure 9: Selecting the Groups ‘Any’
You can see the RADIUS Server is added, then click on ok as shown in the Figure 10.
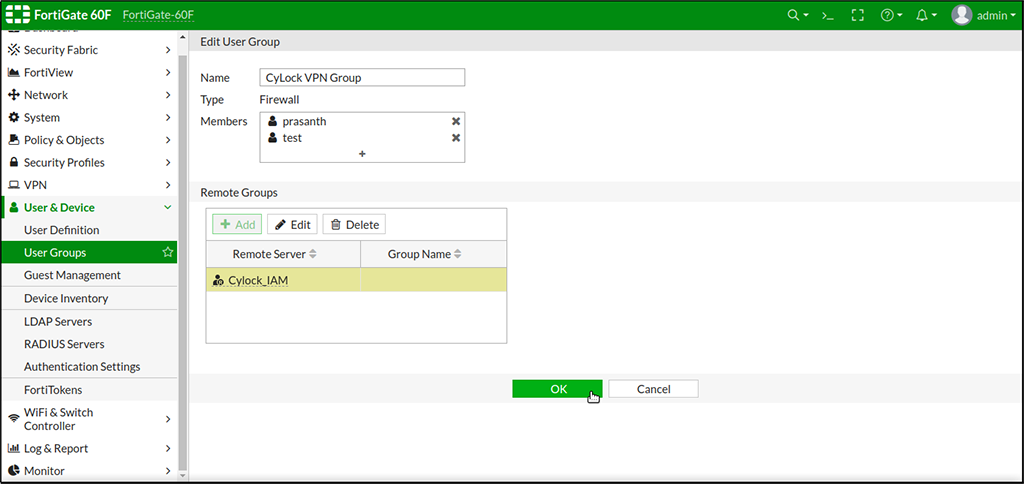
Figure 10: Radius server added
Now RADIUS Server is associated with VPN Group.
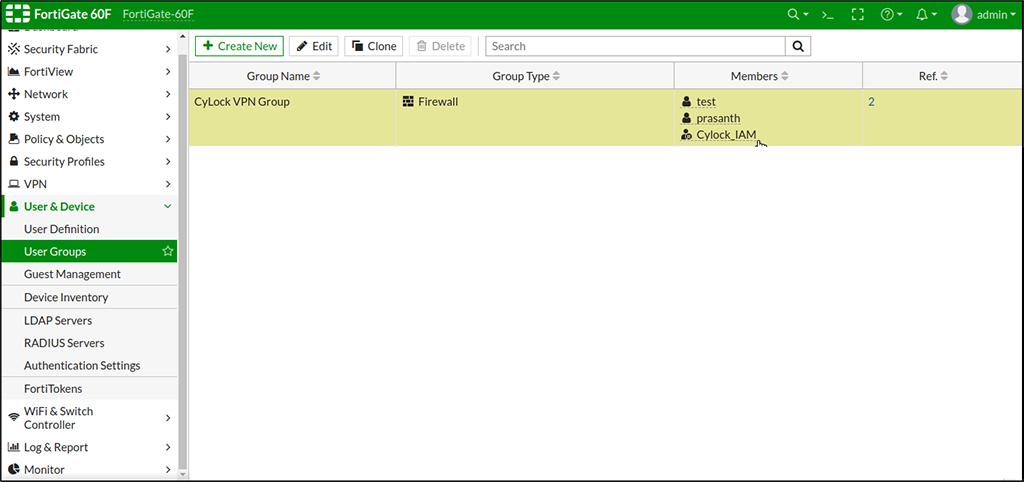
Figure 11: RADIUS Server is associated with VPN Group
Configure timeout
The Fortinet appliance has a default timeout of 5 seconds, which will fail for anything other than a passcode authentication. The timeout can be increased from the Fortinet command line interface to resolve the issue. CyLock MFA recommends increasing the timeout to at least 90 seconds
- Connect to the appliance CLI. Consult the documentation that accompanied your Fortinet device for more information.
- Execute the following commands:
config system global
set remoteauthtimeout 120
end
- Execute the following commands:
config user radius
edit radius server name
set timeout 150
end
Example screenshot:

Figure 12: Configuring default timeout
Test the Set-Up
Types of Authentication Options:
CyLock MFA allows the following authentication options to login SSL VPN.
| # |
Mode |
Process Steps |
| 1 |
Default Mode |
In password field enter << Your password >> (for carrying out the default authentication) |
| 2 |
Online |
In password field enter << Your password >>,1 (for carrying Online MFA Push authentication) |
| 3 |
Online |
In password field enter << Your password >>,2 (for carrying Online MFA Push+PIN authentication) |
| 4 |
Online |
In password field enter << Your password >>,3 (for carrying Online MFA Push+Bio authentication) |
| 5 |
Offline (CR-OTP - Display) |
In password field enter << Your password >>,4 (for carrying Offline MFA CR-OTP (Display) authentication) |
| 6 |
Offline (CR-OTP – Email) |
In password field enter << Your password >>,5 (for carrying out Offline MFA CR-OTP (Email) authentication) |
| 7 |
Offline (CR-OTP – SMS) |
In password field enter << Your password >>,6 (for carrying Offline MFA CR-OTP (SMS) authentication) |
| 8 |
Offline (POTP - Email) |
In password field enter << Your password >>,7 (for carrying out Offline MFA POTP (Email) authentication) |
| 9 |
Offline (POTP – SMS) |
In password field enter << Your password >>,8 (for carrying Offline MFA POTP (SMS) authentication) |
| 10 |
Offline (TOTP) |
In password field enter << Your password >>,9 (for carrying Offline MFA TOTP authentication) |
Test the connection:
- Open the SSL VPN client app from your desktop or laptop
- Select your VPN profile
- Enter User name
- Enter password along with the MFA mode as given in the above table
- Based on the mode entered carrying out the secondary authentication If successful, remote login will be allowed
- Open FortiClient in your Desktop / Laptop.
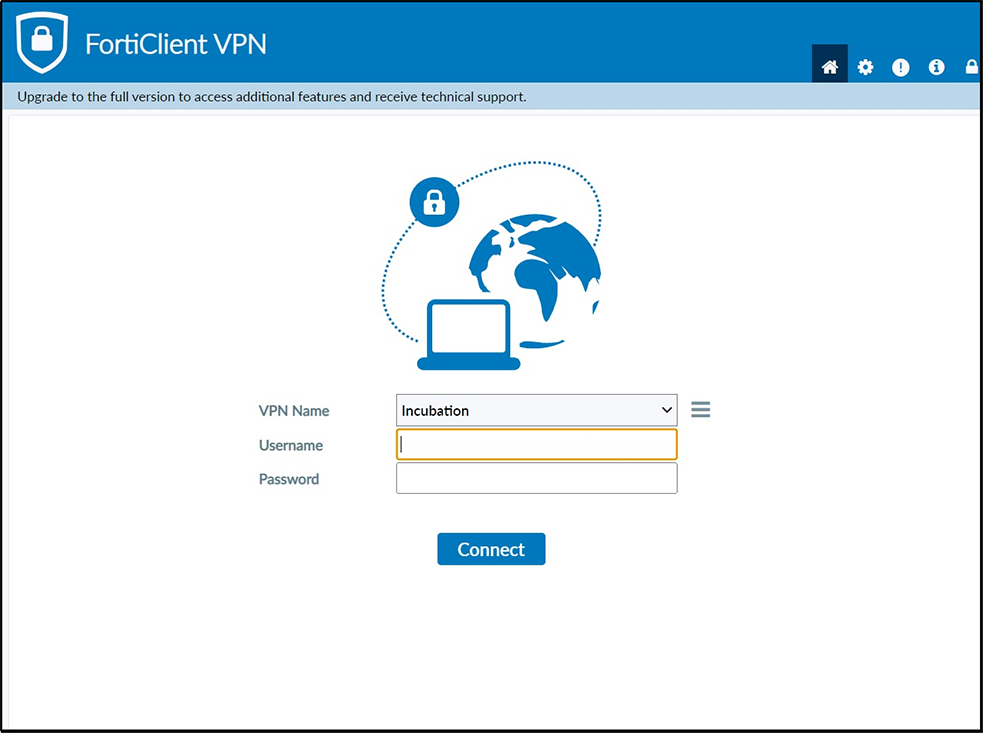
Figure 13: ForiClient home page
- Enter User name and Password as shown in the Figure 14 and then Click Connect.
.png)
Figure 14 : Entering Username and Password (1FA)
- Once the first factor is verified by CyLock RADIUS Proxy , 2FA is triggered by CyLock Authentication server (Here PUSH+PIN has been set as preferred authentication mode for example).
- You will receive PUSH notification in your registered mobile as shown in the figure 15.
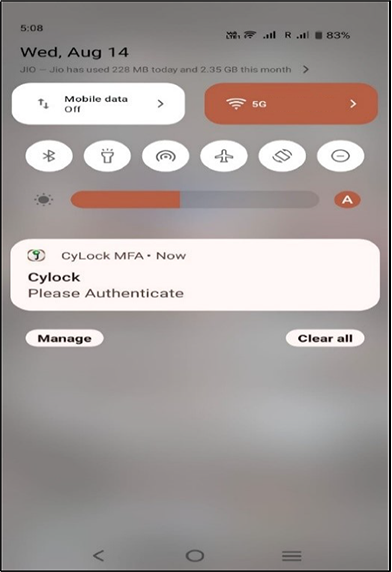
Figure 15: Received PUSH notification (2FA)
- Click on the PUSH notification, Click on the Enter PIN
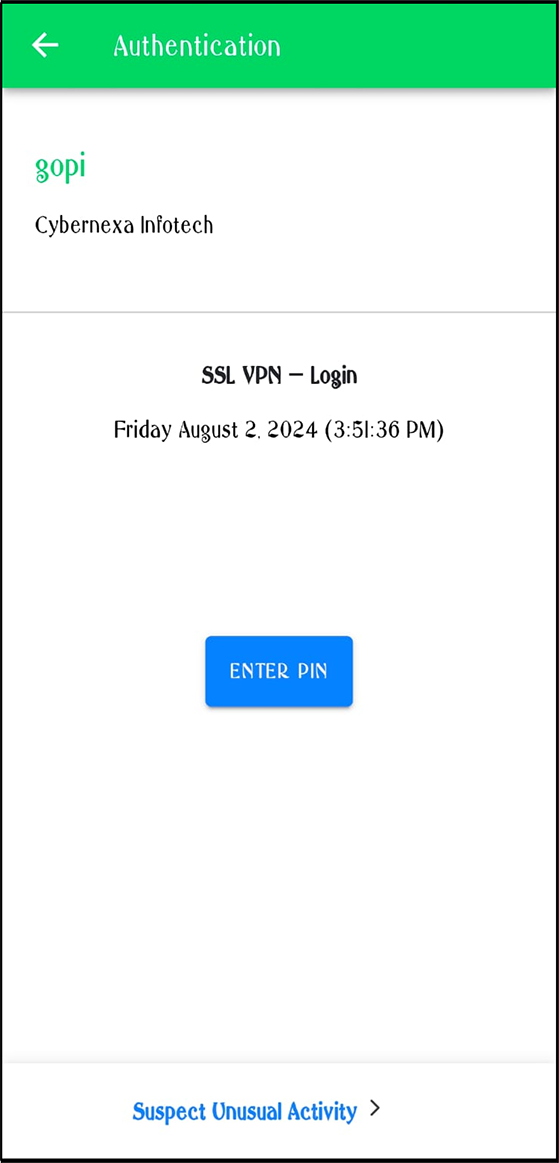
Figure 16: Clicking on Enter PIN
- Then provide the PIN that you have set.
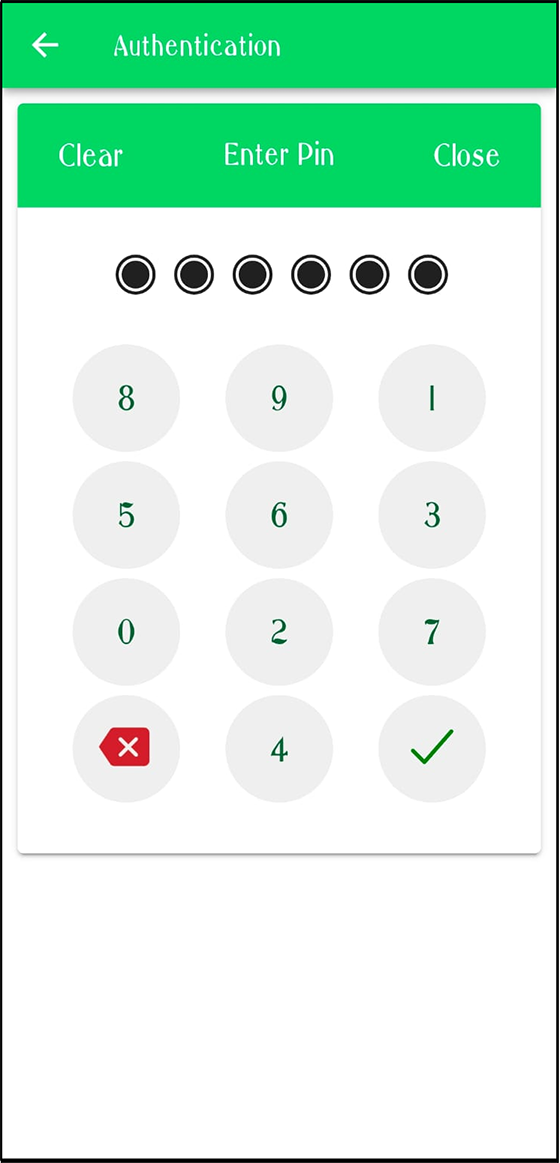
Figure 17 : Entering 6 digit PIN
- Now you are connected to Fortinet VPN as shown in the Figure 18
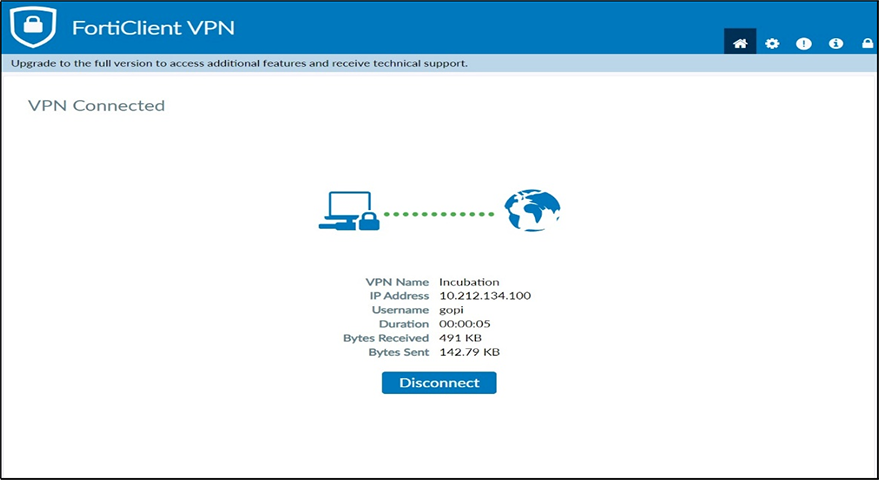
Figure 18: User connected to VPN successfully


.png)


